
User's Manual


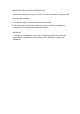
Table Of Contents

OPERATION OF BODY PACK TRANSMITTER
Headset MIC
Lavalier MIC
Battery
Compartment
Belt
MIC in jack
Volume control
Power indicator
Power on/off and mute switch
1. Open the battery cover and insert a fresh 9V battery, observing the correct
polarity. And then close the cover.
2. Plug in either the clip-on or the headset microphone.
3. To use the clip-on MIC, attach it at chest level. Do not place too close to the
mouth- a distance of about six inches usually works best. To use the headset
MIC, place it on the head and adjust the MIC boom so that the MIC is about
one inch to the side of the front of the mouth.
(Note: The clip-on or headset MIC wire is also the transmitting antenna.
Rolling up or shortening the wire may reduce the effective operating range.
Extend the wire fully during use and keep it as straight as possible.)
4. Turn on the transmitter by sliding the power switch to ON position. The
power LED indicator will give a single quick flash, indicating usable battery
strength. In the case of a dead or low battery, the power LED either will not
go on at all or will stay on continuously, indicating that the battery should be
replaced with a fresh one.
5. The RF indicator on the receiver should now be lit.
6. Adjust the volume control of body pack and/or volume control of the receiver
to a comfortable listening level as desired.
7. If the microphone is not going to be used for a long period of time, please
take out the battery to prevent damage by battery leakage.
OFF
ON
MUTE
POWER
LOW HI
MIC
9V +
Quartz Controlled
181.6MHz
30ppm
FM
±75kHz
>100dB
>90dB
80~20000Hz at ±3dB
≤0.5%
Dynamic Microphone
50μs
Built-in housing
<10mW
>40dB
One 9V Battery
<250mW
30m(line and sight area)
-20℃~50℃
Oscillation Mode:
Frequency :
Frequency Stability:
Modulation Mode:
Maximum Deviation:
Audio Dynamic Range:
S/N:
Frequency Response:
T.H.D:
Mike Capsule:
Pre-emphasis:
Antenna:
RF Output:
Spurious Emission:
Power Supply:
Power Dissipation:
Operating Range:
Operation Temperature:
SPECIFICATION