
System information


6-16
Optimizing Port Usage Through Traffic Control and Port Trunking
Port Trunking
Optimizing Port Usage
Through Traffic Control and
Menu: Viewing and Configuring a Static Trunk Group
Important Configure port trunking before you connect the trunked links to another
switch, routing switch, or server. Otherwise, a broadcast storm could occur.
(If you need to connect the ports before configuring them for trunking, you
can temporarily disable the ports until the trunk is configured. See “Using the
CLI To Configure Ports” on page 6-8.)
To View and/or Configure Static Port Trunking: This procedure uses
the Port/Trunk Settings screen to configure a static port trunk group on the
switch.
1. Follow the procedures in the Important note above.
2. From the Main Menu, Select:
2. Switch Configuration . . .
2. Port/Trunk Settings
3. Press [E] (for E
dit) and then use the arrow keys to access the port trunk
parameters.
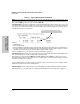
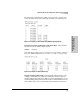
Figure 6-4. Example of the Menu Screen for Configuring a Port Trunk Group
4. In the Group column, move the cursor to the port you want to configure.
5. Use the Space bar to choose the Trk1 trunk group assignment for the
selected port.
• All ports in a trunk must have the same media type and mode (such
as 10/100TX set to 100FDx, or 100FX set to 100FDx). The flow control
settings must also be the same for all ports in a given trunk. (The
These two columns provide
static trunk control.