36V You have purchased one of the highest quality electric bicycles available today. It is important you read this manual to understand your new electric bicycle. All riders including experienced traditional bicycle riders should read this manual. This manual explains the functions of your new electric bicycle and details on performing basic maintenance. All riders must read the section on throttling due to the nature of how to power the bicycle forward.
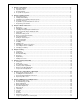
Table of Contents 1) Chapter 1: Introduction ……………………………………………………………………………………………….. 4 a. About this manual ………………………………………………………………………………………………….. 4 b. Important notices …………………………………………………………………………………………………… 4 c. General warning ……………………………………………………………………………………………………. 5 d. A special note to parents ………………………………………………………………………………………….. 5 2) Chapter 2: Getting Started …………………………………………………………………………………………… 5 a. Unpacking your box ……………………………………………………………………………………………….. 5 b.
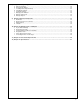
8) Chapter 8: Battery Management …………………………………………………………………………………….. 32 a. About your battery ………………………………………..………………………..………………………………. 32 b. Removing the battery …………………..………………..………………………..………………………………. 32 c. Installing and locking the battery ………………………..………………………..………………………………. 33 d. Charging the battery ………………………..……………………………………..………………………………. 33 e. Storing the battery ………………………………………..………………………..………………………………. 34 f. Battery power indicator ………………………..………………………..…………………………………………. 34 g.
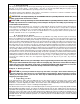
OPERATIONAL INSTRUCTIONS Chapter 1: Introduction Prodeco Technologies thanks you for your purchase of your new G Plus Genesis. Your bicycle is a high quality and environmentally friendly light electric vehicle. This manual will serve to provide you with the information needed to operate, maintain and enjoy it safely. Your electric bicycle should provide you with years of healthy enjoyment provided you follow these steps. For technical questions or customer service please contact PRODECO TECHNOLOGIES at 800.
c. General warning Like any sport, bicycling involves the risk of injury and damage. By choosing to ride a bicycle, you assume the responsibility for that risk, so you need to know — and to practice — the rules of safe and responsible riding and of proper use and maintenance. Proper use and maintenance of your bicycle reduces risk of injury.
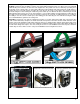
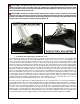
b. Folding and unfolding (SEE PHOTOS BELOW) Folding: your bicycle has the ability to fold for easy storing and transporting. There is a quick release lever that will allow the bicycle to fold into an area half of the original size. The pedals can also be folded by squeezing the 2 metal tabs on the outside edges of each pedal, pulling the pedal outwards and then pushing the pedal down.
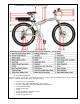
c. Familiarize yourself with your bicycle’s parts d. Contents of the box Check the contents of your box. Your new G Plus Genesis should include the following items in the box or your dealer should have included these items with your purchase: G Plus Genesis electric bicycle Prodeco G Plus saddle (attached to the alloy seat post) Prodeco Technologies 38.4V 9Ah LiFEPO4 removable battery 43.
e. A guideline of your G Plus Genesis tool set The G Plus Genesis includes a multi-use tool set. This tool set includes all the tools necessary to make adjustments and service your new bicycle. The only additional tool you will ever need is an 18mm wrench to remove the front wheel. All other tools are included with the tool kit. The tool kit includes the following tools: Philips Screwdriver Flat Head Screwdriver 2mm Hex Key 2.
b. Adjusting the saddle Your saddle has the ability to adjust the height instantaneously via a quick release clamp. There is also the ability to tilt the nose of the saddle up or down and adjust your riding position to be further or closer to the handlebar. The latter two require the use of the multi-use tool included with the purchase of your G Plus Genesis. Please review the following details on adjusting your saddle.
CAUTION: The saddle mounting clamp front and rear barrel nut and bolt must remain tight at all times. Test saddle for looseness or play in the rotation of the nose. If saddle is loose, tighten the bracket bolts to ensure the saddle will not accidentally rotate up or down when riding. Both bolts should be tightened to 140 in*lb. If loose, this can cause a rider to lose balance and may result in a fall.
CAUTION: The handlebar stem quill bolt and rotation adjustment bolt must be checked for tightness to ensure the handlebar stem will not accidentally slide into the steering tube or the handlebar does not turn the wheel or the stem rise falls upon riding. Either accident can cause a rider to lose balance and may result in a fall. d.
do believe new regulation and rules will apply in the future upon the electric bicycle becoming one of the standard forms of transportation for the masses. Prodeco Technologies will continue to follow new rules and guidance set forth by these agencies, always welcoming and adhering to the guidelines they feel are required to assure safety for the electric bicycle rider.
e. Safety first It is important you follow your local bicycle laws but also it is important you ride safely. Below are examples of understanding how to ride your new G Plus Genesis safely. Always wear an approved helmet when riding your bike, and follow the helmet manufacturer’s instructions for fit, use and care of your helmet.
h. First motorized ride When you buckle on your helmet and go for your first familiarization motorized ride on your new bicycle, be sure to pick a controlled environment, away from cars, other cyclists, obstacles or other hazards. Ride to become familiar with the brake levers against throttling, variable throttle performance while pedaling your new bike and not pedaling.
l. Pedaling Pedaling your G Plus Genesis is the same as pedaling a traditional bicycle. It is recommended you add pedaling to the power of the bicycle to enhance the distance per charge. The G Plus Genesis is a 7 speed bicycle and has the ratio of a 44T front chain ring (sprocket) against a 11-28T rear cassette which is designed to offer an easy pedaling pace at any speed from 1 MPH to 16 MPH.
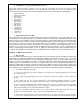
For charging, please review the following instructions. Lift up the handle of the battery to access the RCA charging input. Insert the charging plug from the charger into the battery’s RCA charging input. Insert the charger’s power cord into a wall outlet. The charger’s LED light will light RED while the charger is charging the battery. The charger’s LED light will light GREEN upon the battery being fully charged. There is also a battery indicator for checking a full charge.
b. Riding Safety Below are detailed guidelines according to the NHSTA (National Highway and Traffic Safety Administration) on bicycle safety Protect Your Head: Wear a Helmet - Never ride a bicycle without wearing a properly fitted helmet. Helmets are proven to be 85-88 percent effective in preventing traumatic brain injury, the primary cause of death and disabling injuries resulting from cycling crashes. Wear a helmet that meets the U.S.
c. Wet weather riding You should avoid whenever possible to ride your bicycle in the rain. Riding a bicycle in the rain is like driving a car in the snow. You will not be able to stop as fast and must leave a larger distance between you and the obstacles around you. Your brakes will not perform as quick when they are wet. You will not be able to turn as sharp without the danger of slipping.
The G Plus battery base required an added mounting area to the seat tube, therefore the better way to measure the seat tube is from the base of the saddle clamp (seat post must be inserted at the lowest position) to the centerline of the crank. When measuring this way, the G Plus Genesis would be considered an 18” frame. Even though considered an 18” frame, the frame is unique in other areas, allowing for all size riders and adjustable to be similar to a 23” road bike frame.
rotation, one will not rotate further without the other requiring to be rotated. A compromise may be required when attempting to align the brake levers and establishing the preferred throttle and shifter position. The optimum position to set your brake levers at depends on your riding position but it should be the extension of your arm. Your brake lever should be located at the point where your fingers extend straight out from your arms.
a. Suspension fork adjustment The G Plus Genesis uses a dual preload adjustable suspension fork. The fork’s dual adjustment offers either a softer of firmer ride for smoothing out the bumps in your path. The pre-load can be adjusted according to your weight and liking. You can easily adjust the suspension performance by rotating the knobs at the top of each leg at the crown. Chapter 6: Tire, Tube, Wheel and Axle Repair The G Plus Genesis was designed for ease of servicing.
battery base. LED lights on throttle will light up displaying power to the motor. Pull the front motor wheel off the ground (if the bicycle is not turned upside down) and turn the throttle to test the motor. If the motor turns, the connection is solid. If motor does not turn, turn key to “OFF” position at battery and then check the motor connector to ensure a solid connection has be made. Test again after checking.
d. Replacing a tube or tire Read the previous sections a. and b. to learn how to remove and replace the front and rear wheel. You will need to understand how to remove the wheel prior to replacing a tube or tire. This section only explains how to remove the tire from the rim and how to replace a tube. Before explaining how to replace a tube and tire, details on the G Plus Genesis’s tubes and tires are discussed.
WARNING: There is a safety risk in using gas station air hoses or other air compressors. They are not made for bicycle tires. They move a large volume of air very rapidly, and will raise the pressure in your tire very rapidly, which could cause the tube to explode. Tire pressure is given either as maximum pressure or as a pressure range. How a tire performs under different terrain or weather conditions depends largely on tire pressure.
To install a new tire, follow these instructions: When installing a new tire you should first insert the tube into the tire. The tube should have been partially inflated to a soft but full feel removing any wrinkles in the tube. Check the mounting side of the rim and confirm the directional path of the tire. High performance tires are usually directional tires and the arrow on the sidewall represents the rotation of the tire.
Chapter 7: Maintenance and Replacement Your new G Plus Genesis was designed for ease of use and owner servicing. There are no tasks which require advanced skills. Most maintenance and replacing of parts were designed to be accomplished by the typical bicycle rider. Please read this section to learn how to keep your G Plus Genesis performing like new. a. Keeping your bike clean Your new G Plus Genesis is an outdoor friendly electric bicycle but should be kept clean and free from dirt.
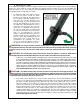
DSK-715 Tool Free Caliper Adjustments The brake pads will be worn during braking, which means the clearance between the two pads will be greater and the braking feeling will be worse. The brake cable can also stretch and the cable will need to be tightened from time to time. (SEE PHOTOS ON NEXT FEW PAGES) The Promax DSK-715 brakes need to be adjusted properly to offer ultimate stopping power.
CAUTION: The angle position of the brake arm has been specially designed. Do not change its angle position higher than 1mm while pulling the brake cable. Otherwise, the brake performance will be affected. Be sure not to adjust the adjusting barrel on the brake lever assembly other than required during riding or it will also have a bad influence on the brake performance. CAUTION: Brake pad replacement – check the brake pads for wear.
e. Derailleur adjustment If the chain of your bicycle falls off at the largest COG/sprocket or the chain is having problems remaining on the correct gear, you may need to adjust your derailleur. There are a multiple ways to adjust your derailleur but for a simple adjustment on the changing of gears, follow these instructions. Locate at the rear of the derailleur, the adjusting knob where the cable enters the derailleur. This knob allows the loosening or tightening of the cable.
f. Wheel check From time to time you should check the truing of your wheel and the condition of your spokes. Your spokes can become loose over a period of time, especially if your wheel needs truing. The easiest way to check the truing of your wheels is as follows: Make sure the battery is turned off and the key is out of the ignition. It is best to turn the bicycle upside down and place it on a blanket to avoid scratching the handlebar controls or saddle.
i. Pedals The G Plus Genesis uses folding pedals to require a slimmer space when folded. Each pedal has 2 tabs on the outside edges of the pedal’s nylon cage. To fold the pedals, squeeze the tabs and pull the pedal outwards with a slight force. Once the pedal nylon cage slides out ½” from the aluminum body, you can fold the pedal down. To straighten the pedal for riding, lift the pedal nylon cage and slide the pedal back into the aluminum body.
l. Torque specifications for common parts Nuts and bolts for your bicycle are set to standard torque settings at the factory. Over time of use and shipping, settings could change and nut or bolt could become loose. Below is a chart on the torque settings in Lb per Inch for the common parts of the G Plus Genesis. They have also been converted to Lb per Foot and NM. Torque Item lb per In lb per Ft NM Axle nut (front motor) 250 lb*in 20.8 lb*ft 28.25 Bottom bracket 420 lb*in 35 lb*ft 47.
To remove the battery, follow these instructions: Locate the key ignition on the battery base and turn the key in a counter clockwise rotation to the “UNLOCK” position. You must push the key in to turn from the “OFF” position to the “UNLOCK” position. This position locks the latching pin into the battery, allowing the battery to be removed. Grab the handle at the back of battery and gently pull towards the back of the bicycle to slide off.
The battery includes a battery indicator also to check for charging. The indicator can be found under the left side battery handle. Press the indicator button to display the battery’s energy storage Once the battery is charged, you should discontinue charging and remove the charger. Unplug the charger’s power cord from the wall and remove the charging plug from the battery.
g. Battery replacement If your battery is no longer working properly and needs replacing, you can contact your local authorized dealer for a replacement or contact Prodeco Technologies directly. You must first contact by phone, email or in person to discuss the issue and determine it is the battery. It is very rare for a LiFEPO4 battery to have issues in the first 2 years and there is usually another situation with the bicycle rather than the battery if the bicycle is not powering properly.
The bolts and nuts which hold the cover to the base can easily be removed within a few minutes. Once the cover is off of the battery base, the controller can be disconnected. If removing the controller, you must first remove the battery completely from the bicycle. There is only one way to connect and disconnect the controller from the bicycle. No two connections are the same. c. Wiring harness Your bicycle uses a wiring harness. Most e-bikes today have each component being wired directly to the controller.
Chapter 10: Warranty Service and Repair Prodeco Technologies has taken great measures in designing and producing your new bicycle to be issue free while offering years of performance. Since the bicycle is a mechanical item, there is the possibility of an issue arising. Prodeco Technologies includes one of the best warranties in the industry if there is an issue and this is a 2 year Front to Back warranty with no pro-rating.
b. Registering your bike It is very important you register your new bicycle when purchasing. This is the only way your warranty will take effect. It is required you register your bicycle within 2 weeks from the date of purchase. You must save your receipt of purchase. To register your bicycle, you can fill out the form on the Prodeco Technologies website at www.prodecotech.com or you can fill out the registration card in the next section below and scan it to service@prodecotech.com, or fax it to 954.974.
e. Part replacement procedure In the rare occurrence of a part becoming defective, Prodeco Technologies tries to make part replacement as painless as possible. Simply contact Prodeco Technologies service department and explain the problem. A representative will assist you with getting the part at issue replaced quickly. You can also bring your bicycle to a local authorized dealer and they can assist you with the problem. Parts are always in stock and can be ship immediately. f.
Chapter 11: Parts and Components List Line Part Description PART NUMBER Cost 1 Accessory - Multi Tool - Nickel Plated & Composite - VHB034 - 15 in 1 - Black AC.TO.151.VHB034.B $8.95 2 Battery - 38.4V 9Ah - LiFEPO4 - Prodeco Technologies - V12.1 - Prismatic Phosphate Polymer Cell PT.BA.V12.1.384.9AH $389.95 3 Battery Mount - Rear Rack - Aluminum - V671-03 - 34.9mm - Black PT.BM.V12.1 4 Bell - Aluminum Cap - V31A-06 Sliding Lever - 40mm Diameter - Silver Cap & Black Base AC.BE.40.V31.SB $2.
Chapter 12: Specifications Frame: Folding Lock: Folding Aircraft Grade T6 Aluminum Alloy 2 Stage Overlapped Locking EZ Adjust Finish: Brushed Aluminum w/ Double Clear Coat Fork: Zoom Aluminum Alloy w/ Pre-Load Adjust Motor: Battery: Power: Headset: Stem: Handlebar: Prodeco 250W HO Brushless Geared w/ Disc Mount Prodeco LiFEPO4 38.