
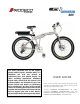
User guide


8
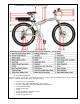
e. A guideline of your G Plus Genesis tool set
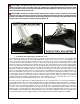
The G Plus Genesis includes a multi-use tool set. This tool set includes all the tools necessary to make
adjustments and service your new bicycle. The only additional tool you will ever need is an 18mm wrench to
remove the front wheel. All other tools are included with the tool kit. The tool kit includes the following tools:
Philips Screwdriver
Flat Head Screwdriver
2mm Hex Key
2.5mm Hex Key
3mm Hex Key
4mm Hex Key
5mm Hex Key
6mm Hex Key
8mm Socket
9mm Wrench
10mm Wrench
12mm Wrench
13mm Wrench
15mm Wrench
2 Tire Levers
f. Registering your new bike
For the warranty to take effect, you should register your new bicycle. Registration of your electric bicycle with us is
the only way we can acknowledge who is the established owner. Your bicycle has 3 individual and unique serial
numbers (frame, motor and battery). Each serial number must be registered when filling out the registration form.
The serial number on the frame is located under the crank/bottom bracket portion of the frame. The serial number
for the motor is found on the motor’s QC hologram label. The serial number for the battery is located on the
barcode label adhered to the underside of the battery. These numbers should be recorded and registered in case of
warranty issues or theft. Please review Chapter 10 “Warranty Service and Repair” section c “Registering your
bicycle” on registering your G Plus Genesis. You can register by either filling out the online registration form or by
sending us the registration card found in Chapter 10 “Warranty Service and Repair” section d “Registration card”.
Chapter 3: Basic Instructions
a. Bicycle Fit
It is very important your G Plus Genesis is properly adjusted for comfort and to avoid the possibility of losing control
while riding. The saddle and handlebar have adjustments available to allow riders from 5’ 6” to 6’ 6” to set the
proper measurements allowing for a safe and comfortable riding position. There are saddle height, rotation and
distance to steering tube adjustments and also a handlebar height and rotation adjustment. When adjusting the
saddle height, it is recommended if you plan to use your electric bicycle also as a traditional pedal bicycle you
adjust the saddle height to allow for a full leg extension when pedaling. The ball of your foot when resting on the
pedal should only allow for a slight bend at the knee when sitting. Please review the following points in determining
how to make the correct adjustments. The subsequent sections will assist you with making these adjustments.
1) Is your bike adjusted to your size?
2) To check, see Chapter 5 “Perfect Fit and Ride”. If your bicycle is not properly adjusted for you, you may
lose control and fall.
3) Is the saddle at the right height? To check, see Chapter 5 “Perfect Fit and Ride” section a “Stand over
height”.
4) Are saddle and seat post securely clamped? A correctly tightened saddle will allow no saddle
movement in any direction. See Chapter 3 “Basic Instructions” section b “Adjusting the saddle” for details.
5) Are the stem and handlebars at the right height for you? To check, see Chapter 5 “Perfect and Ride”
section c “Handlebar height and angle”. If not, see Chapter 3 “Basic Instructions” section c “Installing and
adjusting the handlebar stem” and it will explain how to adjust.
6) Can you comfortably operate the brakes? If not, you are able to adjust their angle and reach. See
Chapter 5 “Perfect Fit and Ride” section e “Brake lever height adjustments” for details.
7) Do you fully understand how to operate your new bicycle? If not, before your first ride, have your dealer
or contact us to explain any functions or features that you do not understand after fully reading this manual.