
User manual
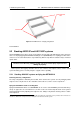


5.3. SUSPENDING AX2265P AND AX1115SP SYSTEMS 5. Guide to System Setup
• Enclosure front coupling on the ground
The operation of coupling the front part of the enclosures is quite simple: get the speakers on their
case boards close together and release the pins holding the cams, then slide the cams into their
housing on the next speaker and fasten them into their new position with the pins. Now you can
proceed iteratively with the following steps necessary to mount the array.
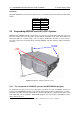
1. Enclosure arrangement on the CP038D04 case boards
2. Disengagement of pins and extraction of front cams
3. Introduction of front cams into the frames of the successive enclosure and securing coupling
pins
Make sure all front cams are correctly inserted in their housing and safely held in place by the
pins
9
. When you start assembling an array on the ground make sure the surface is sufficiently flat
so that the caster on the case boards will be able to roll evenly. When you have to work on grass
or gravel, cover the ground with wood boards to create a sufficiently hard surface..
• Coupling the array with the flying bar
The case reported here is the attachment of the flying bar according to the configuration defined
as A
10
. In the A configuration, the attachment of the flying bar is rather easy: move KPTAX2265
flying bar vertically close to the top enclosure on the array, then use the cams on the enclosure to
couple it to the flying bar. To obtain a correct assembly, the relative angle between the flying bar
and the first enclosure of the array has to equal 0
◦
: to set-up this configuration, insert the pins in
the plate with the indicated angles.
9
Because of their length, the 94AXSMP1 pins could stick out even if they are correctly mounted.
10
Eventual coupling according to the B configuration (reverse mode) is not discussed, but the procedures it requires are definitely
more complex as, normally, the array cannot be left on the ground, but it needs to be partially lifted.
64