
Instruction manual


Cues, Stacks & Pages
Page 88 ORB Operating Manual – Issue 1.0
CUE n TIME {TRIGGER} {MIDI} 00.00.00.00 ENTER
CUE n TIME {TRIGGER} {AUTO} 5 ENTER
CUE n TIME {TRIGGER} {RealTime} 12:34:56 ENTER
CUE n TIME {TRIGGER} {GO} ENTER
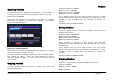
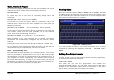
Through the Cue Setup window, navigate to the comments column
of the Cue Stack window and select the cue required, then press
ENTER or double click the field. The Cue Setup window appears:
Figure 64 - Cue Setup Window
The Trigger can then be selected from the dropdown box, and the
Trigger Timecode specified below.
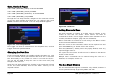
Changing the Next Cue
In the Cue Setup Window it is possible to define the Next cue. This
is the cue number which gets selected after that cue is executed.
This functionality is very useful if a scene is ‘cut’ from the show –
you can tell the ORB to skip the cues in that sceen and jump
straight to the next cue.
Open the Cue Setup Window (by clicking in the Comments column
of the Cue Stack Window) and set the “Next” memory to the
required number.
Figure 65 - Next Cue
Adding Macros to Cues
The desk provides a number of in-built macros relating to the
control of cues and cue stacks. These macros are used as
commands to allow a cue to trigger another event elsewhere on the
console (see Macros chapter, page 112, for full details).
Macro commands are entered as a text string in the Ma
cro column
of the Cue Stack Window as follows:
Move the cursor to the Comments column of the required cue and
press the ENTER key (or double click in the column).
Press the [MACROS…] softkey and in the popup window, enter any
required trigger macros.
The syntax for the various in-built macros is defined in the Macros
section of the manual.
Multiple macro commands can be entered using the colon as a
delimiter, for example, G2:S3:C4.
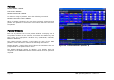
The Cue Stack Window
The Cue Stack Window appears on Monitor 1 by default, however it
can be opened manually by pressing SHIFT and CUE: