
User Manual


7
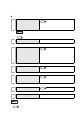
Setup operation flow
The following shows the flow of the setup operation from the purchase of the PL to the completion of the required setup
before use.
PL with no pre-installed OS
1
Connect peripheral devices and wiring
to the PL unit. Connect a commercially
available USB keyboard and, when no
CD/DVD drive is pre-installed, a
commercially available USB CD-ROM
drive to the PL unit.
PL3000 Series Hardware Manual
“Installation and Wiring”
• When connecting a Digital FP as a multi-display to the PL3000 series, refer to the fol-
lowing page.
SEE
Connecting a Digital FP as a multi-display to the PL3000 series (page 9)
2
Turn the PL’s power ON.
Set the power switch on the rear of the PL to ON.
3
Configure the BIOS settings. Under
[Boot priority order] on the [Boot]
menu, move [IDE CD/DVD] (when
using the pre-installed CD/DVD drive)
or [USB CD/DVD] (when using a
commercially available USB CD/DVD-
ROM drive) to the top of the list. Save
the setting and exit the BIOS setting
screen.
2.1 System Setup Scr een Operation (page2-2)
2.2.4 Boot (page2-28)
2.2.5 Exit (page2-29)
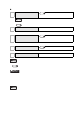
4
Insert the OS setup media into the drive.
Install the OS by following the
messages on the screen.
Refer to the manual of the OS to be installed.
5
Download and install the necessary
drivers and utility software.
Visit the download page at the Otasuke Pro!
site.
URL http://www.pro-face.com/otasuke/
1.4 PL Dedicated Softwar e (page1-13)
6
Install the necessary application
programs.
Refer to the manual of the software to be
installed.
7
Install the PL unit.
• When connecting a Digital FP as a multi-display to the PL3000 series, refer to the following
page and configure the settings.
SEE
Connecting a Digital FP as a multi-display to the PL3000 series (page 9)
SEE
SEE
SEE
SEE
SEE