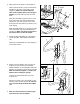
¨ Model No. 831.285840 Serial No The serial number is found in the location shown below. Write the serial number in the space above. Serial Number Decal CAUTION Read all precautions and instructions in this manual before using this equipment. Keep this manual for future reference. USERÕS MANUAL SEARS, ROEBUCK AND CO.
TABLE OF CONTENTS BEFORE YOU BEGIN . . . . . . . . . . . . . . . . . . . . . . . . . . . . . . . . . . . . . . . . . . . . . . . . . . . . . . . . . . . . . . . . . . .2 IMPORTANT PRECAUTIONS . . . . . . . . . . . . . . . . . . . . . . . . . . . . . . . . . . . . . . . . . . . . . . . . . . . . . . . . . . . . .3 ASSEMBLY . . . . . . . . . . . . . . . . . . . . . . . . . . . . . . . . . . . . . . . . . . . . . . . . . . . . . . . . . . . . . . . . . . . . . . . . . . .4 HOW TO USE THE STEPPER . . . . . . .
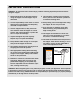
IMPORTANT PRECAUTIONS WARNING: To reduce the risk of serious injury, read the following important precautions before using the stepper. 1. Read all instructions in this manual before using the stepper. Use the stepper only as described. 9. The resistance cylinders may become hot after a period of use. Allow the cylinders to cool before touching them 2. It is the responsibility of the owner to ensure that all users of the stepper are adequately informed of all precautions. 10.
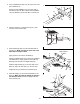
ASSEMBLY Place all parts of the stepper in a cleared area and remove the packing materials. Do not dispose of the packing materials until assembly is completed. Assembly requires the included allen wrench , a phillips screwdriver , two adjustable wrenches and a rubber mallet . PART CHART Use the drawings below to identify the small parts used in assembly. The number in parenthesis below each drawing refers to the key number of the part, from the PART LIST on page 10.
2. Press a Stabilizer Endcap (13) onto each end of the Short Stabilizer (3). 2 Attach the Short Stabilizer (3) to the other end of the Base (2) with two M10 x 65mm Hex Head Bolts (24), two Washers (25) and two M10 Locknuts (15). 25 3 13 24 15 25 2 13 15 3. Attach a Pedal (11) to each Pedal Leg (6, 7) with four M4 x 10mm Screws (28). 3 11 6 28 4. Slide a Metal Cap (30) onto the indicated shaft on the Base (2). Make sure that the open side of the Metal Cap is facing the Base.
. Apply grease to the shafts on the Upright (1). 6 18 19 Slide a Cylinder Spacer (19) and a Resistance Cylinder (9) onto each of the shafts on the Upright (1). Make sure that the indented sides of the Cylinder Spacers are facing the Upright. Tap a 5/8Ó Axle Cap (18) onto each shaft. Apply Grease 19 18 Slots 1 Raise the Left Pedal Leg (6) and rest it on the hook at the lower end of the left Resistance Cylinder (9).
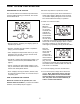
HOW TO USE THE STEPPER DESCRIPTION OF THE CONSOLE Follow the steps below to operate the console. The console features five modes that provide instant exercise feedback during your workouts. The modes are described below. 1. To turn on the power, press the on/reset button or simply begin stepping. When the power is turned on, the entire display will appear for two seconds. The console will then be ready for operation. 2.
HOW TO EXERCISE ON THE STEPPER HOW TO ADJUST THE RESISTANCE Place the stepper on a level surface and place a mat under the stepper. (The stepper features precision hydraulic cylinders. However, there is a possibility of slight oil leakage due to the nature of hydraulic cylinders.) To change the stepping resistance, first lift the Right and Left Pedal Legs (6, 7) off the hooks at the lower ends of the Resistance Cylinders (9). Move the hooks to different slots under the Pedal Legs.
CONDITIONING GUIDELINES The following guidelines will help you to plan your exercise program. Remember that proper nutrition and adequate rest are essential for successful results. For maximum fat burning, adjust the intensity of your exercise until your heart rate is near the middle number in your training zone as you exercise. Aerobic Exercise WARNING: Before beginning this or any exercise program, consult your physician.
EXERCISE FREQUENCY desired. Caution: Be sure to progress at your own pace and avoid overdoing it. Incorrect or excessive training may result in injury to your health. To maintain or improve your condition, plan three workouts each week, with at least one day of rest between workouts. After a few months of regular exercise, you may complete up to five workouts each week, if Remember, the key to success is make exercise a regular and enjoyable part of your everyday life. PART LISTÑModel No. 831.
EXPLODED DRAWINGÑModel No. 831.
The model number and serial number of your PROFORM¨ 220C are listed on a decal attached to the frame. See the front cover of this manual to find the location of the decal. Model No. 831.285840 All replacement parts are available for immediate purchase or special order when you visit your nearest SEARS Service Center. To request service or to order parts by telephone, call the toll-free numbers listed at the left.