
User's Manual


6 7
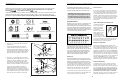
DESCRIPTION OF THE CONSOLE
The console is designed to help you get the most
from your workouts. As you exercise, you can watch
your progress around the LED track, while the
display provides continuous exercise feedback.
The six modes of the display are described below.
SpeedÑThis mode displays your current pedaling
speed, in miles per hour.
TimeÑThis mode displays the length of time you
have exercised. Note: If you stop exercising, the time
mode will pause until you resume.
DistanceÑThis mode displays the total distance you
have pedaled, in miles.
LapsÑThis mode displays the number of 1/4-mile
laps you have completed around the LED track.
CalorieÑThis mode displays the approximate number
of Calories you have burned.
ScanÑThis mode displays the speed, time, distance,
laps, and calorie modes, for 5 seconds each, in a
repeating cycle.
BATTERY INSTALLATION
Before the console can be operated, two ÒAAÓ batter-
ies must be installed. If you have not installed batter-
ies, see assembly step 8 on page 6.
HOW TO OPERATE THE CONSOLE
If there is a thin sheet of clear plastic on the face of
the console, remove it.
1. To turn on the power, press the on/reset button or
simply begin pedaling. When the power is turned
on, one LED indicator will light in the LED track,
and the entire display will appear for two seconds.
The console will then be ready for operation.
2. Select one of the five modes:
Scan modeÑ
When the power
is turned on, the
scan mode will
automatically be
selected. One
mode indicator
will show that the
scan mode is selected, and a flashing mode indica-
tor will show which mode is currently displayed.
Note: If a different mode is selected, you can
select the scan mode again by repeatedly pressing
the mode button.
Speed, time,
distance, laps,
or calorie modeÑ
To select one of
these modes for
continuous
display, press the
mode button repeatedly. The mode indicators will
show which mode is selected. (Make sure that the
scan mode is not selected.)
3. The LED track represents a distance of 1/4 mile.
As you exercise, the indicators around the track
will light one at a time until you have completed 1/4
mile. A new lap will then begin.
4. To reset the display, press the on/reset button.
5. To turn off the power, simply wait for about four
minutes. Note: The console has an Òauto-offÓ
feature. If the pedals are not moved and the
console buttons are not pressed for four
minutes, the power will turn off automatically
in order to conserve the batteries.
Mode Indicators
LED Track
HOW TO USE THE PROFORM
¨
775S
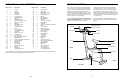
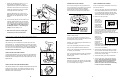
HOW TO ADJUST THE SEAT POST
The Seat Post (3) can be adjusted to the position that is the most
comfortable for you. To adjust the Seat Post, first loosen and remove
the Lock Knob (14) on the right side of the Frame (1). Slide the Seat
Post up or down to the desired position. Insert the Lock Knob through
one of the holes in the Seat Post and tighten it. Do not insert the
Lock Knob under the Seat Post.
HOW TO ADJUST THE PEDAL STRAPS
To adjust each Pedal Strap (27), first pull the end of the Pedal Strap
off the adjustment tab on the Pedal (45). Align a different hole in the
Pedal Strap with the adjustment tab. Press the Pedal Strap onto the
adjustment tab.
HOW TO ADJUST THE PEDALING RESISTANCE
The pedaling resistance can be adjusted with the Resistance Knob (9)
located on the Console (8). To increase the resistance, turn the
Resistance Knob clockwise; to decrease the resistance, turn the
Resistance Knob counterclockwise.
27
45
8
9
Adjustment Tab
14
3
1
8. The Console (8) requires two ÒAAÓ batteries (not
included); alkaline batteries are recommended.
Open the battery cover (not shown) on the back
of the Console. Press two batteries into the bat-
tery clip. Make sure that the negative ends of
the batteries (marked ÒÐÓ) are touching the
springs. Close the battery cover.
9. Make sure that all parts are properly tight-
ened before you use the exercise bike.
8
8
AA
Batteries
Battery
Clip
7
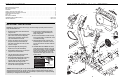
7. Identify the Left Pedal (45) (there is an ÒLÓ on
the Left Pedal for identification). Using an
adjustable wrench, tighten the Left Pedal coun-
terclockwise into the left arm of the Crank (29).
Tighten the Right Pedal (not shown) clockwise
into the right arm of the Crank (29).
Adjust the Pedal Strap (27) on the Left and
Right Pedals to the desired position. Press the
Pedal Strap onto the adjustment tab on both
Pedals.
45
29
27
Adjustment
Tab