258868 258869 Model No. PFEL2926.1 Serial No. 258870 258871 USER’S MANUAL Write the serial number in the space above for reference. Serial Number Decal QUESTIONS? As a manufacturer, we are committed to providing complete customer satisfaction. If you have questions, or if parts are damaged or missing, PLEASE DO NOT CONTACT THE STORE; please contact Customer Care.
TABLE OF CONTENTS WARNING DECAL PLACEMENT . . . . . . . . . . . . . . . . . . . . . . . . . . . . . . . . . . . . . . . . . . . . . . . . . . . . . . . . . . . . . .2 IMPORTANT PRECAUTIONS . . . . . . . . . . . . . . . . . . . . . . . . . . . . . . . . . . . . . . . . . . . . . . . . . . . . . . . . . . . . . . . .3 BEFORE YOU BEGIN . . . . . . . . . . . . . . . . . . . . . . . . . . . . . . . . . . . . . . . . . . . . . . . . . . . . . . . . . . . . . . . . . . . . . .4 ASSEMBLY . . . . . . . . . . . . . .
IMPORTANT PRECAUTIONS WARNING: To reduce the risk of serious injury, read all important precautions and instructions in this manual and all warnings on your elliptical exerciser before using your elliptical exerciser. ICON assumes no responsibility for personal injury or property damage sustained by or through the use of this product. 1. Before beginning any exercise program, consult your physician. This is especially important for persons over the age of 35 or persons with pre-existing health problems.
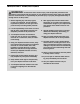
BEFORE YOU BEGIN Congratulations for selecting the new PROFORM® 320. The PROFORM 320 is an incredibly smooth exerciser that moves your feet in a natural elliptical path, minimizing the impact on your knees and ankles. And the unique PROFORM 320 features adjustable resistance and a simple-to-use console to help you get the most from your exercise. product model number and serial number before contacting us.
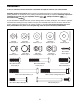
ASSEMBLY To hire an authorized service technician to assemble the elliptical exerciser, call 1-800-445-2480. Assembly requires two persons. Place all parts of the elliptical exerciser in a cleared area and remove all packing materials; do not dispose of the packing materials until assembly is completed. Assembly requires the included hex keys and your own adjustable wrench , Phillips screwdriver , and rubber mallet . As you assemble the elliptical exerciser, use the drawings below to identify small parts.
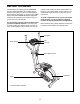
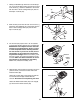
1. Identify the Stabilizer (9) which has round Endcaps (21) on the ends. While another person lifts the front of the Frame (1), attach the Stabilizer to the Frame with two M10 x 75mm Carriage Bolts (34) and two M10 Nylon Locknuts (33). 1 21 34 1 34 9 21 2. While another person lifts the back of the Frame (1), attach the other Stabilizer (9) to the Frame with two M10 x 75mm Carriage Bolts (34) and two M10 Nylon Locknuts (33). 33 2 33 9 33 1 34 3. The Console (23) requires four 1.
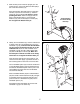
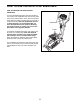
5. While another person holds the Upright (2) in the position shown, connect the Extension Wire (68) to the Lower Wire Harness (73). 5 2 45 Push the Extension Wire (68) and the Lower Wire Harness (73) down into the Frame (1). Slide the Upright (2) onto the Frame. Be careful to avoid pinching the Wires. Attach the Upright with two M10 x 74mm Button Bolts (7), two M10 Split Washers (45), and two M10 Nylon Locknuts (33). Do not tighten the Button Bolts yet.
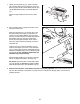
7. Identify the Left Pedal Leg (11), which is marked with a sticker. Attach the Left Pedal (13) to the Left Pedal Leg with two M8 x 52mm Button Screws (27), two M8 Split Washers (28), and two M8 Washers (71). 7 13 Attach the Right Pedal (not shown) in the same way. 11 71 71 28 28 27 8. Apply a small amount of grease to the axle on the left Disc Crossbar (16). 8 Slide the Left Pedal Leg (11) onto the axle on the left Disc Crossbar (16).
HOW TO USE THE ELLIPTICAL EXERCISER HOW TO EXERCISE ON THE ELLIPTICAL EXERCISER To mount the elliptical exerciser, hold the handles on the console or the handlebars and step onto the pedal that is in the lowest position. Then, step onto the other pedal. Push the pedals until they begin to move with a continuous motion. Note: The pedal discs can turn in either direction.
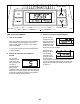
Increase Button Decrease Button HOW TO USE THE CONSOLE 3. Follow your progress with the displays. 1. Turn on the console. As you exercise, the lower left display can show the elapsed time and the distance (total number of revolutions) that you have pedaled. Note: The console requires four 1.5V “D” batteries (see assembly step 3 on page 6). If there is a sheet of clear plastic on the face of the console, peel off the plastic. To turn on the console, press the increase button or begin pedaling.
The upper display is the priority display. The priority display can show the elapsed time, the distance that you have pedaled, your pedaling speed, or the approximate number of calories you have burned. Press the Display button repeatedly until the priority display shows the information that you are most interested in viewing. Note: While information is shown in the priority display, the information will not be shown in the lower left or right display.
MAINTENANCE AND TROUBLESHOOTING Inspect and tighten all parts of the elliptical exerciser regularly. Replace any worn parts immediately. Next, see the drawing below and locate the Reed Switch (53). Loosen, but do not remove, the indicated M4 x 16mm Self-tapping Screw (52). Slide the Reed Switch slightly toward or away from the Magnet (58) on the flywheel. Retighten the Screw. Turn the left Pedal Disc (15) for a moment. Repeat until the console displays correct feedback.
EXERCISE GUIDELINES Burning Fat—To burn fat effectively, you must exercise at a low intensity level for a sustained period of time. During the first few minutes of exercise, your body uses carbohydrate calories for energy. Only after the first few minutes of exercise does your body begin to use stored fat calories for energy. If your goal is to burn fat, adjust the intensity of your exercise until your heart rate is near the lowest number in your training zone.
PART LIST—Model No. PFEL2926.1 Key No. Qty. 1 2 3 4 5 6 7 8 9 10 11 12 13 14 15 16 17 18 19 20 21 22 23 24 25 26 27 28 29 30 31 32 33 34 35 36 37 38 39 40 1 1 1 1 2 1 2 1 2 2 1 1 1 1 2 2 1 1 1 2 2 1 1 2 2 1 4 4 1 2 2 1 7 4 4 2 2 5 2 2 Description R0208A Key No. Qty.
EXPLODED DRAWING—Model No. PFEL2926.
ORDERING REPLACEMENT PARTS To order replacement parts, please see the front cover of this manual.