Model No. 831.293032 Serial No. USER'S MANUAL Serial Number Decal Sears, Roebuck and Co. Hoffman Estates, IL 60179 CAUTION Read all precautions and instructions in this manual before using this equipment. Save this manual for future reference. Visit our website at www.proform.
TABLE OF CONTENTS IMPORTANT PRECAUTIONS . . . . . . . . . . . . . . . . . . . . . . . . . . . . . . . . . . . . . . . . . . . . . . . . . . . . . . . . . . . . . . . .2 BEFORE YOU BEGIN . . . . . . . . . . . . . . . . . . . . . . . . . . . . . . . . . . . . . . . . . . . . . . . . . . . . . . . . . . . . . . . . . . . . . .4 ASSEMBLY . . . . . . . . . . . . . . . . . . . . . . . . . . . . . . . . . . . . . . . . . . . . . . . . . . . . . . . . . . . . . . . . . . . . . . . . . . . . . . .
16. The treadmill is capable of high speeds. Adjust the speed in small increments to avoid sudden jumps in speed. 20. Inspect and properly tighten all parts of the treadmill regularly. 21. Never insert any object into any opening. 17. Never leave the treadmill unattended while it is running. Always remove the key and unplug the power cord when the treadmill is not in use. 22.
BEFORE YOU BEGIN Thank you for selecting the revolutionary PROFORM® 320x treadmill. The 320x treadmill combines advanced technology with innovative design to help you get the most from your exercise program in the convenience and privacy of your home. And when you’re not exercising, the unique 320x treadmill can be folded up, requiring less than half the floor space of other treadmills. Monday through Saturday, 7 a.m. until 7 p.m. Central Time (excluding holidays).
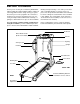
ASSEMBLY Assembly requires two persons. Set the treadmill in a cleared area and remove all packing materials. Do not dispose of the packing materials until assembly is completed. Note: The underside of the treadmill walking belt is coated with high-performance lubricant. During shipping, a small amount of lubricant may be transferred to the top of the walking belt or the shipping carton. This is a normal condition and does not affect treadmill performance.
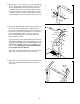
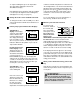
3. With the help of a second person, raise the Uprights (69) to the vertical Position. Attach the Storage Latch (36) to the left Upright with two 3/4” Screws (2). Remove the Lock Knob (30) from the Lock Pin (35). Make sure that the Lock Pin Collar (33) and the Spring (32) are on the Lock Pin as shown. Insert the Lock Pin into the Storage Latch and tighten the Lock Knob back onto the Lock Pin. 3 30 36 32 33 2 35 69 4. Identify the Right Handrail (72), which has a large hole in the left side.
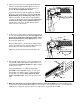
6. Place the Console Base (47) on the Right Handrail (72) and the Left Handrail (not shown). Attach the Console Base with four 3/4” Screws (2) (only two Screws are shown). Do not overtighten the Screws. Insert the Wire Harness (42) through the two indicated plastic ties on the Console Base (47). Next, touch the Right Handrail (72) to discharge any static. Plug the widest connector on the Wire Harness into the widest connector on the back of the Console (43).
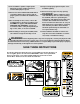
OPERATION AND ADJUSTMENT an equipment-grounding conductor and a grounding plug. Plug the power cord into a surge suppressor, and plug the surge suppressor into an appropriate outlet that is properly installed and grounded in accordance with all local codes and ordinances. Important: The treadmill is not compatible with GFCI-equipped outlets. THE PERFORMANT LUBETM WALKING BELT Your treadmill features a walking belt coated with PERFORMANT LUBETM, a high-performance lubricant.
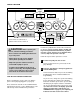
CONSOLE DIAGRAM Displays Note: If there is a thin sheet of plastic on the console, remove it. Key Clip Pulse Sensor Insert the key fully into the console. After a moment, the displays will light. Test the clip by carefully taking a few steps backward until the key is pulled from the console. If the key is not pulled from the console, adjust the position of the clip. CAUTION: Before operating the console, read the following precautions. • Do not stand on the walking belt when turning on the power.
To stop the walking belt, press the Stop button. The elapsed time will begin to flash in the Time/Distance display. continue to hold the Stop button for a moment. An “E” for English miles or an “M” for metric kilometers will appear in the Fat Calories/Calories/Pulse display. Press the Speed ▲ button to change the unit of measurement. When the desired unit of measurement is selected, remove the key and then reinsert it.
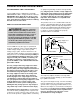
HOW TO FOLD AND MOVE THE TREADMILL HOW TO FOLD THE TREADMILL FOR STORAGE Before folding the treadmill, unplug the power cord. CAUTION: You must be able to safely lift 45 pounds (20 kg) in order to raise, lower, or move the treadmill. 1. Hold the treadmill with your hands in the locations shown at the right. To decrease the possibility of injury, bend your legs and keep your back straight. As you raise the treadmill, make sure to lift with your legs rather than your back.
HOW TO LOWER THE TREADMILL FOR USE 1. Hold the upper end of the treadmill with your right hand as shown. Using your left hand, pull the latch knob to the left and hold it. Pivot the treadmill down until the frame is past the latch pin. Slowly release the latch knob. Latch Knob Frame 2. Hold the treadmill firmly with both hands, and lower the treadmill to the floor. Do not drop the treadmill frame to the floor. To decrease the possibility of injury, bend your legs and keep your back straight.
TROUBLESHOOTING Most treadmill problems can be solved by following the simple steps below. Find the symptom that applies, and follow the steps listed. If further assistance is needed, call our toll-free HELPLINE at 1-800-736-6879, Monday through Saturday, 7 a.m. until 7 p.m. Central Time (excluding holidays). PROBLEM: The power does not turn on SOLUTION: a. Make sure that the power cord is plugged into a surge suppressor, and that the surge suppressor is plugged into a properly grounded outlet (see page 8).
PROBLEM: The walking belt slows when walked on SOLUTION: a. Use only a single-outlet surge suppressor that meets all of the specifications described on page 8. b. If the walking belt is overtightened, treadmill performance may decrease and the walking belt may become damaged. Remove the key and UNPLUG THE POWER CORD. Using the allen wrench, turn both rear roller adjustment bolts counterclockwise, 1/4 of a turn.
CONDITIONING GUIDELINES WARNING: Before beginning this or any exercise program, consult your physician. This is especially important for individuals over the age of 35 or individuals with preexisting health problems. The pulse sensor is not a medical device. Various factors, including your movement, may affect the accuracy of heart rate readings. The sensor is intended only as an exercise aid in determining heart rate trends in general. The following guidelines will help you to plan your exercise program.
The model number and serial number of your PROFORM® 320x treadmill are listed on a decal attached to the frame. See the front cover of this manual to find the location of the decal. Model No. 831.293032 QUESTIONS? If you find that: • you need help assembling or operating the PROFORM 320x treadmill • a part is missing All replacement parts are available for immediate purchase or special order when you visit your nearest SEARS Service Center.
PART IDENTIFICATION CHART Remove this chart and use it to identify small parts during assembly. Save this chart and the EXPLODED DRAWING/PART LIST for future reference.
PART LIST—Model No. 831.293032 Key No. Qty.
92 102 38 95 94 11 41 102 99 68 92 15 1 102 38 93 96 97 85 84 91 102 100 98 2 83 82 74 15 2 2 86 90 26 15 14 3 87 16 89 58 17 10 85 56 13 12 9* 7 19 18 8 4 5 15 77 83 21 13 28 103 84 6 81 2 24 82 13 29 27 23 12 20 30 31* 65 14 22 66 64 26 26 26 63 25 80 59 22 58 57 61* 26 62 13 2 35 33 60 56 34 32 58 79 78 36 37 38 77 65 66 13 61* 65 52 53 38 64 63 62 57 58 54 69 13 53 39 37 40 58 57