Model No. PFTL41105.0 Serial No. USER'S MANUAL Serial Number Decal QUESTIONS? As a manufacturer, we are committed to providing complete customer satisfaction. If you have questions, or if parts are damaged or missing, PLEASE CONTACT OUR CUSTOMER SERVICE DEPARTMENT DIRECTLY. CALL TOLL-FREE: 1-888-533-1333 Mon.–Fri., 6 a.m.–6 p.m. MST ON THE WEB: www.proformservice.com CAUTION Read all precautions and instructions in this manual before using this equipment. Save this manual for future reference.
TABLE OF CONTENTS IMPORTANT PRECAUTIONS . . . . . . . . . . . . . . . . . . . . . . . . . . . . . . . . . . . . . . . . . . . . . . . . . . . . . . . . . . . . . . . .3 BEFORE YOU BEGIN . . . . . . . . . . . . . . . . . . . . . . . . . . . . . . . . . . . . . . . . . . . . . . . . . . . . . . . . . . . . . . . . . . . . . .5 ASSEMBLY . . . . . . . . . . . . . . . . . . . . . . . . . . . . . . . . . . . . . . . . . . . . . . . . . . . . . . . . . . . . . . . . . . . . . . . . . . . . . . .
IMPORTANT PRECAUTIONS WARNING: To reduce the risk of burns, fire, electric shock, or injury to persons, read the following important precautions and information before operating the treadmill. 12. Failure to use a properly functioning surge suppressor could result in damage to the control system of the treadmill. If the control system is damaged, the walking belt may change speed, accelerate, or stop unexpectedly, which may result in a fall and serious injury. 1.
22. Inspect and properly tighten all parts of the treadmill regularly. motor hood unless instructed to do so by an authorized service representative. Servicing other than the procedures in this manual should be performed by an authorized service representative only. 23. Never insert any object into any opening. 24. DANGER: Always unplug the power 25. This treadmill is intended for in-home use only. Do not use this treadmill in a commercial, rental, or institutional setting.
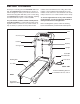
BEFORE YOU BEGIN number and serial number before calling. The model number of the treadmill is PFTL41105.0. The serial number can be found on a decal attached to the treadmill (see the front cover of this manual for the location). Thank you for selecting the new PROFORM® 450 treadmill. The PROFORM 450 treadmill offers a selection of features designed to make your workouts at home more effective and enjoyable.
ASSEMBLY To hire an authorized service technician to assemble the treadmill, call toll-free 1-800-445-2480. Assembly requires two persons. Set the treadmill in a cleared area and remove all packing materials. Do not dispose of the packing materials until assembly is completed. Note: The underside of the treadmill walking belt is coated with high-performance lubricant. During shipping, a small amount of lubricant may be transferred to the top of the walking belt or the shipping carton.
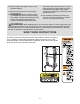
2. Attach a Wheel (66) to the base of the Uprights (69) with a Wheel Bolt (64) and a Wheel Nut (32) as shown. Do not overtighten the Wheel Bolt; the Wheel should turn freely. 2 64 66 69 With the help of a second person, carefully tip the treadmill onto its other side. See assembly step 1 and attach the other Extension Leg (63) and Base Pads (57). Next, attach the other Wheel (66) as described above.
5. Set the console assembly on the Handrails (71); insert the excess wiring down into the right Handrail. Attach the console assembly with four 3/4” Screws (2), two Console Bolts (90), and two 1/4” Star Washers (96) as shown. Make sure that no wires are pinched. Start all four Screws and both Console Bolts before tightening any of them. 5 Console Assembly 71 71 96 2 6. Attach the Latch Housing (29) to the left Upright (69) with two 3/4” Screws (2).
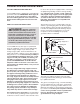
OPERATION AND ADJUSTMENT THE PRE-LUBRICATED WALKING BELT tric shock. This product is equipped with a cord having an equipment-grounding conductor and a grounding plug. Plug the power cord into a surge suppressor, and plug the surge suppressor into an appropriate outlet that is properly installed and grounded in accordance with all local codes and ordinances. Important: The treadmill is not compatible with GFCI-equipped outlets. Your treadmill features a walking belt coated with highperformance lubricant.
CONSOLE DIAGRAM Key Clip FEATURES OF THE CONSOLE using the treadmill. The first time you use the treadmill, periodically inspect the alignment of the walking belt, and center the walking belt if necessary (see page 18). The treadmill console offers an array of features designed to make your workouts more effective. When the manual mode of the console is selected, the speed and incline of the treadmill can be changed with the touch of a button.
Note: The console can display speed and distance in either miles or kilometers (see THE INFORMATION MODE/DEMO MODE on page 15). For simplicity, all instructions in this section refer to miles. HOW TO USE THE MANUAL MODE 1 Insert the key into the console. See HOW TO TURN ON THE POWER on page 10. 2 To stop the walking belt, press the Stop button. The time will begin to flash in the Weight/Time/ Pace display. To restart the walking belt, press the Start button. Enter your weight if desired.
The Weight/Time/Pace display—This display will show the elapsed time. Each time the speed setting changes, the display will also show your pace, in minutes per mile. Note: When a program is selected, this display will show the time remaining in the program instead of the elapsed time. When you enter your weight by pressing the Weight increase or decrease button, this display will also show your weight. tacts—avoid moving your hands.
setting for the second period will then be shown in the flashing Current Period column and the treadmill will automatically adjust to the speed and incline settings for the second period. Note: If all six of the indicators in the Current Period column are lit, the speed settings may move downward so that only the highest indicators appear in the matrix. HOW TO USE A TRAINER PROGRAM 1 Insert the key into the console. See HOW TO TURN ON THE POWER on page 10.
4 HOW TO USE THE CALORIES GOAL PROGRAM 1 A moment after the button is pressed, the walking belt will begin to move at 2.5 mph (or the speed setting that you selected). Hold the handrails and begin walking. Insert the key into the console. See HOW TO TURN ON THE POWER on page 10. 2 To change the speed of the walking belt or the incline of the treadmill at any time during the program, press the Speed or Incline buttons.
THE INFORMATION MODE/DEMO MODE The console features an information mode that keeps track of the total number of miles or kilometers that the walking belt has moved and the total number of hours that the treadmill has been operated. The information mode also allows you to select miles or kilometers as the unit of measurement and to turn on and turn off the demo mode. To select the information mode, hold down the Stop button while inserting the key into the console, and then release the Stop button.
HOW TO FOLD AND MOVE THE TREADMILL HOW TO FOLD THE TREADMILL FOR STORAGE 1 Before folding the treadmill, adjust the incline to the lowest position. If this is not done, the treadmill may be permanently damaged. Next, unplug the power cord. CAUTION: You must be able to safely lift 45 pounds (20 kg) to raise, lower, or move the treadmill. 1. Hold the metal frame firmly in the location shown by the arrow at the right.
TROUBLESHOOTING Most treadmill problems can be solved by following the steps below. Find the symptom that applies, and follow the steps listed. If further assistance is needed, please call the toll-free telephone number on the front cover of this manual. PROBLEM: The power does not turn on SOLUTION: a. Make sure that the power cord is plugged into a surge suppressor, and that the surge suppressor is plugged into a properly grounded outlet (see page 9).
PROBLEM: The walking belt slows when walked on SOLUTION: a. Use only a single-outlet surge suppressor that meets all of the specifications described on page 9. b. If the walking belt is overtightened, treadmill performance may decrease and the walking belt may become damaged. Remove the key and UNPLUG THE POWER CORD. Using the allen wrench, turn both rear roller bolts counterclockwise, 1/4 of a turn.
CONDITIONING GUIDELINES WARNING: Before beginning this or any exercise program, consult your physician. This is especially important for individuals over the age of 35 or individuals with preexisting health problems. The pulse sensor is not a medical device. Various factors, including the user’s movement, may affect the accuracy of heart rate readings. The pulse sensor is intended only as an exercise aid in determining heart rate trends in general.
PART LIST—Model No. PFTL41105.0 Key No. Qty.
92 41 38 44 113 25 67 58 98 112 15 74 11 58 58 94 31 115 1 92 30 38 84 112 113 88 44 45 72 85 58 58 22 98 78 58 83 82 9 58 22 67 40 114 86 107 25 58 115 15 22 12 97 58 87 9 10 7 53 109 14 3 89 58 13 8 28 49 19 58 17 4 83 85 84 13 4 58 28 68 20 20 18 91 24 84 58 58 6 110 81 82 14 58 2 65 23 107 109 13 26 73 63 12 93 2 114 58 61 62 114 60 2 27 108 46 58 33 39 29 2 26 69 59 63 57 54 13 54 58
ORDERING REPLACEMENT PARTS To order replacement parts, see the front cover of this manual. To help us assist you, please be prepared to give the following information: • the MODEL NUMBER of the product (PFTL41105.