
User`s manual

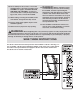
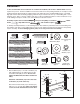
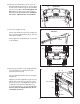

2. Identify the Right Upright (39), which has a
square hole in the location shown.
Orient the Right Upright (39) and the Base (37)
a
s shown. Attach the Right Upright to the Base
with two Upright Bolts (4) and two Upright Star
Washers (6); do not tighten the Upright Bolts
yet.
37
4
6
39
2
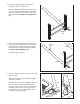
3. Orient the Left Upright (38) as shown. Note the
location of the two small latch holes. Attach the
Left Upright to the Base (37) with two Upright
Bolts (4) and two Upright Star Washers (6); do
not tighten the Upright Bolts yet.
Raise the Uprights (38, 39).
37
38
Latch
Holes
6
6
39
3
Square
Hole
4
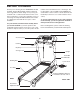
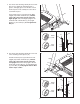
4.
Position the Base (37) near the front of the tread-
mill as shown.
Cut the small tie (not shown) holding the Upright
Wire (69) in a bundle.
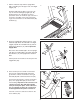
Wrap the strap around the Upright Wire (69) and
secure the strap using the included plastic tie.
Then, insert the connector into the square hole in
the Right Upright. Pull the opposite end of the
strap until the end of the Upright Wire is pulled
through the Right Upright (39).
37
39
4
Strap
69
Tie
39
69
Strap
7