Model No. PETL51305.2 Serial No. Serial Number Decal QUESTIONS? As a manufacturer, we are committed to providing complete customer satisfaction. If you have questions, or if there are missing or damaged parts, please call: 08457 089 009 Or write: ICON Health & Fitness, Ltd. Unit 4 Revie Road Industrial Estate Revie Road, Beeston Leeds, LS11 8JG UK email: csuk@iconeurope.com CAUTION Read all precautions and instructions in this manual before using this equipment. Save this manual for future reference.
TABLE OF CONTENTS IMPORTANT PRECAUTIONS . . . . . . . . . . . . . . . . . . . . . . . . . . . . . . . . . . . . . . . . . . . . . . . . . . . . . . . . . . . . . . . .3 BEFORE YOU BEGIN . . . . . . . . . . . . . . . . . . . . . . . . . . . . . . . . . . . . . . . . . . . . . . . . . . . . . . . . . . . . . . . . . . . . . .5 ASSEMBLY . . . . . . . . . . . . . . . . . . . . . . . . . . . . . . . . . . . . . . . . . . . . . . . . . . . . . . . . . . . . . . . . . . . . . . . . . . . . . . .
IMPORTANT PRECAUTIONS WARNING: To reduce the risk of burns, fire, electric shock, or injury to persons, read the following important precautions and information before operating the treadmill. 1. It is the responsibility of the owner to ensure that all users of this treadmill are adequately informed of all warnings and precautions. conductor, 1mm2 (14-gauge) cord that is no longer than 1.5 m (5 ft.). 12. Keep the power cord away from heated surfaces. 2. Use the treadmill only as described in this manual.
21. When using iFIT.com programs, an electronic “chirping” sound will alert you when the speed and/or incline of the treadmill is about to change. Always listen for the “chirp” and be prepared for speed and/or incline changes. In some instances, the speed and/or incline may change before the personal trainer describes the change. 24. Inspect and properly tighten all parts of the treadmill regularly. 25. Never insert any object into any opening. 26.
BEFORE YOU BEGIN Thank you for selecting the revolutionary PROFORM® 570 V treadmill. The 570 V treadmill offers an impressive array of features to help you achieve your fitness goals in the convenience and privacy of your home. And when you’re not exercising, the unique 570 V treadmill can be folded up, requiring less than half the floor space of conventional treadmills. the telephone number on the front cover of this manual.
Internal Star Washer (77)–4 Console Bolt (76)–4 Latch Screw (46)–2 ASSEMBLY Assembly requires two persons. Set the treadmill in a cleared area and remove all packing materials. Do not dispose of the packing materials until assembly is completed. Note: The underside of the treadmill walking belt is coated with high-performance lubricant. During shipping, a small amount of lubricant may be transferred to the top of the walking belt or the shipping carton.
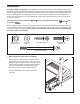
2. With the help of a second person, carefully tip the Uprights (97) down as shown. (Note: It may be helpful to place one foot against one of the Extension Legs [115] as you tip the Uprights.) Make sure that the Extension Legs remain in the Uprights. 2 39 Attach each Extension Leg (115) with two Extension Leg Bolts (80) and two 1/4” Washers (39) as shown. 80 115 80 39 39 97 80 115 3. Attach the four Base Pads (99) to the base of the Uprights (97) with four 1” Tek Screws (40).
5. See drawing 5c. With the help of a second person, hold the Console Base (101) near the Uprights (97). Look under the Console Base and locate the wires on the sides of the Console Base. Make sure that the wires are not routed through the openings for the Trays (111, 112). Drawing 5a shows the correct route for the wires. Drawing 5b shows an incorrect route. See drawing 5c. Cut the plastic ties holding the Wire Harness (74) and the pulse wire in the Uprights (97).
HOW TO USE THE CHEST PULSE SENSOR HOW TO PUT ON THE CHEST PULSE SENSOR • Store the chest pulse sensor in a warm, dry place. Do not store the chest pulse sensor in a plastic bag or other container that may trap moisture. The chest pulse sensor consists of two components: the chest strap and the sensor unit (see the drawing below). Insert the tab on one end of the chest strap into the hole in one end of the sensor unit, as shown in the inset drawing.
OPERATION AND ADJUSTMENT THE PERFORMANT LUBE™ WALKING BELT Your treadmill features a walking belt coated with PERFORMANT LUBE™, a high-performance lubricant. IMPORTANT: Never apply silicone spray or other substances to the walking belt or the walking platform. Such substances will deteriorate the walking belt and cause excessive wear. HOW TO PLUG IN THE POWER CORD This product must be earthed.
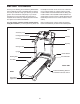
CONSOLE DIAGRAM Note: If there is a sheet of clear plastic on the face of the console, remove it. Clip Key FEATURES OF THE CONSOLE sonal trainer in your home. Using a stereo audio cable, you can connect the treadmill to your portable stereo, home stereo, computer, or VCR and play special iFIT.com MP3, CD, and video programs (iFIT.com MP3 programs, CDs, and videocassettes are available separately). IFIT.
HOW TO TURN ON THE POWER mph. As you exercise, change the speed of the walking belt as desired by pressing the Speed + and – buttons. Each time a button is pressed, the speed setting will change by 0.1 mph; if a button is held down, the speed setting will change in increments of 0.5 mph. Note: After the buttons are pressed, it may take a moment for the walking belt to reach the selected speed setting. Note: To prevent damage to the walking platform, wear clean shoes while using the treadmill.
The left side of the display will show the incline level of the treadmill, the elapsed time, and the distance that you have walked or run. Note: When a program is selected (except for pulse control program 1), the display will show the time remaining in the program instead of the elapsed time. the handrail. Next, stand on the foot rails and hold the metal contacts— avoid moving Contacts your hands.
tings for the next four segments will be shown in the columns to the right. HOW TO USE A SPEED & INCLINE PROGRAM 1 When only three seconds remain in the first segment of the program, both the Current Segment column and the column to the right will flash and a series of tones will sound. If the speed and/or incline of the treadmill is about to change, the speed setting and/or incline setting will flash in the display to alert you. Insert the key into the console. See HOW TO TURN ON THE POWER on page 12.
4 Follow your progress with the display. HOW TO USE A SPEED PROGRAM See step 5 on page 12. 5 1 Measure your heart rate if desired. See HOW TO TURN ON THE POWER on page 12. See step 6 on page 13. 6 Turn on the fan if desired. 2 Select one of the speed programs. To select one of the speed programs, press the Speed Program button repeatedly. As each speed program is selected, the maximum speed setting of the program will flash in the display for a few seconds.
4 HOW TO USE A PULSE CONTROL PROGRAM If pulse control program 1 is selected, the target heart rate setting for the program will flash in the display. If desired, press the Incline increase or decrease button to change the target heart rate setting (see EXERCISE INTENSITY on page 29). Note: The same target heart rate setting will be programmed for the entire program.
When only three seconds remain in the first segment, both the Current Segment column and the column to the right will flash and a series of tones will sound. When the first segment ends, all target heart rate settings will move one column to the left. The target heart rate setting for the second segment will then be shown in the flashing Current Segment column.
HOW TO CONNECT THE TREADMILL TO USE IFIT.COM PROGRAMS To use iFIT.com MP3 or CD programs, the treadmill must be connected to your MP3 player, CD player, portable stereo, home stereo, or computer. See pages 18 and 19 for connecting instructions. To use iFIT.com programs directly from our Web site, the treadmill must be connected to your computer. See page 19 for connecting instructions. To use iFIT.com video programs, the treadmill must be connected to your VCR. See page 20 for connecting instructions.
HOW TO CONNECT YOUR HOME STEREO HOW TO CONNECT YOUR COMPUTER Note: If your stereo has an unused LINE OUT jack, see instruction A below. If the LINE OUT jack is being used, see instruction B. A. Plug one end of a long 3.5 mm to 3.5 mm stereo audio cable (available at electronics stores) into the input jack on the console. Plug the other end of the cable into the LINE OUT jack on your computer.
HOW TO CONNECT YOUR VCR HOW TO USE AN IFIT.COM MP3, CD, OR VIDEO PROGRAM Note: If your VCR has an unused AUDIO OUT jack, see instruction A below. If the AUDIO OUT jack is being used, see instruction B. If you have a TV with a built-in VCR, see instruction B. If your VCR is connected to your home stereo, see HOW TO CONNECT YOUR HOME STEREO on page 19. To use an iFIT.com MP3, CD, or video program, the treadmill must be connected to your MP3 player, CD player, or VCR.
If the speed or incline settings are too high or too low, you can manually override the settings at any time by pressing the Speed or Incline buttons on the console. However, when the next “chirp” is heard, the speed and/or incline will change to the next settings of the program. • Make sure that the audio cable is properly connected. To stop the walking belt at any time, press the Stop button on the console. The time will begin to flash in the display.
THE INFORMATION MODE/DEMO MODE that the treadmill has been operated. An “E” for English miles or an “M” for metric kilometers will appear in the right side of the display. Press the Speed + button to change the unit of measurement if desired. The information mode keeps track of the total number of hours that the treadmill has been operated and the total number of miles that the walking belt has moved.
7 HOW TO USE AN IFIT.COM PROGRAM DIRECTLY FROM OUR WEB SITE When the on-screen countdown ends, the program will begin and the walking belt will begin to move. Hold the handrails, step onto the walking belt, and begin walking. During the program, an electronic “chirping” sound will alert you when the speed and/or incline of the treadmill is about to change. CAUTION: Always listen for the “chirp” and be prepared for speed and/or incline changes. Our Web site at www.iFIT.
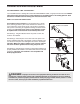
HOW TO FOLD AND MOVE THE TREADMILL HOW TO FOLD THE TREADMILL FOR STORAGE Before folding the treadmill, adjust the incline to the lowest position. If this is not done, the treadmill may be permanently damaged. Next, unplug the power cord. CAUTION: You must be able to safely lift 20 kg (45 lbs.) to raise, lower, or move the treadmill. 1. Hold the treadmill in the location shown by the arrow at the right. To decrease the possibility of injury, bend your legs and keep your back straight.
HOW TO LOWER THE TREADMILL FOR USE 1. Hold the upper end of the treadmill with your right hand as shown. Using your left hand, pull the latch knob to the left and hold it. Pivot the treadmill down until the frame is past the latch pin. Slowly release the latch knob. Frame Latch Knob Latch Pin 2. Hold the treadmill firmly with both hands, and lower the treadmill to the floor. Do not drop the treadmill frame to the floor. To decrease the possibility of injury, bend your legs and keep your back straight.
TROUBLESHOOTING Most treadmill problems can be solved by following the steps below. Find the symptom that applies, and follow the steps listed. If further assistance is needed, please call the telephone number on the front cover of this manual. PROBLEM: The power does not turn on SOLUTION: a. Make sure that the power cord is plugged into a properly earthed outlet. (See page 10.) If an extension cord is needed, use only a 3-conductor, 1 mm2 (14-gauge) cord that is no longer than 1.5 m (5 ft.).
With the help of a second person, carefully raise the Uprights (97) as shown. Carefully pivot the Hood (54) off. Locate the Reed Switch (22) and the Magnet (19) on the left side of the Pulley (18). Turn the Pulley until the Magnet is aligned with the Reed Switch. Make sure that the gap between the Magnet and the Reed Switch is about 3 mm (1/8 in.). If necessary, loosen the Screw (108), move the Reed Switch slightly, and then retighten the Screw.
PROBLEM: The chest pulse sensor does not function properly SOLUTION: a. If the chest pulse sensor does not function properly, see CHEST PULSE SENSOR TROUBLESHOOTING on page 9. b. If the chest pulse sensor still does not function properly, the battery should be changed. To replace the battery, first locate the battery cover on the back of the sensor unit. Insert a coin into the slot in the cover, and turn the cover counterclockwise to the “open” position. Then, remove the cover.
CONDITIONING GUIDELINES WARNING: Before beginning this or any exercise program, consult your physician. This is especially important for individuals over the age of 35 or individuals with preexisting health problems. The pulse sensors are not medical devices. Various factors, including the user’s movement, may affect the accuracy of heart rate readings. The sensors are intended only as exercise aids in determining heart rate trends in general.
PART LIST—Model No. PETL51305.2 R0106A To locate the parts listed below, see the EXPLODED DRAWING attached in the centre of this manual. Key No. Qty. 1 2 3 4 5 6 7 8 9 10 11 12 13 14 15 16 17 18 19 20 21 22 23 24 25 26 27 28 29 30 31 32 33 34 35 36 37 38 39 40 41 42 43 44 45 46 47 48 49 50 1 8 2 2 1 2 2 1 2 2 1 2 1 2 4 2 2 1 1 8 2 1 2 1 2 1 1 1 1 1 1 1 1 1 2 2 1 3 4 6 1 2 1 54 1 1 1 1 1 1 Description Key No. Qty.
Key No. Qty. 101 102 103 104 105 106 107 108 109 110 111 112 113 114 115 116 117 118 119 1 1 1 1 1 1 1 15 2 1 1 1 4 1 2 2 1 3 1 Description Console Base, Top Optic Disk Console Back Key Clip Left Handrail Console Fan Console Screw Motor Bracket Bolt Pulse Bar Right Accessory Tray Left Accessory Tray Internal Star Washer Latch Insert Extension Leg Base Endcap Chest Pulse Sensor Strap Belly Pan Screw Large Belly Pan Screw Key No. Qty.
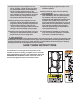
62 66 125 88 44 64 16 5 69 2 123 122 35 1 62 125 13 44 2 108 63 44 12 4 2 7 9 123 60 16 68 59 2 35 88 67 15 14 2 42 6 10 To identify the parts shown on this EXPLODED DRAWING, see the PART LIST on pages 30 and 31 of the User’s Manual.
90 94 20 115 86 25 99 40 91 39 80 45 99 40 97 94 20 114 82 108 95 89 115 38 91 86 108 110 116 90 99 40 108 113 99 40 20 39 80 108 20 99 40 108 108 74 77 108 38 74 113 95 99 40 116 107 89 101 44 112 104 44 EXPLODED DRAWING—Model No. PETL51305.
ORDERING REPLACEMENT PARTS To order replacement parts, contact the ICON Health & Fitness, Ltd. office, or write: ICON Health & Fitness, Ltd. Customer Service Department Unit 4, Revie Road Industrial Estate Revie Road Beeston Leeds, LS118JG UK Tel: 08457 089 009 Outside the UK: (44) 113 387 7133 Fax: (44) 113 387 7125 To help us assist you, please be prepared to give the following information: • the MODEL NUMBER of the product (PETL51305.