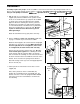
® Model No. PCTL53691 Serial No. USER'S MANUAL Find the serial number in the location shown below. Write the serial number in the space above for reference. Serial Number Decal If you require SERVICE for this product, please call SEARS: 1-800-4 MY HOME (469-4663) If you are MISSING PARTS or require INFORMATION on how to operate this product, call 1-888-936-ICON (4266) CAUTION Read all precautions and instructions in this manual before using this equipment. Save this manual for future reference.
TABLE OF CONTENTS IMPORTANT PRECAUTIONS . . . . . . . . . . . . . . . . . . . . . . . . . . . . . . . . . . . . . . . . . . . . . . . . . . . . . . . . . . . . . . . . .2 BEFORE YOU BEGIN . . . . . . . . . . . . . . . . . . . . . . . . . . . . . . . . . . . . . . . . . . . . . . . . . . . . . . . . . . . . . . . . . . . . . . .4 ASSEMBLY . . . . . . . . . . . . . . . . . . . . . . . . . . . . . . . . . . . . . . . . . . . . . . . . . . . . . . . . . . . . . . . . . . . . . . . . . . . . . . .
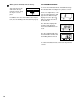
14. Never start the treadmill while you are standing on the walking belt. Always hold the handrails while using the treadmill. 15. The treadmill is capable of high speeds. Adjust the speed in small increments to avoid sudden jumps in speed. 16. The pulse sensor is not a medical device. Various factors, including the user's movement, may affect the accuracy of heart rate readings. The pulse sensor is intended only as an exercise aid in determining heart rate trends in general. 17.
BEFORE YOU BEGIN Thank you for selecting the new PROFORM® 595LE treadmill. The 595LE treadmill combines advanced technology with innovative design to let you enjoy an excellent form of cardiovascular exercise in the convenience and privacy of your home. And when you’re not exercising, the unique 595LE can be folded up, requiring less than half the floor space of other treadmills. 1-888-936-4266, Monday through Friday 8h00 until 18h30 eastern time (excluding holidays).
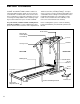
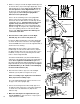
ASSEMBLY Assembly requires two people. Set the treadmill in a cleared area and remove all packing materials. Do not dispose of the packing materials until assembly is completed. Assembly requires the included allen wrench and your own phillips screwdriver , adjustable wrench and scissors . 1. With the help of a second person, carefully raise the Uprights (82) until the treadmill is in the position shown. Insert one of the Extension Legs (103) into the treadmill as shown.
4. While a second person holds the Right Handrail (85) and the Console Base (87) near the right Upright (82), cut the indicated plastic ties off the Right Handrail. Do not cut the other plastic tie off the Right Handrail. Next, cut the plastic tie off the Upright Wire Harness (34) in the right Upright (82). Do not drop the Upright Wire Harness into the right Upright. Refer to the inset drawing. Connect the Upright Wire Harness (34) to the Console Wire Harness (48).
OPERATION AND ADJUSTMENT THE PERFORMANT LUBETM WALKING BELT Your treadmill features a walking belt coated with PERFORMANT LUBETM, a high-performance lubricant. IMPORTANT: Never apply silicone spray or other substances to the walking belt or the walking platform. Such substances will deteriorate the walking belt and cause excessive wear. HOW TO PLUG IN THE POWER CORD DANGER: Improper connection of the equipment-grounding conductor can result in an increased risk of electric shock.
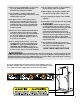
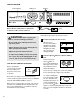
CONSOLE DIAGRAM Incline Display LED Track Note: If there is a thin sheet of clear plastic on the face of the console, remove it. Displays Clip Key Follow the steps below to operate the console. CAUTION: Before operating the console, read the following precautions. 1 When the key is inserted, one indicator will light in the incline display, one indicator will light in the LED track, and the four displays will light. • Do not stand on the walking belt when turning on the power.
3 Speed display—This display shows the speed of the walking belt, in miles per hour or kilometers per hour. The letters “MPH” or “KPH” will appear to show which unit of measurement is selected. Change the incline of the treadmill as desired. To change the incline of the treadmill, press the incline buttons. Each time one of the buttons is pressed, the incline will change by 0.5%. The buttons can be held down to change the incline rapidly.
6 When you are finished, remove the key. THE INFORMATION MODE Step onto the foot rails and remove the key from the console. Keep the key in a secure place. To access the information mode, hold down the Stop/ Reset button while inserting the key into the console. In addition, move the on/off switch to the off position. (See the drawing near the bottom of page 8.) An “E,” for english miles, or an “M,” for metric kilometers, will appear in the Distance/Laps display.
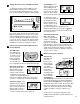
HOW TO FOLD AND MOVE THE TREADMILL HOW TO FOLD THE TREADMILL FOR STORAGE 1 Before folding the treadmill, adjust the incline to the lowest position. If this is not done, the treadmill may be permanently damaged. Next, unplug the power cord. CAUTION: You must be able to safely lift 20 kg (45 lbs.) in order to raise, lower, or move the treadmill. 1. Hold the treadmill with your hands in the locations shown at the right.
TROUBLE-SHOOTING Most treadmill problems can be solved by following the simple steps below. Find the symptom that applies, and follow the steps listed. If further assistance is needed, call our toll-free customer service department at 1-888-936-4266, Monday through Friday 8h00 until 18h30 eastern time (excluding holidays). PROBLEM: THE POWER DOES NOT TURN ON SOLUTION: a. Make sure that the power cord is plugged into a surge protector, and that the surge protector is plugged into a properly grounded outlet.
PROBLEM: The walking belt slows when walked on SOLUTION: a. If an extension cord is needed, use only a 3-conductor, 1mm2 (14-gauge) cord that is no longer than 1.5 m (5 ft.). b. If the walking belt is overtightened, treadmill performance may decrease and the walking belt may become damaged. Remove the key and UNPLUG THE POWER CORD. Using the allen wrench, turn both rear roller adjustment bolts counterclockwise, 1/4 of a turn.
CONDITIONING GUIDELINES WARNING: Before beginning this or any exercise program, consult your physician. This is especially important for individuals over the age of 35 or individuals with preexisting health problems. The pulse sensor is not a medical device. Various factors, including your movement, may affect the accuracy of heart rate readings. The sensor is intended only as an exercise aid in determining heart rate trends in general. The following guidelines will help you to plan your exercise program.
PART LIST—Model No. PCTL53691 Key No. Qty.
ORDERING REPLACEMENT PARTS To order replacement parts, call our Customer Service Department toll-free at 1-888-936-4266, Monday through Friday 8h00 until 18h30 Eastern Time (excluding holidays).
65 36 67 65 56 58 36 12 60 59 47 70 68 69 64 56 45 62 61 63 57 46 111 68 60 59 110 58 44 71 55 44 40 3 47 44 32 2 46 43 54 33 42 66 112 41 45 47 22 53 46 47 44 111 39 21 76 15 16 16 38 46 16 109 18 3 5 49 37 6 45 15 16 15 7 15 89 5 13 19 112 14 8 118 76 35 16 113 73 116 10 10 11 15 36 9 33 16 16 51 32 15 18 25 16 31 17 24 52 16 76 23 30 26 29 To identify the parts shown on this exploded drawing, refer to
104 75 103 72 97 98 20 78 74 36 81 96 80 77 79 80 119 84 104 105 83 82 36 114 98 97 97 98 103 20 86 92* 93 84 93 75 78 15 85 34 106 80 101 62 107 95 93 93 78 119 115 36 80 36 78 99 100 96 84 79 84 34 114 86 97 95 98 15 83 101 101 87 50 108 91 101 16 88 101 117 94 101 90 16 16 16 EXPLODED DRAWING—Model No.