Class H Fitness Product Model No. PFEVEL59940 Serial No. USERʼS MANUAL Serial Number Decal QUESTIONS? As a manufacturer, we are committed to providing complete customer satisfaction. If you have questions, or if there are missing or parts, please call: 08457 089 009 Or write: ICON Health & Fitness, Ltd. Customer Service Department Unit 4 Revie Road Industrial Estate Revie Road Beeston Leeds, LS118JG UK email: csuk@iconeurope.
TABLE OF CONTENTS IMPORTANT PRECAUTIONS . . . . . . . . . . . . . . . . . . . . . . . . . . . . . . . . . . . . . . . . . . . . . . . . . . . . . . . . . . . . . . . .2 BEFORE YOU BEGIN . . . . . . . . . . . . . . . . . . . . . . . . . . . . . . . . . . . . . . . . . . . . . . . . . . . . . . . . . . . . . . . . . . . . . .3 ASSEMBLY . . . . . . . . . . . . . . . . . . . . . . . . . . . . . . . . . . . . . . . . . . . . . . . . . . . . . . . . . . . . . . . . . . . . . . . . . . . . . . .
BEFORE YOU BEGIN Congratulations for selecting the new PROFORM® 615 HR. The PROFORM 615 HR is an incredibly smooth exerciser that moves your feet in a natural elliptical path, minimizing the impact on your knees and ankles. And the unique PROFORM 615 HR features adjustable resistance and a state-of-the-art console to help you get the most from your exercise. Welcome to a whole new world of natural, elliptical-motion exercise from PROFORM.
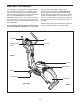
ASSEMBLY Assembly requires two persons. Place all parts of the elliptical crosstrainer in a cleared area and remove the packing materials. Do not dispose of the packing materials until assembly is completed. Assembly requires the included hex keys and your own a phillips screwdriver , adjustable spanner , . and rubber mallet As you assemble the elliptical crosstrainer, use the drawings below to identify the small parts used in assembly.
1. Identify the Front Stabiliser (3), which has Wheels (32) attached to it. Whilst another person lifts the front of the Frame (1), attach the Front Stabiliser to the Frame with two M10 x 112mm Carriage Bolts (34) and two M10 Nylon Locknuts (29). Make sure that the Front Stabiliser is turned so the Wheels are not touching the floor. 2. Whilst another person lifts the back of the Frame (1), attach the Rear Stabiliser (4) to the Frame with two M10 x 112mm Carriage Bolts (34) and two M10 Nylon Locknuts (29).
5. Whilst another person holds the Console (5) in the position shown, connect the wire harness on the Console to the Upper Wire Harness (86). Insert the excess wire harness into the Upright (2). 5 6. Identify the Left Handlebar (9), which is marked with a sticker. Insert the Left Handlebar into one of the Handlebar Legs (79); make sure that the Handlebar Leg is turned so the hexagonal holes are on the indicated side.
8. Identify the Left Pedal (13). Attach the Left Pedal to the left Pedal Spring (14) with an Adjustment Bolt (20), an M10 Washer (38), an M10 Split Washer (70), and a Pedal Knob (15) as shown. Note: The Left Pedal can be attached in several positions using the five positions in the Left Pedal and the three holes in the Pedal Spring. Attach the Right Pedal (not shown) in the same way. Make sure that both Pedals are in the same hole and in the same pedal position. 8 20 13 14 38 70 15 9.
HOW TO OPERATE THE ELLIPTICAL CROSSTRAINER HOW TO ADJUST THE PEDALS To dismount the elliptical crosstrainer, wait until the pedals come to a complete stop. Note: The elliptical crosstrainer does not have a free wheel; the pedals will continue to move until the flywheel stops. When the pedals are stationary, step off the highest pedal first. Then, step off the lowest pedal. The motion of the pedals is determined by their position on the pedal springs.
Fan Button Display Buttons On/Reset Button Resistance Buttons FEATURES OF THE CONSOLE can connect the elliptical crosstrainer to your home stereo, portable stereo, computer, or VCR and play special iFIT.com CD and video programs (iFIT.com CDs and videocassettes are available separately). iFIT.com CD and video programs automatically control the resistance of the pedals and prompt you to vary your pace as a personal trainer coaches you through every step of your workout.
number to the next every few seconds. If you use the handgrip pulse sensor, the display will also show your heart rate (see step 5 on page 11). HOW TO USE THE MANUAL MODE 1 2 3 4 Turn on the console. To view only the distance Upper Button you have pedalled or the number of calories or fat calories you have burned, press the upper button on the left side of the large display until only the word DISTANCE, CALORIES, or FAT CALORIES appears in the upper section of the large display.
To reset the displays, press the On/Reset button. 5 Note: The console can show speed and distance in either miles or kilometers. The letters MPH or KM/H will appear in the lower section of the large display to show which system of measurement is selected. To change the system of measurement, hold down the On/Reset button for about six seconds. Note: When the button is held down, the fan will turn on for a moment.
The target pace for the current Indicator period will be Bar shown by the arrows in the Arrows small display. To pedal at the target pace, simply increase or decrease your pace until there is one arrow pointing to each segment of the indicator bar (see the drawing above). At the end of each period, the number of arrows will change if a different target pace is programmed for the next period.
HOW TO USE A HEART RATE PROGRAM Heart Rate program 1 is designed to keep your heart rate between 65% and 85% of your maximum heart rate during your workout. (Your maximum heart rate is estimated by subtracting your age from 220. For example, if you are 25 years old, your maximum heart rate is 195 beats per minute.) Heart Rate program 2 is designed to keep your heart rate near a target heart rate that you select. 5 Follow the steps below to use a Heart Rate program. 1 2 3 4 Turn on the console.
6 7 8 Note: If you stop pedaling for a few seconds, the program will end. To use the program again, reselect it and start it at the beginning. Follow your progress with the large display. See step 4 on page 10. Turn on the fan if desired. See step 6 on page 11. When you are finished exercising, the console will automatically turn off. See step 7 on page 11. HOW TO CONNECT YOUR CD PLAYER, VCR, OR COMPUTER To use iFIT.
HOW TO CONNECT YOUR PORTABLE STEREO HOW TO CONNECT YOUR HOME STEREO Note: If your stereo has an RCA-type AUDIO OUT jack, see instruction A below. If your stereo has a 3.5mm LINE OUT jack, see instruction B. If your stereo has only a PHONES jack, see instruction C. Note: If your stereo has an unused LINE OUT jack, see instruction A below. If the LINE OUT jack is being used, see instruction B. A. Plug one end of the audio cable into the jack beneath the console.
HOW TO CONNECT YOUR COMPUTER HOW TO CONNECT YOUR VCR Note: If your computer has a 3.5mm LINE OUT jack, see instruction A. If your computer has only a PHONES jack, see instruction B. Note: If your VCR has an unused AUDIO OUT jack, see instruction A below. If the AUDIO OUT jack is being used, see instruction B. If you have a TV with a built-in VCR, see instruction B. If your VCR is connected to your home stereo, see HOW TO CONNECT YOUR HOME STEREO on page 15. A.
The program will function in almost the same way as a Smart program (see step 3 on page 12). However, an electronic “chirping” sound will alert you when the resistance level and/or the target pace is about to change. HOW TO USE IFIT.COM CD AND VIDEO PROGRAMS To use iFIT.com CDs or videocassettes, the elliptical crosstrainer must be connected to your portable CD player, portable stereo, home stereo, computer with CD player, or VCR. See HOW TO CONNECT YOUR CD PLAYER, VCR, OR COMPUTER on page 14.
4 HOW TO USE PROGRAMS DIRECTLY FROM OUR WEB SITE 5 Our Web site at www.iFIT.com allows you to play iFIT.com programs directly from the internet. To use programs from our Web site, the elliptical crosstrainer must be connected to your computer. See HOW TO CONNECT YOUR COMPUTER on page 16. In addition, you must have an internet connection and an internet service provider. A list of specific system requirements is found on our Web site. Follow the steps below to use a program from our Web site.
MAINTENANCE AND TROUBLESHOOTING HANDGRIP PULSE SENSOR TROUBLESHOOTING Inspect and tighten all parts of the elliptical crosstrainer regularly. Replace any worn parts immediately. • Avoid moving your hands whilst using the handgrip pulse sensor. Excessive movement may interfere with heart rate readings. Do not hold the metal contacts too tightly; doing so may interfere with heart rate readings. To clean the elliptical crosstrainer, use a damp cloth and a small amount of mild detergent.
CONDITIONING GUIDELINES WARNING: • Before beginning this or any exercise program, consult your physician. This is especially important for persons over the age of 35 or persons with pre-existing health problems. During the first few minutes of exercise, your body uses easily accessible carbohydrate calories for energy. Only after the first few minutes of exercise does your body begin to use stored fat calories for energy.
SUGGESTED STRETCHES 1 The correct form for several basic stretches is shown at the right. Move slowly as you stretch—never bounce. 1. Toe Touch Stretch Stand with your knees bent slightly and slowly bend forward from your hips. Allow your back and shoulders to relax as you reach down toward your toes as far as possible. Hold for 15 counts, then relax. Repeat 3 times. Stretches: Hamstrings, back of knees and back. 2 2. Hamstring Stretch Sit with one leg extended.
PART LIST—Model No. PFEVEL59940 Key No. Qty.
EXPLODED DRAWING—Model No.
ORDERING REPLACEMENT PARTS To order replacement parts, contact the ICON Health & Fitness, Ltd. office, or write: ICON Health & Fitness, Ltd.