® Model No. PFTL62581 Serial No. Serial Number Decal QUESTIONS? As a manufacturer, we are committed to providing complete customer satisfaction. If you have questions, or if there are missing or damaged parts, we will guarantee complete satisfaction through direct assistance from our factory. TO AVOID UNNECESSARY DELAYS, PLEASE CALL DIRECT TO OUR TOLL-FREE CUSTOMER HOT LINE. The trained technicians on our Customer Hot Line will provide immediate assistance, free of charge to you.
TABLE OF CONTENTS IMPORTANT PRECAUTIONS . . . . . . . . . . . . . . . . . . . . . . . . . . . . . . . . . . . . . . . . . . . . . . . . . . . . . . . . . . . . . . . . .2 BEFORE YOU BEGIN . . . . . . . . . . . . . . . . . . . . . . . . . . . . . . . . . . . . . . . . . . . . . . . . . . . . . . . . . . . . . . . . . . . . . . .4 ASSEMBLY . . . . . . . . . . . . . . . . . . . . . . . . . . . . . . . . . . . . . . . . . . . . . . . . . . . . . . . . . . . . . . . . . . . . . . . . . . . . . . .
14. Never start the treadmill while you are standing on the walking belt. Always hold the handrails while using the treadmill. 15. The treadmill is capable of high speeds. Adjust the speed in small increments to avoid sudden jumps in speed. 16. The pulse sensor is not a medical device. Various factors, including the user's movement, may affect the accuracy of heart rate readings. The pulse sensor is intended only as an exercise aid in determining heart rate trends in general. 17.
BEFORE YOU BEGIN Thank you for selecting the PROFORM® 625EX treadmill. The 625EX treadmill combines advanced technology with innovative design to let you enjoy an excellent form of cardiovascular exercise in the convenience and privacy of your home. And when you’re not exercising, the unique 625EX can be folded up, requiring less than half the floor space of other treadmills. at 1-800-999-3756, Monday through Friday, 6 a.m. until 6 p.m. Mountain Time (excluding holidays).
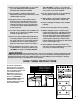
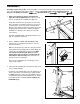
ASSEMBLY Assembly requires two people. Set the treadmill in a cleared area and remove all packing materials. Do not dispose of the packing materials until assembly is completed. Assembly requires the included allen wrench and your own phillips screwdriver , adjustable wrench , and scissors . 1. Refer to the drawing on page 4 and identify the right side of the treadmill. With the help of a second person, carefully lay the treadmill on its right side.
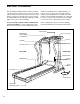
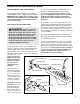
4. Cut the indicated plastic tie from the Right Handrail (62). Next, feed the large wire tie and the Console Wire Harness (90) into the Right Handrail and out through the indicated bracket. Pull as much of the Console Wire Harness through the Right Handrail as possible. Note: It may be helpful to turn the Console over on a flat surface as you do this. 4 90 35 62 46 Next, rest the left side of the Console Base (46) on the Left Handrail (not shown).
OPERATION AND ADJUSTMENT THE PERFORMANT LUBETM WALKING BELT Your treadmill features a walking belt coated with PERFORMANT LUBETM, a high-performance lubricant. IMPORTANT: Never apply silicone spray or other substances to the walking belt or the walking platform. They will deteriorate the walking belt and cause excessive wear. HOW TO PLUG IN THE POWER CORD DANGER: Improper connection of the equipment-grounding conductor can result in an increased risk of electric shock.
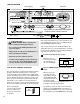
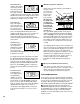
CONSOLE DIAGRAM Displays Incline Display LED Track Program Indicators Manual Indicator Note: If there is a thin sheet of clear plastic on the face of the console, remove it. Key Pulse Sensor CAUTION: Before operating the console, read the following precautions. • Do not stand on the walking belt when turning on the power. • Always wear the clip (see the drawing above) while operating the treadmill. • Adjust the speed in small increments.
Note: There are two twenty-minute programs and two thirty-minute programs. The graphs on the left side of the console show how the speed of the walking belt will change during the programs. During the AEROBIC 1 program, for example, the speed will gradually increase during the first ten minutes, and then gradually decrease during the last ten minutes. Each program begins with a warm-up period and ends with a cool-down period.
• DISTANCE/LAPS display—This display shows the total distance that you have walked and the number of laps you have completed (one lap equals 1/4 mile). The display will alternate between one number and the other every seven seconds. The LAPS indicator will light when the number of laps is shown. 7 Stand on the foot rails and place your thumb on the pulse sensor as shown. The pulse sensor is Pulse Sensor pressure-activated—fully press it down.
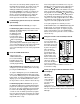
HOW TO FOLD AND MOVE THE TREADMILL HOW TO FOLD THE TREADMILL FOR STORAGE 1 Unplug the power cord. CAUTION: You must be able to safely lift 45 pounds (20 kg) in order to raise, lower, or move the treadmill. 1. Hold the treadmill with your hands in the locations shown at the right. CAUTION: To decrease the possibility of injury, bend your legs and keep your back straight. As you raise the treadmill, make sure to lift with your legs rather than your back.
MAINTENANCE AND TROUBLE-SHOOTING Most treadmill problems can be solved by following the steps below. Find the symptom that applies, and follow the steps listed. If further assistance is needed, please call our Customer Service Department tollfree at 1-800-999-3756, Monday through Friday, 6 a.m. until 6 p.m. Mountain Time (excluding holidays). PROBLEM: The power does not turn on SOLUTION: a.
PROBLEM: The walking belt slows when walked on SOLUTION: a. Use only a UL-listed surge protector, rated at 15 amps, with a 14-gauge cord of five feet or less in length. b. If the walking belt is overtightened, treadmill performance may decrease and the walking belt may be permanently damaged. Remove the key and UNPLUG THE POWER CORD. Using the allen wrench, turn both rear roller adjustment bolts counterclockwise, 1/4 of a turn.
CONDITIONING GUIDELINES Fat Burning WARNING: Before beginning this or any exercise program, consult your physician. This is especially important for individuals over the age of 35 or individuals with preexisting health problems. The pulse sensor is not a medical device. Various factors, including your movement, may affect the accuracy of heart rate readings. The sensor is intended only as an exercise aid in determining heart rate trends in general.
A Cool-down—Finish each workout with 5 to 10 minutes of stretching to cool down. This will increase the flexibility of your muscles and will help prevent post-exercise problems. Exercise Frequency To maintain or improve your condition, complete three workouts each week, with at least one day of rest between workouts. After a few months, you may complete up to five workouts each week if desired. The key to success is to make exercise a regular and enjoyable part of your everyday life.
ORDERING REPLACEMENT PARTS To order replacement parts, call our Customer Service Department toll-free at 1-800-999-3756, Monday through Friday, 6 a.m. until 6 p.m. Mountain Time (excluding holidays). When ordering parts, please be prepared to give the following information: • The MODEL NUMBER OF THE PRODUCT (PFTL62581). • The NAME OF THE PRODUCT (PROFORM® 625EX treadmill). • The SERIAL NUMBER OF THE PRODUCT (see the front cover of this manual).
34 REMOVE THIS EXPLODED DRAWING AND PART LIST FROM THE MANUAL. Save this page for future reference. Note: Specifications are subject to change without notice. For information about ordering replacement parts, see the back cover of the User’s Manual.
PART LIST—Model No. PFTL62581 Key No. Qty.
75 107 106 26 108 25 77 63 24 4 14 104 102 13 108 107 104 1 5 3 104 5 105 118 103 101 16 12 111 106 104 15 2 7 104 6 12 78 100 99 15 8 13 6 118 17 11 9 3 97 98 58 2 15 10 98 78 15 80 98 87 17 58 89 37 96 98 86 54 86 78 78 109 7 78 91 93 72 80 70 56 88 94 95 98 73 71 92 108 37 54 86 119 78 80 54 76 18 15 87 74 69 86 81 85 54 80 61 54 86 78 19 19 29 33 78 59 60 23 83 84 67 66* 82 68 20 15 21