Model No. PFEVEL29010 Serial No. USER’S MANUAL Serial Number Decal QUESTIONS? As a manufacturer, we are committed to providing complete customer satisfaction. If you have questions, or if there are missing or damaged parts, please call: 08457 089 009 Or write: ICON Health & Fitness, Ltd. Customer Service Department Unit 4 Revie Road Industrial Estate Revie Road Beeston Leeds, LS118JG UK email: csuk@iconeurope.
TABLE OF CONTENTS IMPORTANT PRECAUTIONS . . . . . . . . . . . . . . . . . . . . . . . . . . . . . . . . . . . . . . . . . . . . . . . . . . . . . . . . . . . . .2 BEFORE YOU BEGIN . . . . . . . . . . . . . . . . . . . . . . . . . . . . . . . . . . . . . . . . . . . . . . . . . . . . . . . . . . . . . . . . . . .3 ASSEMBLY . . . . . . . . . . . . . . . . . . . . . . . . . . . . . . . . . . . . . . . . . . . . . . . . . . . . . . . . . . . . . . . . . . . . . . . . . . .
BEFORE YOU BEGIN Congratulations for selecting the new PROFORM® 640 S elliptical crosstrainer. The PROFORM® 640 S is an incredibly smooth exerciser that moves your feet in a natural elliptical path, minimising the impact on your knees and ankles. And the unique 640 S features adjustable resistance and an easy-to-use console to help you get the most from your exercise. questions after reading the manual, call our Customer Service Department at 08457 089 009.
ASSEMBLY Assembly requires two persons. Place all parts of the elliptical crosstrainer in a cleared area and remove the packing materials. Do not dispose of the packing materials until assembly is completed. In addition to the included allen wrenches, assembly requires a phillips screwdriver , an adjustable spanner , and a rubber mallet . As you assemble the elliptical crosstrainer, use the drawings below to identify the small parts used in assembly.
1. Identify the Front Stabiliser (3), which has Wheels (32) attached to it. Whilst another person lifts the front of the Frame (1) slightly, attach the Front Stabiliser to the Frame with two M10 x 112mm Carriage Bolts (34) and two M10 Nylon Locknuts (29). Make sure that the Front Stabiliser is turned so the Wheels are not touching the floor. 1 32 34 32 3 1 29 2.
5. The Console (5) requires four “D” batteries (not included); alkaline batteries are recommended. Press the tab on the battery cover, and lift off the battery cover. Insert four batteries into the Console. Make sure that the batteries are oriented as shown by the markings inside the battery compartment. Reattach the battery cover. 5 Tab Battery Cover Batteries 5 6. Whilst another person holds the Console (5) in the position shown, connect the wire harness on the Console to the Upper Wire Harness (82).
9. Hold the lower end of the Left Handlebar (9) against the Left Pedal Arm (14). Apply grease to an M10 x 92mm Button Bolt (27). Attach the Left Handlebar to the Left Pedal Arm with the Button Bolt, two M10 Large Washers (38), and an M10 Nylon Locknut (29). Do not overtighten the Nylon Locknut; the Left Handlebar must be able to pivot freely. 9 63 9 29 38 Attach the Right Handlebar (10) to the Right Pedal Arm (not shown) in the same way. Tighten the M10 x 88mm Button Bolt (63). 10 38 27 14 Grease 10.
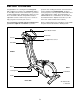
HOW TO USE THE ELLIPTICAL CROSSTRAINER HOW TO ADJUST THE PEDALS To dismount the elliptical crosstrainer, wait until the pedals come to a complete stop. Note: The elliptical crosstrainer does not have a free wheel; the pedals will continue to move until the flywheel stops. When the pedals are stationary, step off the highest pedal first. Then, step off the lowest pedal. The motion of the Pedal pedals is determined by their position on the pedal arms; there are three different positions.
Note: If there is a thin sheet of plastic on the face of the console, remove it. A B C F D H E G FEATURES OF THE CONSOLE B. Display mode indicators—These indicators show which display mode is currently shown (scan, speed, time, distance, resistance level, calories, watts, or heart rate). Note: When the distance is shown, the word Miles or the letters Kms will appear; when your speed is shown, the letters MPH or Km/H will appear.
When a personal trainer program is selected, the display will show the time remaining in the program instead of the elapsed time. HOW TO USE THE MANUAL MODE 1 Turn on the console. If desired, you can select a single mode for continuous display. Press the Display Mode button repeatedly until only the MPH (or Km/H), Time, Miles (or Kms), Resist., Cals., or Watts indicator appears in the display. Make sure that the Scan indicator does not appear.
During the program, the resistance of the elliptical crosstrainer will automatically change as shown by the applicable profile on the console. If the current resistance level is too high or too low, you can change the resistance level by pressing the + and – buttons. However, when the current period of the program is completed, the resistance level will automatically change if a different resistance setting is programmed for the next period. HOW TO USE A PERSONAL TRAINER PROGRAM 1 Turn on the console.
MAINTENANCE AND TROUBLESHOOTING Inspect and properly tighten all parts of the elliptical crosstrainer regularly. Replace any worn parts immediately. HANDGRIP PULSE SENSOR TROUBLE-SHOOTING • Avoid moving your hands whilst using the handgrip pulse sensor. Excessive movement may interfere with heart rate readings. To clean the elliptical crosstrainer, use a damp cloth and a small amount of mild dish soap.
CONDITIONING GUIDELINES During the first few minutes of exercise, your body uses easily accessible carbohydrate calories for energy. Only after the first few minutes of exercise does your body begin to use stored fat calories for energy. If your goal is to burn fat, adjust the intensity of your exercise until your heart rate is near the lowest number in your training zone as you exercise. WARNING: Before beginning this or any exercise program, consult your physician.
PART LIST—Model No. PFEVEL29010 Key No. Qty. 1 2 3 4 5 6 7 8 9 10 11 12 13 14 15 16 17 18 19 20 21 22 23 24 25 26 27 28 29 30 31 32 33 34 35 36 37 38 39 40 41 42 43 1 1 1 1 1 1 1 2 1 1 2 1 1 1 4 8 6 1 1 1 4 2 2 4 2 2 2 4 8 1 1 2 2 4 2 2 2 4 1 2 1 2 1 Description Key No. Qty.
EXPLODED DRAWING—Model No.
ORDERING REPLACEMENT PARTS If you encounter any difficulties with this product, or if you need to order replacement parts, call the ICON Health & Fitness, Ltd. office, or write: ICON Health & Fitness, Ltd.