Model No. 831.285370 Serial No. USER’S MANUAL Write the serial number in the space above for future reference. Serial Number Decal SEARS, ROEBUCK AND CO., HOFFMAN ESTATES, IL 60179 CAUTION Read all precautions and instructions in this manual before using this equipment. Keep this manual for future reference. Visit our website at www.proform.
TABLE OF CONTENTS IMPORTANT PRECAUTIONS . . . . . . . . . . . . . . . . . . . . . . . . . . . . . . . . . . . . . . . . . . . . . . . . . . . . . . . . . . . . .3 BEFORE YOU BEGIN . . . . . . . . . . . . . . . . . . . . . . . . . . . . . . . . . . . . . . . . . . . . . . . . . . . . . . . . . . . . . . . . . . .4 ASSEMBLY . . . . . . . . . . . . . . . . . . . . . . . . . . . . . . . . . . . . . . . . . . . . . . . . . . . . . . . . . . . . . . . . . . . . . . . . . . .
IMPORTANT PRECAUTIONS WARNING: To reduce the risk of serious injury, read the following important precautions before using the elliptical crosstrainer. 1. Read all instructions in this manual before using the elliptical crosstrainer. 8. Always hold the console handgrip or the handlebars when mounting, dismounting, or using the elliptical crosstrainer. 2. It is the responsibility of the owner to ensure that all users of the elliptical crosstrainer are adequately informed of all precautions. 9.
BEFORE YOU BEGIN Congratulations for selecting the new PROFORM® 650 CARDIO CROSSTRAINER. The PROFORM® 650 is an incredibly smooth exerciser that moves your feet in a natural elliptical path, minimizing the impact on your knees and ankles. And the unique PROFORM® 650 features adjustable resistance and a state-of-theart console to help you get the most from your exercise. Welcome to a whole new world of natural, elliptical-motion exercise from PROFORM.
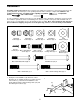
ASSEMBLY Assembly requires two persons. Place all parts of the elliptical crosstrainer in a cleared area and remove the packing materials. Do not dispose of the packing materials until assembly is completed. In addition to the included allen wrenches, assembly requires a phillips screwdriver , an adjustable wrench , and a rubber mallet . As you assemble the elliptical crosstrainer, use the drawings below to identify the small parts used in assembly.
2. While another person lifts the back of the Frame (1), attach the Rear Stabilizer (9) to the Frame with two M10 x 75mm Carriage Bolts (34) and two M10 Nylon Locknuts (33). 2 33 9 33 1 34 3. The Console (23) requires three “AA” batteries (not included); alkaline batteries are recommended. Insert three batteries into the battery compartment. Make sure that the batteries are oriented as shown by the diagram inside the battery compartment. 3 Batteries 23 4.
6. Identify the Left Handlebar (6), which is marked with a sticker. Insert the Left Handlebar into one of the Handlebar Legs (5); make sure that the Handlebar Leg is turned so the hexagonal holes are on the indicated side. Attach the Left Handlebar to the Handlebar Leg with two M8 x 45mm Button Bolts (50) and two M8 Nylon Locknuts (38). Make sure that the Nylon Locknuts are inside of the hexagonal holes. Do not fully tighten the Button Bolts yet.
. Apply a small amount of grease to the axle on the left Disc Crossbar (16). Slide a Spring Spacer (63) onto the axle; make sure that the Spring Spacer is turned so the flat side is facing the elliptical crosstrainer. Next, slide the Left Rear Spring Bracket (12) on the left Pedal Spring (11) onto the axle. Slide a Spring Bracket Washer (35) onto an M10 x 27mm Patch Screw (40), and tighten the Patch Screw into the axle.
HOW TO USE THE ELLIPTICAL CROSSTRAINER HOW TO ADJUST THE RESISTANCE OF THE PEDALS As you exercise, you can adjust the resistance of the pedals with the resistance knob on the right side of the console. To increase the resistance, turn the knob clockwise; to decrease the resistance, turn the knob counterclockwise. The number in the resistance window displays the resistance level. HOW TO USE THE HANDLEBARS The handlebars are designed to add upper-body exercise to your workouts.
FEATURES OF THE CONSOLE HOW TO OPERATE THE CONSOLE Make sure that there are batteries in the console (see assembly steps 3 and 4 on page 6). If there is a thin sheet of clear plastic on the console, remove it. Follow the steps below to operate the console. 1. To turn on the power, press the On/Reset button or simply begin pedalling. When the power is turned on, the entire display will appear for two seconds. The console will then be ready for operation. 2.
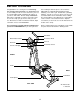
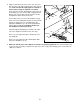
3. Measure your heart rate, if desired. Make sure that you are applying the proper amount of pressure to the heart rate sensor. Try the heart rate sensor several times until you become familiar with it. Remember to stand still while measuring your heart rate. To measure your heart rate, stop Heart Rate Sensor pedaling and place your thumb on the heart rate sensor as shown. Do not press too hard, or the circulation in your thumb will be restricted, and your pulse will not be detected.
MAINTENANCE AND TROUBLESHOOTING Inspect and tighten all parts of the elliptical crosstrainer regularly. Replace any worn parts immediately. Next, refer to the drawing below and locate the Reed Switch (53). Loosen, but do not remove, the indicated M4 x 16mm Self-tapping Screw (52). Slide the Reed Switch slightly toward or away from the Magnet (58) on the flywheel. Retighten the Screw. Turn the left Pedal Disc (15) for a moment. Repeat until the console displays correct feedback.
CONDITIONING GUIDELINES During the first few minutes of exercise, your body uses easily accessible carbohydrate calories for energy. Only after the first few minutes of exercise does your body begin to use stored fat calories for energy. If your goal is to burn fat, adjust the intensity of your exercise until your heart rate is near the lowest number in your training zone as you exercise. WARNING: • Before beginning this or any exercise program, consult your physician.
PART LIST—Model No. 831.285370 Key No. Qty. 1 2 3 4 5 6 7 8 9 10 11 12 13 14 15 16 17 18 19 20 21 22 23 24 25 26 27 28 29 30 31 32 33 34 35 36 1 1 1 1 2 1 2 1 1 1 2 1 1 1 2 2 1 1 1 2 2 1 1 2 2 12 2 2 3 2 2 1 7 4 2 12 Description R1002A Key No. Qty.
EXPLODED DRAWING—Model No. 831.
The model number and serial number of your PROFORM® 650 CARDIO CROSSTRAINER are listed on a decal attached to the frame. See the front cover of this manual to find the location of the decal. Model No. 831.285370 QUESTIONS? If you find that: • you need help assembling or operating the PROFORM® 650 CARDIO CROSSTRAINER All replacement parts are available for immediate purchase or special order when you visit your nearest SEARS Service Center.