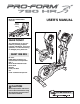
Model No. PFEVEL5986.0 Serial No. Serial Number Decal QUESTIONS? As a manufacturer, we are committed to providing complete customer satisfaction. If you have questions, or if there are missing or damaged parts, please call: 08457 089 009 Or write: ICON Health & Fitness, Ltd. Customer Service Department Unit 4 Revie Road Industrial Estate Revie Road Beeston Leeds, LS118JG UK email: csuk@iconeurope.com CAUTION Read all precautions and instructions in this manual before using this equipment.
TABLE OF CONTENTS IMPORTANT PRECAUTIONS . . . . . . . . . . . . . . . . . . . . . . . . . . . . . . . . . . . . . . . . . . . . . . . . . . . . . . . . . . . . . . . .3 BEFORE YOU BEGIN . . . . . . . . . . . . . . . . . . . . . . . . . . . . . . . . . . . . . . . . . . . . . . . . . . . . . . . . . . . . . . . . . . . . . .4 ASSEMBLY . . . . . . . . . . . . . . . . . . . . . . . . . . . . . . . . . . . . . . . . . . . . . . . . . . . . . . . . . . . . . . . . . . . . . . . . . . . . . . .
IMPORTANT PRECAUTIONS WARNING: To reduce the risk of serious injury, read the following important precautions before using the elliptical exerciser. 1. Read all instructions in this manual and all warnings on the elliptical exerciser before using the elliptical exerciser. Use the elliptical exercise only as described in this manual. 10. The pulse sensor is not a medical device. Various factors may affect the accuracy of heart rate readings.
BEFORE YOU BEGIN Thank you for selecting the revolutionary PROFORM® 790 HR elliptical exerciser. The 790 HR elliptical exerciser provides a wide array of features, including two motivational fitness games, designed to make your workouts at home more effective and enjoyable—and when you’re not exercising, the unique 790 HR elliptical exerciser can be folded out of the way. tions after reading this manual, please see the front cover of this manual.
ASSEMBLY Assembly requires two persons. Place all parts of the elliptical exerciser in a cleared area and remove the packing materials. Do not dispose of the packing materials until assembly is completed. In addition to the included hex keys, assembly requires a phillips screwdriver , an adjustable wrench , and a rubber mallet . As you assemble the elliptical exerciser, use the drawings below to identify small parts.
1. 1 To make assembly easier, read the information on page 5 before you begin assembling the elliptical exerciser. 82 While another person lifts the Base (1), attach the Front Stabilizer (6) to the Base with two M10 x 82mm Button Screws (82). 119 118 Next, hold the Left Stabilizer Cover (118) and the Right Stabilizer Cover (119) around the Base (1). Attach the Stabilizer Covers with six M4 x 16mm Round Head Screws (101) (only three screws are shown). 2.
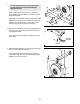
4. Identify the Left Crank Arm (36), which is marked with a “Left” sticker. Hold the Left Crank Arm against the left Crank Hub (38), and align the holes in the Left Crank Arm with the unused holes in the Crank Hub. Next, insert four Hub Screws (87) into the Left Crank Arm, and finger tighten the Hub Screws into the Crank Hub. Tighten one of the Hub Screws, and then tighten the Hub Screw furthest from the first Hub Screw. Then, tighten the remaining two Hub Screws.
6. Orient the Left Upright Cover (17) as shown, and hold it against the Upright (3). Insert the Left Extension Wire (135), which is marked with a tag, through the Left Upright Cover. Attach the Left Upright Cover with two M4 x 16mm Round Head Screws (101). Avoid pinching the Left Extension Wire. 6 Avoid pinching the extension wires during this step 101 3 Repeat this step for the Right Upright Cover (130) and the Right Extension Wire (136). 17 130 135 136 101 7. The Console (5) requires four 1.
. Identify the Left Handlebar (8) and the Left Upper Body Arm (11), which are marked with “Left” stickers. 9 Orient the Left Handlebar (8) and the Left Upper Body Arm (11) as shown. Insert the Left Handlebar into the Left Upper Body Arm. Attach the Left Handlebar with two M8 x 41mm Button Bolts (78) and two M8 Jamnuts (79). Make sure that the Jamnuts are in the hexagonal holes in the Left Upper Body Arm. 9 8 Attach the Right Handlebar (9) to the Right Upper Body Arm (12) in the same way.
11. Route the Left Extension Wire (135) through the Left Rear Handlebar Cover (19), and then connect the Left Extension Wire to the Left Controller Wire (127). Then, route the Right Extension Wire (136) through the Right Rear Handlebar Cover (21), and connect it to the Right Controller Wire (128). 11 21 127 128 136 19 135 12. Note: For clarity, the wires that you connected in step 11 are not shown in the drawing at the right.
14. Apply a small amount of grease to one of the Pedal Leg Axles (32) and to the two Pedal Leg Bushings (33) in the Left Pedal Leg (14). 14 Next, slide a 5mm Spacer (77), an M8 Washer (88), and a Pedal Leg Cover (31) onto an M8 x 23mm Shoulder Screw (115), and tighten the Shoulder Screw a few turns into the Pedal Leg Axle (32).
HOW TO USE THE ELLIPTICAL EXERCISER HOW TO FOLD AND UNFOLD THE ELLIPTICAL EXERCISER When the elliptical exerciser is not in use, the frame can be folded out of the way. First, lift the latch under each pedal leg, and lift the pedal legs off the sleeves on the crank arms. HOW TO MOVE THE ELLIPTICAL EXERCISER To move the elliptical exerciser, first fold it as described at the left.
HOW TO EXERCISE ON THE ELLIPTICAL EXERCISER HOW TO ADJUST THE STRIDE OF THE ELLIPTICAL EXERCISER To mount the elliptical exerciser, hold the handlebars and step onto the pedal that is in the lowest position. Next, step onto the other pedal. Push the pedals until they begin to move with a continuous motion. Note: The pedal discs can turn in either direction.
CONSOLE DIAGRAM FEATURES OF THE CONSOLE The revolutionary console offers an array of features designed to make your workouts more effective and enjoyable. When you use the manual mode of the console, you can change the resistance of the pedals with the touch of a button. While you exercise, the console will display continuous exercise feedback. You can also measure your heart rate using the handgrip pulse sensor or the optional chest pulse sensor.
4 HOW TO USE THE MANUAL MODE The upper left corner of the display will show the elapsed time. Note: When a program is selected, the display will show the time remaining in the program instead of the elapsed time. Note: If there is a sheet of clear plastic on the face of the console, remove the plastic. 1 Follow your progress with the display. Begin pedaling or press any button on the console to turn on the console. A moment after you begin pedaling or press a button, the display will light.
The console has three backlight options. The “On” option keeps the backlight on while the console is on. To conserve the batteries, the “Auto” option keeps the backlight on only while you are pedaling. The “Off” option turns the backlight off. To select a backlight option, first press and hold down the Certified Personal Trainer Programs button for several seconds. Next, press the increase button to select the desired backlight option.
As you exercise, you will be prompted to keep your pedaling pace near the target rpm setting for the current segment. When an upward arrow appears in the display, increase your pace. When a downward arrow appears in the display, decrease your pace. When no arrow appears, maintain your current pace. HOW TO USE A SMART PROGRAM 1 Begin pedaling or press any button on the console to turn on the console. A moment after you begin pedaling or press a button, the display will light. 2 Select a smart program.
4 HOW TO USE A HEART RATE PROGRAM 1 To use a heart rate program, you must hold the handgrip pulse sensor or wear the optional chest pulse sensor (see page 23 for information about the optional chest pulse sensor). Note: If you hold the handgrip pulse sensor and wear the chest pulse sensor at the same time, the console will not display your heart rate accurately. Begin pedaling or press any button on the console to turn on the console. A moment after you turn on the console, the display will light.
As you pedal, the console will regularly compare your heart rate to the target heart rate setting. If your heart rate is too far below or above the target heart rate setting, the resistance of the pedals will automatically increase or decrease to bring your heart rate closer to the target heart rate setting. The program will continue in this way until the last segment ends. To stop the program at any time, stop pedaling. A tone will sound and the time will begin to flash in the display.
A block composed of four or five Complete Row black squares will slowly move downward until it reaches the bottom of the arena. Another block will then move downward. There are blocks of eight different shapes. As each block falls, you can move it to the left or right using the left and right buttons on the left controller. In addition, you can rotate the block counterclockwise or clockwise using the left and right buttons on the right controller.
When the game ends, the display will show your final score and the level of play that you reached. The display will then show the four highest scores recorded since the scores were reset. If desired, press and hold down the right button on either controller to reset the scores. Note: If your score is one of the four highest, the display will prompt you to enter a name consisting of three letters or digits.
Between the drones and the laser blaster are five shields. You can hide the laser blaster below a shield if desired. However, each time a shield is hit by a laser, a piece will be vaporized. HOW TO PLAY THE CALORIE DESTROYER GAME The Calorie Destroyer game is a fast-paced game that pits you against a squadron of laser-firing drones. In addition to the console buttons, you will use the fourbutton game controllers on the handlebar to play the game. Follow the steps below to play the Calorie Destroyer game.
THE OPTIONAL CHEST PULSE SENSOR The optional chest pulse sensor provides hands-free operation and continuously monitors your heart rate during your workouts. To purchase the optional chest pulse sensor, call the telephone number on the front cover of this manual. MAINTENANCE AND TROUBLESHOOTING Inspect and tighten all parts of the elliptical exerciser regularly. Replace any worn parts immediately.
CONDITIONING GUIDELINES During the first few minutes of exercise, your body uses easily accessible carbohydrate calories for energy. Only after the first few minutes of exercise does your body begin to use stored fat calories for energy. If your goal is to burn fat, adjust the intensity of your exercise until your heart rate is near the lowest number in your training zone as you exercise. WARNING: Before beginning this or any exercise program, consult your physician.
SUGGESTED STRETCHES 1 The correct form for several basic stretches is shown at the right. Move slowly as you stretch—never bounce. 1. Toe Touch Stretch Stand with your knees bent slightly and slowly bend forward from your hips. Allow your back and shoulders to relax as you reach down toward your toes as far as possible. Hold for 15 counts, then relax. Repeat 3 times. Stretches: Hamstrings, backs of knees, and back. 2 2. Hamstring Stretch Sit with one leg extended.
NOTES 26
NOTES 27
PART LIST—Model No. PFEVEL5986.0 Key No. Qty. 1 2 3 4 5 6 7 8 9 10 11 12 13 14 15 16 17 18 19 20 21 22 23 24 25 26 27 28 29 30 31 32 33 34 35 36 37 38 39 40 41 42 43 44 45 46 47 48 49 50 1 1 1 1 1 1 1 1 1 2 1 1 1 1 1 1 1 1 1 1 1 1 2 2 2 1 2 1 1 2 4 2 8 1 2 1 2 2 1 1 2 4 2 2 1 1 2 1 1 1 Description Key No. Qty.
Key No. 101 102 103 104 105 106 107 108 109 110 111 112 113 114 115 116 117 118 119 120 Qty. 14 4 23 8 6 2 6 2 2 2 2 8 1 1 4 8 2 1 1 4 Description Key No.
EXPLODED DRAWING A—Model No. PFEVEL5986.
EXPLODED DRAWING B—Model No. PFEVEL5986.
ORDERING REPLACEMENT PARTS To order replacement parts, contact the ICON Health & Fitness, Ltd. office, or write: ICON Health & Fitness, Ltd. Customer Service Department Unit 4, Revie Road Industrial Estate Revie Road Beeston Leeds, LS118JG UK Tel: 08457 089 009 Outside the UK: (44) 113 387 7133 Fax: (44) 113 387 7125 To help us assist you, please be prepared to give the following information: • the MODEL NUMBER of the product (PFEVEL5986.