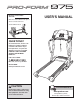
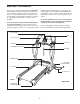
Model No. PFTL91206.0 Serial No. USER'S MANUAL Write the serial number in the space above for future reference. Serial Number Decal QUESTIONS? As a manufacturer, we are committed to providing complete customer satisfaction. If you have questions, or if parts are damaged or missing, PLEASE CONTACT OUR CUSTOMER SERVICE DEPARTMENT DIRECTLY. CALL TOLL-FREE: 1-888-533-1333 Mon.–Fri., 6 a.m.–6 p.m. MST ON THE WEB: www.proformservice.
TABLE OF CONTENTS IMPORTANT PRECAUTIONS . . . . . . . . . . . . . . . . . . . . . . . . . . . . . . . . . . . . . . . . . . . . . . . . . . . . . . . . . . . . . . . . .3 BEFORE YOU BEGIN . . . . . . . . . . . . . . . . . . . . . . . . . . . . . . . . . . . . . . . . . . . . . . . . . . . . . . . . . . . . . . . . . . . . . . .5 ASSEMBLY . . . . . . . . . . . . . . . . . . . . . . . . . . . . . . . . . . . . . . . . . . . . . . . . . . . . . . . . . . . . . . . . . . . . . . . . . . . . . . .
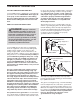
IMPORTANT PRECAUTIONS WARNING: To reduce the risk of burns, fire, electric shock, or injury to persons, read the following important precautions and information before operating the treadmill. 1. It is the responsibility of the owner to ensure that all users of this treadmill are adequately informed of all warnings and precautions. 11. Failure to use a properly functioning surge suppressor could result in damage to the control system of the treadmill.
tenance and adjustment procedures described in this manual. Never remove the motor hood unless instructed to do so by an authorized service representative. Servicing other than the procedures in this manual should be performed by an authorized service representative only. 20. When folding or moving the treadmill, make sure that the storage latch is fully closed. 21. Inspect and properly tighten all parts of the treadmill every three months. 22.
BEFORE YOU BEGIN number and serial number before contacting us. The model number of the treadmill is PFTL91206.0. The serial number can be found on a decal attached to the treadmill (see the front cover of this manual for the location). Thank you for selecting the revolutionary PROFORM® 975 treadmill. The 975 treadmill offers an impressive array of features designed to make your workouts at home more enjoyable and effective.
ASSEMBLY To hire an authorized service technician to assemble the treadmill, call toll-free 1-800-445-2480. Assembly requires two persons. Set the treadmill in a cleared area and remove all packing materials. Do not dispose of the packing materials until assembly is completed. Note: The underside of the treadmill walking belt is coated with high-performance lubricant. During shipping, a small amount of lubricant may be transferred to the top of the walking belt or the shipping carton.
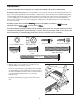
2. Remove the screws and the wood brace from the Uprights (109). Discard the screws and the brace. 2 122 Identify the left handrail, which has a hole in the indicated location, and the right handrail. Hold the right handrail near the right Upright (109), and insert the Wire Harness (83) into the large hole in the right handrail and out of the upper end as shown. Brace Left Handrail 109 Hole Right Handrail 112 Attach the left handrail as described above.
4. With the help of a second person, carefully tip the Uprights (109) down to the position shown. Make sure that the Extension Legs (105) remain in the Uprights. Attach each Extension Leg (105) with two 3/4” Tek Screws (47) and a Round Base Pad (121) as shown. Note: Attach the lower Tek Screw (without the Round Base Pad) first. 4 106 109 108 21 107 21 106 107 Attach a Wheel (108) to each Wheel Housing (106) with a Wheel Bolt (107) and a Wheel Nut (21).
If you purchase the optional chest pulse sensor (see page 18), follow the steps below to install the receiver and the short jumper wire included with the chest pulse sensor. 1. Make sure that the power cord is unplugged. Remove the indicated 3/4” Screw (6) and the Access Door (94) from the back of the Console Back (95). 95 2. Connect the wire on the receiver (A) to the indicated wire extending from the Console Back (95). Next, remove the paper from the adhesive pad on the back of the receiver.
TREADMILL OPERATION THE PRE-LUBRICATED WALKING BELT Your treadmill features a walking belt coated with highperformance lubricant. IMPORTANT: Never apply silicone spray or other substances to the walking belt or the walking platform. Such substances will deteriorate the walking belt and cause excessive wear. HOW TO PLUG IN THE POWER CORD DANGER: Improper connection of the equipment-grounding conductor can result in an increased risk of electric shock.
Clip Key FEATURES OF THE CONSOLE Two heart rate programs are also offered. Each program automatically adjusts the speed and incline of the treadmill to keep your heart rate near a target heart rate while you exercise. The treadmill console offers an impressive array of features designed to make your workouts more effective and enjoyable. To use the manual mode of the console, follow the steps beginning on page 12. To use a preset program, see page 14. To use a heart rate program, see page 16.
If the Start button or the speed + button is pressed, the walking belt will begin to move at 1 mph. As you exercise, change the speed of the walking belt as desired by pressing the speed + and – buttons. Each time a button is pressed, the speed setting will change by 0.1 mph; if a button is held down, the speed setting will change in increments of 0.5 mph. Note: After the buttons are pressed, it may take a moment for the walking belt to reach the selected speed setting.
Speed display—This display shows the speed of the walking belt. 6 Measure your heart rate if desired. Note: If you use the handgrip pulse sensor and the optional chest pulse sensor at the same time, the console will not display your heart rate accurately. Before using the handgrip pulse sensor, first remove the sheets of clear plastic from the metal contacts on the pulse bar. In addition, make Contacts sure that your hands are clean.
the next four segments are shown in the columns to the right. HOW TO USE A PRESET PROGRAM 1 When only three seconds remain in the first segment of the program, both the Current Segment column and the column to the right will flash and a series of tones will sound. If the speed and/or incline of the treadmill is about to change, the Speed display and/or the Distance/Incline display will flash to alert you. When the first segment ends, all speed settings will move one column to the left.
4 Monitor your progress with the displays. 7 When you are finished exercising, remove the key from the console. See step 5 on pages 12 and 13. 5 When the program ends, make sure that the incline of the treadmill is at the lowest setting. Next, remove the key from the console and put it in a secure place. Note: If the displays and various indicators on the console remain lit after the key is removed, the console is in the “demo” mode. See page 18 and turn off the demo mode.
Calories/Pulse display. If desired, press the increase and decrease buttons beside the Enter button to change the maximum target heart rate setting (see EXERCISE INTENSITY on page 23). Then, press the Enter button. Note: If the maximum target heart rate setting is changed, the intensity level of the entire program will change. HOW TO USE A HEART RATE PROGRAM CAUTION: If you have heart problems, or if you are over 60 years of age and have been inactive, do not use the heart rate programs.
During both heart rate programs, the console will regularly compare your heart rate to the target heart rate setting for the current segment. If your heart rate is too far below or above the target heart rate setting, the speed of the walking belt will automatically increase or decrease to bring your heart rate closer to the target heart rate setting. To stop the program at any time, press the Stop button. To restart the program, press the Start button or the speed + button.
THE INFORMATION MODE/DEMO MODE IMPORTANT: The Calories/Pulse display should be blank. If a “d” appears in the display, the console is in the “demo” mode. This mode is intended to be used only when a treadmill is displayed in a store. When the console is in the demo mode, the power cord can be plugged in, the key can be removed from the console, and the displays and indicators on the console will automatically light in a preset sequence. The buttons on the console will not operate.
HOW TO FOLD AND MOVE THE TREADMILL HOW TO FOLD THE TREADMILL FOR STORAGE Before folding the treadmill, adjust the incline to the lowest position; if you do not do this, you may permanently damage the treadmill. Next, unplug the power cord. CAUTION: You must be able to safely lift 45 pounds (20 kg) to raise, lower, or move the treadmill. 1. Hold the treadmill in the locations shown at the right. To decrease the possibility of injury, bend your legs and keep your back straight.
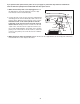
HOW TO LOWER THE TREADMILL FOR USE 1. Hold the treadmill frame firmly with your left hand. Pull the latch knob to the right. Pivot the frame down until the pin on the latch knob is below the handgrip. Then, slowly release the latch knob. Pin Handgrip Latch Knob Frame 2. Hold the frame firmly with both hands, and lower it to the floor. To decrease the possibility of injury, bend your legs and keep your back straight.
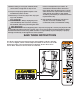
TROUBLESHOOTING Most treadmill problems can be solved by following the steps below. Find the symptom that applies, and follow the steps listed. If further assistance is needed, please see the front cover of this manual. PROBLEM: The power does not turn on SOLUTION: a. Make sure that the power cord is plugged into a surge suppressor, and that the surge suppressor is plugged into a properly grounded outlet (see page 10).
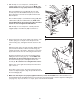
Locate the Reed Switch (24) and the Magnet (18) on the left side of the Pulley (120). Turn the Pulley until the Magnet is aligned with the Reed Switch. Make sure that the gap between the Magnet and the Reed Switch is about 1/8”. If necessary, loosen the Screw (43), move the Reed Switch slightly, and then retighten the Screw. Then, reattach the hood (not shown), making sure that each screw is in the hole from which it was removed. Run on the treadmill for a few minutes to check for a correct speed reading.
EXERCISE GUIDELINES WARNING: Before beginning this or any exercise program, consult your physician. This is especially important for individuals over the age of 35 or individuals with preexisting health problems. The pulse sensor is not a medical device. Various factors, including the user's movement, may affect the accuracy of heart rate readings. The pulse sensor is intended only as an exercise aid in determining heart rate trends in general.
SUGGESTED STRETCHES The correct form for several basic stretches is shown at the right. Move slowly as you stretch—never bounce. 1. Toe Touch Stretch Stand with your knees bent slightly and slowly bend forward from your hips. Allow your back and shoulders to relax as you reach down toward your toes as far as possible. Hold for 15 counts, then relax. Repeat 3 times. Stretches: Hamstrings, back of knees and back. 1 2. Hamstring Stretch Sit with one leg extended.
NOTES 25
PART LIST—Model No. PFTL91206.0 R0906A To locate the parts listed below, see the EXPLODED DRAWING on pages 28 to 31. Key No. Qty. 1 2 3 4 5 6 7 8 9 10 11 12 13 14 15 16 17 18 19 20 21 22 23 24 25 26 27 28 29 30 31 32 33 34 35 36 37 38 39 40 41 42 43 44 45 46 47 48 49 50 2 1 1 2 4 40 1 4 1 1 2 1 1 1 2 2 2 1 2 1 8 1 1 1 2 1 2 3 1 1 1 2 2 1 2 9 1 1 1 1 1 2 14 4 1 1 20 1 1 1 Description Key No. Qty.
Key No. Qty. 101 102 103 104 105 106 107 108 109 110 111 112 113 114 115 116 117 118 119 120 2 1 1 1 2 2 2 2 1 1 1 2 1 1 1 1 1 1 1 1 Description Lift Frame Bolt Hairpin Cotter Incline Motor Bolt, Lower Hood Decal Plate Extension Leg Wheel Housing Wheel Bolt Wheel Upright Pulse Bar Incline Motor Bolt, Upper 4” Bolt Left Endcap Insert Reset/Off Circuit Breaker 5/32” Hex Key Right Handgrip Top Motor Bracket Photo Switch Nut Front Roller Adj. Bolt Front Roller/Pulley Key No. Qty.
60 43 42 61 64 43 59 58 56 55 74 11 115 60 113 10 42 61 80 12 62 75 47 6 43 56 69 58 43 25 126 57 81 84 90 93 6 5 15 36 127 4 3 55 11 54 53 65 52 16 17 86 69 93 18 1 81 120 84 25 90 6 1 47 16 2 5 65 4 65 15 17 51 EXPLODED DRAWING A—Model No. PFTL91206.
EXPLODED DRAWING B—Model No. PFTL91206.
EXPLODED DRAWING C—Model No. PFTL91206.
EXPLODED DRAWING D—Model No. PFTL91206.
ORDERING REPLACEMENT PARTS To order replacement parts, please see the front cover of this manual. To help us assist you, be prepared to provide the following information: • the MODEL NUMBER of the product (PFTL91206.0) • the NAME of the product (PROFORM 975 treadmill) • the SERIAL NUMBER of the product (see the front cover of this manual) • the KEY NUMBER and DESCRIPTION of the part(s) (see the PART LIST and EXPLODED DRAWING on pages 26 to 31) LIMITED WARRANTY ICON Health & Fitness, Inc.