Model No. PFTL71730 Serial No. USER'S MANUAL Write the serial number in the space above for future reference. Serial Number Decal QUESTIONS? If you have questions, or if there are missing parts, we will guarantee complete satisfaction through direct assistance from our factory. TO AVOID DELAYS, PLEASE CALL DIRECT TO OUR TOLLFREE CUSTOMER HOT LINE. The trained technicians on our Customer Hot Line will provide immediate assistance, free of charge to you. CUSTOMER HOT LINE: 1-800-999-3756 Mon.–Fri., 6 a.m.
TABLE OF CONTENTS IMPORTANT PRECAUTIONS . . . . . . . . . . . . . . . . . . . . . . . . . . . . . . . . . . . . . . . . . . . . . . . . . . . . . . . . . . . . . . . . .3 BEFORE YOU BEGIN . . . . . . . . . . . . . . . . . . . . . . . . . . . . . . . . . . . . . . . . . . . . . . . . . . . . . . . . . . . . . . . . . . . . . . .5 ASSEMBLY . . . . . . . . . . . . . . . . . . . . . . . . . . . . . . . . . . . . . . . . . . . . . . . . . . . . . . . . . . . . . . . . . . . . . . . . . . . . . . .
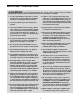
IMPORTANT PRECAUTIONS WARNING: To reduce the risk of burns, fire, electric shock, or injury to persons, read the following important precautions and information before operating the treadmill. 1. It is the responsibility of the owner to ensure that all users of this treadmill are adequately informed of all warnings and precautions. 11. Failure to use a properly functioning surge suppressor could result in damage to the control system of the treadmill.
20. When using iFIT.com CDs and videos, an electronic “chirping” sound will alert you when the speed and/or incline of the treadmill is about to change. Always listen for the “chirp” and be prepared for speed and/or incline changes. In some instances, the speed and/or incline may change before the personal trainer describes the change. 23. Inspect and properly tighten all parts of the treadmill every three months. 24. Never drop or insert any object into any opening. 25.
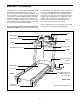
BEFORE YOU BEGIN Congratulations for purchasing the PROFORM® C970 treadmill. The C970 treadmill offers an impressive array of features to help you achieve your fitness goals in the convenience of your home. From the advanced console to the cushioned walking platform, the C970 treadmill is designed to make each workout more effective and enjoyable. And when you’re not exercising, the treadmill can be folded away, taking less than half the floor space of conventional treadmills.
ASSEMBLY Assembly requires two persons. Place the treadmill in a cleared area and remove all packing materials. Do not dispose of the packing materials until the treadmill is assembled. Note: The underside of the treadmill walking belt is coated with high-performance lubricant. During shipping, a small amount of lubricant may be transferred to the top of the walking belt, the sides of the walking platform, or the shipping carton. This does not affect treadmill performance.
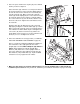
3. Note: The parts shown in this step may be preassembled but may need to be adjusted. 3 Raise the Frame (55) and have a second person hold it in the position shown. Insert the Left Frame Guide (68) into the left side of the Frame. Remove the Latch Knob (67) from the Latch Pin (72). Make sure that the Latch Pin Collar (70) and the Spring (69) are on the Latch Pin. Insert the Latch Pin into the Frame and the Left Frame Guide. Press the Latch Insert (5) onto the Frame, with the Latch Pin in the center hole.
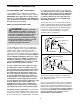
If you purchase the optional chest pulse sensor (see page 22), follow the steps below to install the receiver and the short jumper wire included with the chest pulse sensor. 1. Make sure that the power cord is unplugged. Remove the indicated 3/4” Screws (40) from the Console Back (117). Remove the Console Back. 1 117 40 40 2. Connect the short jumper wire (A) to the wire on the receiver (B). Connect the other end of the short jumper wire to the PULSE jack on the back of the Console (80).
TREADMILL OPERATION THE PERFORMANT LUBETM WALKING BELT an equipment-grounding conductor and a grounding plug. Plug the power cord into a surge suppressor, and plug the surge suppressor into an appropriate outlet that is properly installed and grounded in accordance with all local codes and ordinances. Important: The treadmill is not compatible with GFCI-equipped outlets. Your treadmill features a walking belt coated with PERFORMANT LUBETM, a high-performance lubricant.
Note: If there is a thin sheet of clear plastic on the console, remove it. Key FEATURES OF THE CONSOLE The treadmill console offers an impressive array of features designed to make your workouts more effective. When the manual mode of the console is selected, the speed and incline of the treadmill can be changed with the touch of a button. As you exercise, the console will display instant exercise feedback.
Each time a button is pressed, the speed setting will change by 0.1 mph; if a button is held down, the speed setting will change in increments of 0.5 mph. To change the speed setting quickly, press one of the twelve Quick Speed buttons. Note: The console can display speed and distance in either miles or kilometers. For simplicity, all instructions in this section refer to miles. HOW TO TURN ON THE POWER 1 Plug in the power cord (see page 9). 2 Locate the reset/off circuit breaker near the power cord.
Pulse/Calories/Fat Calories display—This display shows the approximate numbers of calories and fat calories you have burned (see FAT BURNING on page 27). The display will change from one number to the other every few seconds. The display will also show your heart rate when you use the handgrip pulse sensor (see step 6 at the right) or the optional chest pulse sensor (see page 22). 6 Measure your heart rate if desired.
The speed setting for Current Segment the first segment is shown in the flashing Current Segment column of the LED matrix. (The incline settings are not shown in the matrix.) The speed settings for the next seven segments are shown in the columns to the right. HOW TO USE PERSONAL TRAINER PROGRAMS 1 Insert the key fully into the console. See HOW TO TURN ON THE POWER on page 11. 2 Select one of the personal trainer programs. When the key is inserted, the manual mode will be selected.
To stop the program temporarily, press the Stop button. The Time/Pace display will begin to flash. To restart the program, press the Start button or the Speed + button. After a moment, the walking belt will begin to move at 1 mph. When the next segment of the program begins, the treadmill will automatically adjust to the speed and incline settings for the next segment. 4 7 When you are finished exercising, remove the key from the console.
speed setting for the first segment is shown in the flashing Current Segment column of the LED matrix. (The incline settings are not shown in the matrix.) To program a speed setting and an incline setting for the first segment, simply adjust the speed and incline of the treadmill as desired by pressing the Speed and Incline buttons. Every few times a Speed button is pressed, an additional indicator will light or darken in the Current Segment column.
The speed settings for the next seven segments are shown in the columns to the right. HOW TO USE CUSTOM PROGRAMS 1 When only three seconds remain in the first segment of the program, both the Current Segment column and the column to the right will flash, a series of tones will sound, and the Speed display and/or the Distance/Incline/Laps display will flash. When the first segment ends, all speed settings will move one column to the left.
HOW TO CONNECT YOUR PORTABLE STEREO HOW TO CONNECT THE TREADMILL TO YOUR CD PLAYER, VCR, OR COMPUTER Note: If your stereo has an RCA-type AUDIO OUT jack, see instruction A below. If your stereo has a 3.5mm LINE OUT jack, see instruction B. If your stereo has only a PHONES jack, see instruction C. To use iFIT.com CDs, the treadmill must be connected to your portable CD player, portable stereo, home stereo, or computer with CD player. See pages 17 and 18 for connecting instructions. To use iFIT.
HOW TO CONNECT YOUR HOME STEREO HOW TO CONNECT YOUR COMPUTER Note: If your stereo has an unused LINE OUT jack, see instruction A below. If the LINE OUT jack is being used, see instruction B. Note: If your computer has a 3.5mm LINE OUT jack, see instruction A. If your computer has only a PHONES jack, see instruction B. A. Plug one end of the audio cable into the jack on the front of the treadmill near the power cord. Plug the other end of the cable into the included adapter.
HOW TO CONNECT YOUR VCR HOW TO USE IFIT.COM CD AND VIDEO PROGRAMS Note: If your VCR has an unused AUDIO OUT jack, see instruction A below. If the AUDIO OUT jack is being used, see instruction B. If you have a TV with a built-in VCR, see instruction B. If your VCR is connected to your home stereo, see HOW TO CONNECT YOUR HOME STEREO on page 18. To use iFIT.com CDs or videocassettes, the treadmill must be connected to your portable CD player, portable stereo, home stereo, computer with CD player, or VCR.
If the speed or incline settings are too high or too low, you can manually override the settings by pressing the Speed or Incline buttons on the console. However, when the next “chirp” is heard, the speed and/or incline will change to the next settings of the CD or video program. • Make sure that the audio cable is properly connected, that it is fully plugged in, and that it is not wrapped around a power cord.
7 HOW TO USE PROGRAMS DIRECTLY FROM OUR WEB SITE When the on-screen countdown ends, the program will begin and the walking belt will begin to move. Hold the handrails, step onto the walking belt, and begin walking. During the program, an electronic “chirping” sound will alert you when the speed and/or incline of the treadmill is about to change. CAUTION: Always listen for the “chirp” and be prepared for speed and/or incline changes. Our Web site at www.iFIT.
THE INFORMATION MODE/DEMO MODE HOW TO ADJUST THE FIRMNESS OF THE CUSHIONING SYSTEM The console features an information mode that keeps track of the total number of hours that the treadmill has been used and the total number of miles that the walking belt has moved. The information mode also allows you to switch the console from miles per hour to kilometers per hour. In addition, the information mode allows you to turn on and turn off the demo mode.
HOW TO FOLD AND MOVE THE TREADMILL HOW TO FOLD THE TREADMILL FOR STORAGE Before folding the treadmill, adjust the incline to the lowest position. If this is not done, the treadmill may be permanently damaged. Next, unplug the power cord. CAUTION: You must be able to safely lift 45 pounds (20 kg) to raise, lower, or move the treadmill. 1. Hold the treadmill in the locations shown at the right. To decrease the possibility of injury, bend your legs and keep your back straight.
HOW TO LOWER THE TREADMILL FOR USE 1. Hold the treadmill firmly with your left hand. Pull the latch knob to the right. Pivot the treadmill down until the pin on the latch knob is below the foam grip. Slowly release the latch knob. Pin Latch Knob Foam Grip 2. Hold the treadmill firmly with both hands, and lower the treadmill to the floor. To decrease the possibility of injury, bend your legs and keep your back straight.
TROUBLESHOOTING Most treadmill problems can be solved by following the instructions below. If further assistance is needed, please call our Customer Service Department toll-free at 1-800-999-3756, Monday through Friday, 6 a.m. until 6 p.m. Mountain Time (excluding holidays). PROBLEM: The power does not turn on SOLUTION: a. Make sure that the power cord is plugged into a surge suppressor, and that the surge suppressor is plugged into a properly grounded outlet (see page 9).
PROBLEM: The walking belt is off-center or slips when walked on SOLUTION: a. If the walking belt is off-center, first remove the key and UNPLUG THE POWER CORD. If the walking belt has shifted to the left, use the allen wrench to turn the left rear roller bolt clockwise 1/2 of a turn; if the walking belt has shifted to the right, turn the bolt counterclockwise 1/2 of a turn. Be careful not to overtighten the walking belt. Plug in the power cord, insert the key and run the treadmill for a few minutes.
EXERCISE GUIDELINES WARNING: Before beginning this or any exercise program, consult your physician. This is especially important for individuals over the age of 35 or individuals with preexisting health problems. The pulse sensor is not a medical device. Various factors, including the user's movement, may affect the accuracy of heart rate readings. The pulse sensor is intended only as an exercise aid in determining heart rate trends in general.
SUGGESTED STRETCHES The correct form for several basic stretches is shown at the right. Move slowly as you stretch—never bounce. 1. Toe Touch Stretch Stand with your knees bent slightly and slowly bend forward from your hips. Allow your back and shoulders to relax as you reach down toward your toes as far as possible. Hold for 15 counts, then relax. Repeat 3 times. Stretches: Hamstrings, back of knees, and back. 1 2. Hamstring Stretch Sit with one leg extended.
NOTES 29
PART LIST—Model No. PFTL71730 R0703A To locate the parts listed below, see the EXPLODED DRAWING attached in the center of this manual. Key No. Qty. 1 2 3 4 5 6 7 8 9 10 11 12 13 14 15 16 17 18 19 20 21 22 23 24 25 26 27 28 29 30 31 32 33 34 35 36 37 38 39 40 41 42 43 44 45 46 47 48 49 50 51 52 53 54 55 56 1 4 1 4 1 1 4 1 2 2 1 1 7 2 2 1 1 1 2 1 1 1 2 1 1 3 2 1 2 1 1 2 4 1 1 2 1 1 1 12 1 2 20 44 1 1 1 1 1 1 2 7 2 1 1 1 Description Key No. Qty.
Key No. Qty. 113 114 115 116 117 118* 119 120 121 122 123 124 125 126 127 128 2 1 1 1 1 1 1 1 2 1 1 1 2 2 1 1 Description Static Decal Book Plate Idler Pulley Bolt Right Foam Grip Console Base Latch Assembly Right Fan Cover Left Fan Cover Motor Bushing Idler Arm Nylon Washer Hand Pulse Wire Incline Bracket Incline Motor Nut Hood Mounting Screw Motor Isolator Plate Left Cup Holder Key No. Qty.
53 52 72 40 54 118* 71 133 131 69 70 92 67 74* 2 52 43 47 55 57 44 56 52 5 44 53 68 90 81 40 44 10 30 19 134 132 8 48 2 58 50 1 44 7 52 43 6 42 4 94 33 92 40 133 44 28 57 43 45 44 81 9 7 40 12 7 115 2 99 11 131 44 19 13 27 17 2 84 22 132 44 33 7 15 14 79 122 13 64 44 109 63 134 110 73 59* 42 40 46 84 44 16 18 35 84 4 43 94 9 41 127 24 29 13 31 40 126 15 125 32 14 21 52 29 121 32 34* 113 60
23 43 20 ll P R 43 98 UP UCT LI T. GR O rk Ni eb er ga OD Ki 135 98 62 75 23 88 43 125 36 65 76 87 91 40 124 98 66 31 40 112 105 129 75 51 129 13 26 104 77 78 66 98 43 26 129 98 43 85 13 123 101 123 116 129 61 85 76 66 44 13 88 40 36 43 108 40 98 104 13 101 120 51 40 87 129 86 80 44 77 40 78 106 40 44 49 40 113 40 40 93 82 107 117 128 40 40 119 40 93 97 96 83 95 43 114 130 EXPLODED DRAWING—Model No.
ORDERING REPLACEMENT PARTS To order replacement parts, call our Customer Service Department toll-free at 1-800-999-3756, Monday through Friday, 6 a.m. until 6 p.m. Mountain Time (excluding holidays).