Model No. PFEL45010 Serial No. USER'S MANUAL S Number /_// Deca, QUESTIONS? If you have questions, or if there are missing parts, we will guarantee complete satisfaction through direct assistance from our factory. TO AVOID UNNECESSARY DELAYS, PLEASE CALL DIRECT TO OUR TOLL-FREE CUSTOMER HOT LINE. The trained technicians on our customer hot line will provide immediate assistance, free of charge to you. CUSTOMER HOT LINE: 1-800-999-3756 Mon.-Fri., 6 a.m.-6 p.m.
r©ss r TABLE OF CONTENTS IMPORTANT PRECAUTIONS ............................................................. BEFORE YOU BEGIN ................................................................... ASSEMBLY ........................................................................... HOW TO USE THE ELLIPTICAL CROSSTRAINER ............................................. MAINTENANCE AND TROUBLESHOOTING ................................................. CONDITIONING GUIDELINES ........................................
IM PORTANT PRECAUTIONS WARN ING: '_ To reduce the risk of serious injury, read the following important precau- tions before using the elliptical crosstrainer. 1. Read all instructions in this manual before using the elliptical crosstrainer, . It is the responsibility of the owner to ensure that all users of the elliptical crosstrainer are adequately informed of aJl precautions. 3. Place the elliptical crosstrainer on a level surface, with a mat beneath it to protect the floor or carpet.
BEFORE YOU BEGIN Congratulations for selecting the new PROFORM '_ 900 CARDIO CROSSTRAINER. The PROFORM ®900 is an incredibly smooth exerciser that moves your feet in a natural elliptical path, minimizing the impact on your knees and ankles. And the unique PROFORM '_ 900 features adjustable resistance and a state-of-theart console to help you get the most from your exercise.
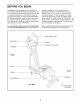
ASSEMBLY Assembly requires two persons. Place all parts of the elliptical crosstrainer in a cleared area and remove the packing materials. Do not dispose of the packing materials until assembly is completed. In addition to the included allen wrenches, assembly requires a phillips screwdriver __, an adjustable wrench __ , and a rubber mallet ¢................. I_ I ° 1= ) As you assemble the elliptical crosstrainer, use the drawings below to identify the small parts used in assembly.
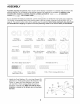
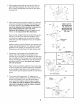
2. Whileanotherpersonliftsthebackofthe Frame(1), attachtheRearStabilizer(9)totheFramewithtwo M10x 75mmCarriageBolts(34)andtwoM1ONylon Locknuts(33). 33 9 3. WhileanotherpersonholdstheUpright(2) inthe positionshown,connectthe Extension WireHarness(44) to theWireHarness(79).Carefullypull the upper end of the Extension Wire Harness to remove any slack. While holding the upper end of the Extension Wire Harness, insert the Upright into the Frame (1). Do not pinch the Wire Harnesses.
6. While another person holds the Console (23) in the position shown, connect the wire harness on the Console to the Extension Wire Harness (44). Insert the excess wire harness into the Upright Extension (73). Attach the Console (23) to the Upright Extension (73) with three M10 x 27mm Button Screws (67) and three M10 Split Washers (59). Be careful to avoid pinching the wire harnesses. Wi_ Harness 44 67 7. Identify the Left Handlebar (6), which is marked with a sticker.
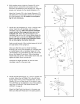
9. Apply a small amount of grease to the axle on the left Disc Crossbar (16). Slide a Spring Spacer (63) and the Left Rear Spring Bracket (12) on the left Pedal Spring (11) onto the axle. Next, slide a Spring Bracket Washer (35) onto an M10 x 27mm Patch Screw (40), and tighten the Patch Screw into the axle. Next, hold the lower end of the Handlebar Leg (5) inside of the Front Spring Bracket (76) on the left Pedal Spring (11). Apply grease to an M10 Bolt Set (74).
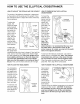
HOW TO USE THE ELLIPTICAL CROSSTRAINER HOW TO ADJUST THE PEDALS AND THE UPRIGHT The motion of the elliptical crosstrainer is determined by the positions of the pedals and the upright. Follow the instructions below to adjust the motion of the elliptical crosstrainer. To adjust the pedals, first loosen the pedal knobs beneath the pedals. Slide the pedals forward or backward to one of the five positions, and then retighten the knobs. Make sure that both pedals are in the same position.
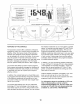
A .= B K lr press /' (_smart PROORaMS 1 select //' /-_ ON_ PR( ........... 3 begin exe_ AWARNL [/ ,i F/ / risk of serious injury, read and understand thi _ user*s manual, i I _can all instrucdon4 before using Keep children HEART RATE CO, COACH ] RESISTANCE & PACE PROGRAMS , and warnings t tis equipment. away.
CONSOLE DESCRIPTION currently shown. Note: When the distance is shown, the word Miles or the letters Kms will appear; when your speed is shown, the letters MPH or Km/H will appear. Refer to the drawing on page 10. Note: If there is a thin sheet of clear plastic on the face of the console, remove it. Pace bar graphs--When the manual mode is selected, only the left bar graph will appear. This bar graph represents your exercise pace.
changes, the console will show the resistance level for six seconds. In addition, when a Smart program or a Heart Rate program is selected, the display will show the time remaining in the program instead of the elapsed time. HOW TO USE THE MANUAL MODE n Turn on the console. Note: The console requires four "D" batteries (not included). If you have not installed batteries, refer to step 5 on page 6 and install batteries.
The pace settings for the pro- HOW TO USE A SMART PROGRAM B gram will be I_ shown by the s%,_ right bar graph in the display. (The Increase Arrow .......... left bar graph will show your actual exercise pace.) As the right bar graph changes during the program, simply increase or decrease your pace so that the same number of bars appear on both bar graphs.
'El Hold the handgrip HOW TO USE A HEART RATE PROGRAM When using a Heart Rate program, you must use the handgrip pulse sensor (refer to step 5 on page 12) or the optional chest pulse sensor (refer to page 19). If you use the handgrip pulse sensor, it is not necessary to hold the handgrips continuously during the program. However, you should hold the handgrips frequently for the program to operate properly. Each time you hold the handgrips, keep your hands on the metal contacts for at least 30 seconds.
right bar graph changes, increase or decrease your pace so that the same number of bars appear on both bar graphs. If your pace is slower than the current pace setting, the increase arrow will appear in the display; if your pace is faster than the pace setting, the decrease arrow will appear. Important: The pace settings for the program are intended only to provide a goal. Your actual pace may be slower than the pace settings, especially during the first few months of your exercise program.
HOW TO CONNECT YOUR PORTABLE STEREO HOW TO CONNECT YOUR HOME STEREO Note: If your stereo has an RCA-type AUDIO OUT jack, see instruction A below. If your stereo has a 1/8" LINE OUT jack, see instruction B. If your stereo has only a PHONES jack, see instruction C. Note: If your stereo has an unused LINE OUT jack, see instruction A below. If the LINE OUT jack is being used, see instruction B. A.
HOW TO CONNECT YOUR COMPUTER HOW TO CONNECT YOUR VCR Note: If your computer has a 1/8" LINE OUT jack, see instruction A. If your computer has only a PHONES jack, see instruction B. Note: If your VCR has an unused AUDIO OUT jack, see instruction A below. If the AUDIO OUT jack is being used, see instruction B. If you have a TV with a built-in VCR, see instruction B. If your VCR is connected to your home stereo, see HOW TO CONNECT YOUR HOME STEREO on page 16. A.
HOW TO USE IFIT,COM CD AND VIDEO PROGRAMS B A moment after the play button is pressed, your personal trainer will begin guiding you through your workout. Simply follow your personal trainer's instructions. To use iFIT.com CDs or videocassettes, the elliptical crosstrainer must be connected to your portable CD player, portable stereo, home stereo, computer with CD player, or VCR. See HOW TO CONNECT YOUR CD PLAYER, VCR, OR COMPUTER on page 15. Note: For information about the availability of iFIT.
HOW TO USE PROGRAMS DIRECTLY FROM OUR WEB SITE Our Web site at www.iFIT.com allows you to play iFIT.com audio and video programs directly from the internet. To use programs from our Web site, the elliptical crosstrainer must be connected to your home computer. See HOW TO CONNECT YOUR COMPUTER on page 17. tn addition, you must have an internet connection and an internet service provider. A list of specific system requirements will be found on our Web site.
MAINTENANCE AND TROUBLESHOOTING Inspect and tighten all parts of the elliptical crosstrainer regularly. Replace any worn parts immediately. Next, remove the four Screws (51) from the right Pedal Disc (15), and slide the Pedal Disc off. Remove all Screws (52, 64) from the Right Side Shield (4) and the two Screws (77) from beneath the Pedal Disc, and remove the Right Side Shield (4). Remove all Screws (52) from the Left Side Shield (3) and remove the Left Side Shield.
CONDITIONING GUIDELINES uses easily accessible carbohydrate calories for energy. Only after the first few minutes of exercise does your body begin to use stored fat calories for energy. If your goal is to burn fat, adjust the intensity of your exercise until your heart rate is near the lowest number in your training zone as you exercise. i" Before beginning this or any exercise program, consult your physician.
PART LISTmModel Key No. Qty. 1 1 2 3 4 5 6 7 No. PFEL45010 Description R1201A Key No. Qty.
EXPLODED DRAWINGmModel No. PFEL45010 R1201A 23 59 67< 77 _'i,67 4 I 77 64 47 49 49 /' / / 14 66 81 40_ 35 1 70 34 } 331 21 15 66 2O 13 36 66 37 40 3 37 \ 23
HOW TO ORDER REPLACEMENT PARTS To order replacement parts, simply call our Customer Service Department toll-free at 1-800-999-3756, Monday through Friday, 6 a.m. until 6 p.m. Mountain Time (excluding holidays).