Model No. 30511.0 Serial No. Write the serial number in the space above for future reference. ELLIPTICAL TRAINER EXERCISER User’s Manual Serial Number Decal (Under Seat) QUESTIONS? As a manufacturer, we are committed to providing complete customer satisfaction. If you have questions, or if there are missing parts, please call: 1-888-936-4266 Mon.–Fri. 8h00 until 17h00 EST (excluding holidays). CAUTION Read all precautions and instructions in this manual before using this equipment.
TABLE OF CONTENTS WARNING DECAL PLACEMENT . . . . . . . . . . . . . . . . . . . . . . . . . . . . . . . . . . . . . . . . . . . . . . . . . . . . . . . . . . . . . .2 IMPORTANT PRECAUTIONS . . . . . . . . . . . . . . . . . . . . . . . . . . . . . . . . . . . . . . . . . . . . . . . . . . . . . . . . . . . . . . . . 3 BEFORE YOU BEGIN . . . . . . . . . . . . . . . . . . . . . . . . . . . . . . . . . . . . . . . . . . . . . . . . . . . . . . . . . . . . . . . . . . . . . . 4 ASSEMBLY . . . . . . . . . . . . .
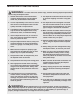
IMPORTANT PRECAUTIONS WARNING: To reduce the risk of serious injury, read the following important precautions before using the elliptical trainer. 1. Read all instructions in this manual before using the elliptical trainer. Use the elliptical trainer only as described in this manual. 11. The elliptical crosstrainer should not be used by persons weighing more than 115 kg (250 lbs.). 2.
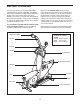
BEFORE YOU BEGIN Department at 1-888-936-4266, Monday through Friday, 8h00 until 18h30 Eastern Time (excluding holidays). To help us assist you, please note the product model number and serial number before calling. To help us assist you, please note the product model number and serial number before calling. The model number is 30511.0. The serial number can be found on a decal attached to the elliptical trainer (see the front cover of this manual).
ASSEMBLY • As you assemble the elliptical trainer, make sure all parts are oriented as shown in the drawings. Make Things Easier for Yourself Everything in this manual is designed to ensure that the elliptical trainer can be assembled successfully by anyone. However, it is important to realize that the versatile elliptical trainer has many parts and that the assembly process will take time. Most people find that by setting aside plenty of time, assembly will go smoothly.
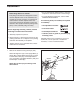
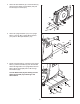
2. Attach the Seat Stabilizer (9) to the Seat Base (2) with two M10 x 78mm Carriage Bolts (149) and two M10 Nylon Locknuts (81). 2 81 2 9 149 3. Attach the Upright Stabilizer (10) to the Upright Base (1) with two M10 x 78mm Button Screws (101) and two M10 Split Washers (114). 81 3 101 114 114 10 1 4. Identify the Right Rail (6). Carefully tip the Upright Base (1) and the Seat Base (2) onto the left side.
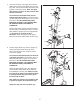
5. Insert the connector of the Upper Wire Harness (188) into the socket of the Middle Wire Harness (37). Next, connect the two Wire Harnesses (159) together in the same manner. Note: The Upper Wire Harness connector is wider than the Wire Harness connectors. 5 Pull 188 159 The connectors should slide easily into the sockets and snap into place. If a connector does not slide easily and snap into place, turn it over and then insert it.
7. Attach the Backrest (22) to the Upright (3) and the Upright Base (1) with four M6 x 16mm Screws (130). 7 130 22 3 130 1 8. Connect the Sensor Wire Harness (187), the Wire Harness (159), and the Upper Wire Harness (188) to the Console (71). Push the excess wire into the Upright (3). 8 85 188 The connector should slide easily into the socket and snap into place. If a connector does not slide easily and snap into place, turn it over and then insert it.
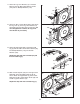
11. Attach the Leg Lever Bracket (14) to the Seat Base (2) with two M8 x 40mm Button Screws (142) and two M8 Split Washers (140). 11 142 140 140 2 14 12. Grease an M10 x 75mm Button Bolt (129). Attach the Leg Lever (4) to the Leg Lever Bracket (14) with the Bolt and an M10 Nylon Locknut (81). Do not overtighten the Locknut; the Leg Lever must be able to pivot easily. 12 14 129 4 13.
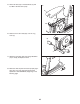
15. Attach the Seat (23) to the Seat Base (2) with four M6 x 16mm Screws (130). 15 23 130 2 130 16. Slide the two Foam Pads (64) onto the Leg Lever (4). 130 16 64 64 4 17. Adjust the Feet (48) under the Upright Stabilizer (10) to steady the elliptical trainer. 17 10 18. Make sure that all parts have been properly tightened. The use of the remaining parts will be explained in ADJUSTMENTS, beginning on the following page.
ADJUSTMENTS This section explains how to adjust the elliptical trainer. See the EXERCISE GUIDELINES on page 25 for important information about how to get the most benefit from your exercise program. Also, refer to the accompanying exercise guide to see the correct form for each exercise. Make sure that all parts are properly tightened each time the elliptical trainer is used. Replace any worn parts immediately. The elliptical trainer can be cleaned with a damp cloth and a mild, non-abrasive detergent.
ATTACHING THE LEG LEVER To use the Leg Lever (4), first attach the low pulley station (see ATTACHING THE LOW PULLEY STATION on page 11). Then, attach the Long Cable (164) to the Leg Lever (4) with a Cable Clip (157). Always attach both Long Cables to the Leg Lever before using the Leg Lever. Note: The elliptical trainer must be in the collapsed position while the leg lever is used. 4 164 157 EXTENDING THE SEAT BASE 7 To use the Pedal Legs (7, 8), turn the Base Knob (44) to loosen it.
MOVING THE ELLIPTICAL TRAINER To move the elliptical trainer, first unplug the Transformer (not shown) from the 120-volt outlet and secure the elliptical trainer in the collapsed position (see EXTENDING THE SEAT BASE on page 12). Then, using the handle on the Upright Stabilizer (10), tilt the elliptical trainer onto the Stabilizer Wheels (47). Finally, move the elliptical trainer to the new location. 10 WARNING: The elliptical trainer is heavy; lift with your knees to prevent injury to your back.
CONSOLE OPERATION FEATURES OF THE CONSOLE Ten crossover training programs are also offered. Each crossover training program combines elliptical exercise with strength training exercises to give you a combined cardiovascular and strength workout. The console also features iFIT.com interactive technology. Having iFIT.com technology is like having a personal trainer in your home.
To select a single display mode, press the MODE button repeatedly until the desired mode indicator appears; make sure that the SCAN indicator does not appear. To reselect the SCAN display mode, press the MODE button until the SCAN indicator appears. To reset the display modes to their default settings, press the RESET button. The SCAN display mode will be selected. ELLIPTICAL TRAINING MANUAL OPERATION 1. Plug In the Transformer. See PLUGGING IN THE ELLIPTICAL TRAINER on page 14.
PROGRAM OPERATION Note: You can override the resistance setting, if desired, by pressing the RESISTANCE + and – buttons. However, when the next period begins, the resistance will change if a different resistance setting is programmed for the next period. The console offers a level 1 (beginning) elliptical training program, two level 2 (intermediate) programs, and three level 3 (advanced) programs. To use an elliptical training program, first follow steps 1 and 2 on page 15. Then, follow the steps below.
5. Enter the Numbers of Sets and Repetitions that You Plan to Do. STRENGTH TRAINING To enter the number of sets that you plan to do, press the SETS + and – buttons. To enter the number of repetitions that you plan to do, press the REPS + and – buttons. MANUAL OPERATION 1. Plug In the Transformer. See PLUGGING IN THE ELLIPTICAL TRAINER on page 14. Important: Always plug in the transformer when using the elliptical trainer.
PROGRAM OPERATION 5. Perform the Exercise. The resistance setting and the numbers of sets and repetitions for the first exercise will appear in the SYSTEM RESISTANCE, SETS, and REPS displays. The resistance setting and the numbers of sets and repetitions may be too high or too low for you, depending on such factors as your body size and your physical condition. If desired, adjust the resistance setting and the numbers of sets and repetitions by pressing the buttons below the three displays.
When the program begins, the word ELLIPTICAL and a time period of 3 or 4 minutes will appear in the CROSSOVER TRAINING display. Extend the seat base and begin pedaling. Continue to pedal while the time is counted down in the display. CROSSOVER TRAINING The console offers ten crossover training programs that combine elliptical exercise with strength training exercises. To use a crossover training program, follow the steps below. 1. Plug In the Transformer. See PLUGGING IN THE ELLIPTICAL TRAINER on page 14.
IFIT.COM ELLIPTICAL TRAINING 5. Press the Play Button on Your CD Player or VCR. A moment after the play button is pressed, your personal trainer will begin guiding you through your workout. Simply follow your personal trainer’s instructions. IFIT.COM CD AND VIDEO PROGRAMS To use iFIT.com CDs or videocassettes, the elliptical trainer must be connected to your portable CD player, portable stereo, home stereo, computer with CD player, or VCR.
IFIT.COM INTERNET PROGRAMS 7. Follow the On-line Instructions to Start the Program. Our Web site at www.iFIT.com allows you to play iFIT.com programs directly from the internet. To use programs from our Web site, the elliptical trainer must be connected to your home computer. See HOW TO CONNECT YOUR COMPUTER on page 24. In addition, you must have an internet connection and an internet service provider. A list of specific system requirements is found on our Web site. To use an iFIT.
HOW TO CONNECT YOUR PORTABLE CD PLAYER HOW TO CONNECT YOUR CD PLAYER, VCR, OR COMPUTER To use iFIT.com programs, a stereo audio cable must be plugged into the iFIT jack on the back of the console. Note: If your CD player has separate LINE OUT and PHONES jacks, see instruction A below. If your CD player has only one jack, see instruction B. iFIT Jack A. Plug one end A of a 1/8" to 1/8" stereo LINE OUT PHONES audio cable (available at electronics HeadAudio stores) into the phones Cable console iFIT jack.
HOW TO CONNECT YOUR PORTABLE STEREO HOW TO CONNECT YOUR HOME STEREO Note: If your stereo has an RCA-type AUDIO OUT jack, see instruction A below. If your stereo has a 1/8" LINE OUT jack, see instruction B. If your stereo has only a PHONES jack, see instruction C. Note: If your stereo has an unused LINE OUT jack, see instruction A below. If the LINE OUT jack is being used, see instruction B. A.
HOW TO CONNECT YOUR COMPUTER HOW TO CONNECT YOUR VCR Note: If your computer has a 1/8" LINE OUT jack, see instruction A. If your computer has only a PHONES jack, see instruction B. Note: If your VCR has an unused AUDIO OUT jack, see instruction A below. If the AUDIO OUT jack is being used, see instruction B. If you have a TV with a built-in VCR, see instruction B. If your VCR is connected to your home stereo, see HOW TO CONNECT YOUR HOME STEREO on page 23. A.
EXERCISE GUIDELINES THE FOUR BASIC TYPES OF WORKOUTS PERSONALIZING YOUR EXERCISE PROGRAM Muscle Building To increase the size and strength of your muscles, push them close to their maximum capacity. Your muscles will continually adapt and grow as you progressively increase the intensity of your exercise. You can adjust the intensity level of an individual exercise in two ways: • by changing the amount of resistance used. • by changing the number of repetitions or sets performed.
slowly as you stretch and do not bounce. Ease into each stretch gradually and go only as far as you can without strain. Stretching at the end of each workout is an effective way to increase flexibility. Rest for a short period of time after each set. The ideal resting periods are: • Rest for three minutes after each set for a muscle building workout. • Rest for one minute after each set for a toning workout. • Rest for 30 seconds after each set for a weight loss workout.
NOTES 27
81
PART IDENTIFICATION CHART See the drawings below to identify small parts used in assembly. The number in parentheses by each drawing is the key number of the part, from the PART LIST in the center of this manual. Note: Some small parts may have been pre-attached for shipping purposes. If you cannot find a part in the parts bag, check to see if it has been pre-attached. If a part is missing, call toll-free 1-888-936-4266.
PART LIST—Model No. 30511.0 Key No. Qty.
Key No. Qty.
EXPLODED DRAWING—Model No. 30511.
REMOVE THIS EXPLODED DRAWING FROM THE MANUAL.
EXPLODED DRAWING—Model No. 30511.
90 58 50 89 167 50 42 163 105 50 161 167 81 157 81 52 90 131 164 161 58 163 81 80 158 42 50 99 52 11 175 131 17 54 103 160 85 102 85 103 71 165 102 3 135 130 164 161 102 22 161 81 80 183 184 135 27 159 187 188 94 95 72 7 74 139 95 54 85 89 167 105 16 102 85 103 130 167 103 98 140 139 140 98 141 110 43 110 141 72 10 28 48 154 141 44 110 43 72 110 141 85 5 45 72 85 8 140 98 95 101 114 154 74 94 139 98 139 140 6 73 85 48
ORDERING REPLACEMENT PARTS To order replacement parts, simply call our Customer Service Department toll-free at 1-888-936-4266, Monday through Friday 8h00 until 17h00 Eastern Time (excluding holidays). To help us assist you, please be prepared to give the following information: • the MODEL NUMBER of the product (30511.