Model No. DTL44941 Serial No. Serial Number Decal QUESTIONS? If you have questions, or if there are missing parts, we will guarantee complete satisfaction through direct assistance from our factory. TO AVOID DELAYS, PLEASE CALL DIRECT TO OUR TOLLFREE CUSTOMER HOT LINE. The trained technicians on our Customer Hot Line will provide immediate assistance, free of charge to you. CUSTOMER HOT LINE: 1-800-999-3756 Mon.–Fri., 6 a.m.–6 p.m.
TABLE OF CONTENTS IMPORTANT PRECAUTIONS . . . . . . . . . . . . . . . . . . . . . . . . . . . . . . . . . . . . . . . . . . . . . . . . . . . . . . . . . . . . . . . .3 BEFORE YOU BEGIN . . . . . . . . . . . . . . . . . . . . . . . . . . . . . . . . . . . . . . . . . . . . . . . . . . . . . . . . . . . . . . . . . . . . . .5 ASSEMBLY . . . . . . . . . . . . . . . . . . . . . . . . . . . . . . . . . . . . . . . . . . . . . . . . . . . . . . . . . . . . . . . . . . . . . . . . . . . . . . .
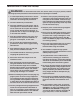
IMPORTANT PRECAUTIONS WARNING: To reduce the risk of burns, fire, electric shock, or injury to persons, read the following important precautions and information before operating the treadmill. 1. It is the responsibility of the owner to ensure that all users of this treadmill are adequately informed of all warnings and precautions. 12. Failure to use a properly functioning surge suppressor could result in damage to the control system of the treadmill.
maintenance and adjustment procedures described in this manual. Never remove the motor hood unless instructed to do so by an authorized service representative. Servicing other than the procedures in this manual should be performed by an authorized service representative only. 21. When folding or moving the treadmill, make sure that the storage latch is fully closed. 22. Inspect and properly tighten all parts of the treadmill regularly. 23. Never insert any object into any opening. 24.
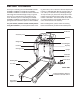
BEFORE YOU BEGIN Thank you for selecting the new PROFORM® CROSSTRAINER ULTIMATE LX treadmill. The CROSSTRAINER ULTIMATE LX treadmill combines advanced technology with innovative design to help you get the most from your exercise in the convenience of your home. And when you’re not exercising, the CROSSTRAINER ULTIMATE LX treadmill can be folded up, requiring less than half the floor space of other treadmills.
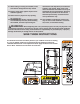
ASSEMBLY Assembly requires two persons. Set the treadmill in a cleared area and remove all packing materials. Do not dispose of the packing materials until assembly is completed. Note: The underside of the treadmill walking belt is coated with high-performance lubricant. During shipping, a small amount of lubricant may be transferred to the top of the walking belt or the shipping carton. This is a normal condition and does not affect treadmill performance.
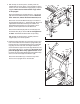
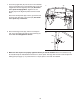
2. With the help of another person, carefully lower the Uprights (69) as shown. Note: It may be helpful to place one foot on one of the Extension Legs [63] as you tip the Uprights. Make sure that the Extension Legs remain in the Uprights. 66 64 69 2 39 Attach each Extension Leg (63) with two 1” Tek Screws (39) and a Round Base Pad (57) as shown. Attach the lower Tek Screw, without the Round Base Pad, first.
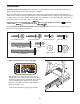
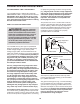
4. Hold the Console Base (47) near the Left Handrail (71). Attach the end of the ground wire on the Console Base to the indicated small hole in the Left Handrail with the 1/2” Ground Screw (75). 4 47 Ground Wire Small Hole 75 71 5. Set the Console Base (47) on the Right Handrail (72) and the Left Handrail (71). Attach the Console Base with four 3/4” Screws (2). Start all four Screws before tightening them; do not overtighten the Screws. 5 47 71 72 2 2 6.
7. Press the Upright Wire (42) into the slot in the underside of the Console Base (47) in the indicated area. Cover the Upright Wire with the Right Grip Plate (36). Be careful not to pinch the Upright Wire. Tighten three 1/2” Screws (49) into the Right Grip Plate and the Console Base. 47 7 Slot Ground Wire 42 Attach the Left Grip Plate (32) over the ground wire and the other wires with three 1/2” Screws (49). Be careful not to pinch any of the Wires. 36 32 49 8.
OPERATION AND ADJUSTMENT THE PERFORMANT LUBETM WALKING BELT an equipment-grounding conductor and a grounding plug. Plug the power cord into a surge suppressor, and plug the surge suppressor into an appropriate outlet that is properly installed and grounded in accordance with all local codes and ordinances. Important: The treadmill is not compatible with GFCI-equipped outlets. Your treadmill features a walking belt coated with PERFORMANT LUBETM, a high-performance lubricant.
CONSOLE DIAGRAM Displays Pulse Sensor Key Clip Note: If there is a thin sheet of plastic on the console, remove the plastic. Insert the key into the console. A tone will sound and the three displays will light. Test the clip by carefully taking a few steps backward until the key is pulled from the console. If the key is not pulled from the console, adjust the position of the clip. CAUTION: Before operating the console, read the following precautions.
while inserting the key into the console. An “E” for English miles or an “M” for metric kilometers will appear in the Speed display. Press the Speed + button to change the unit of measurement. When the desired unit of measurement is selected, remove the key and then reinsert it. To stop the walking belt, press the Stop button. The Time/Distance display will begin to flash.
HOW TO USE THE HAND WEIGHTS To exercise your upper body as you walk on the treadmill, hold the 2-pound weights at your sides or press the weights above your head. To increase the intensity of your exercise, use the 3-pound or 5-pound weights. The hand weights can be stored in the weight rack. WARNING: Do not use the hand weights at speeds faster than walking speeds. Using weights and not holding the handrails may compromise your ability to maintain your balance.
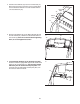
HOW TO FOLD AND MOVE THE TREADMILL HOW TO FOLD THE TREADMILL FOR STORAGE Before folding the treadmill, adjust the incline to the lowest position. If this is not done, the treadmill may be permanently damaged. Next, unplug the power cord. CAUTION: You must be able to safely lift 45 pounds (20 kg) to raise, lower, or move the treadmill. 1. Hold the treadmill with your hands in the locations shown at the right. To decrease the possibility of injury, bend your legs and keep your back straight.
HOW TO LOWER THE TREADMILL FOR USE 1. Hold the upper end of the treadmill with your right hand. Press the storage latch to the left. Pivot the treadmill down until the frame and foot rail are past the storage latch. Storage Latch Catch 2. Hold the treadmill firmly with both hands, and lower the treadmill to the floor. Do not drop the treadmill frame to the floor. To decrease the possibility of injury, bend your legs and keep your back straight.
TROUBLESHOOTING Most treadmill problems can be solved by following the instructions below. If further assistance is needed, please call our Customer Service Department toll-free at 1-800-999-3756, Monday through Friday, 6 a.m. until 6 p.m. Mountain Time (excluding holidays). PROBLEM: The power does not turn on SOLUTION: a. Make sure that the power cord is plugged into a surge suppressor, and that the surge suppressor is plugged into a properly grounded outlet (see page 10).
PROBLEM: The walking belt slows when walked on SOLUTION: a. Use only a single-outlet surge suppressor that meets all of the specifications described on page 10. b. If the walking belt is overtightened, treadmill performance may decrease and the walking belt may become damaged. Remove the key and UNPLUG THE POWER CORD. Using the allen wrench, turn both rear roller adjustment bolts counterclockwise, 1/4 of a turn.
CONDITIONING GUIDELINES WARNING: Before beginning this or any exercise program, consult your physician. This is especially important for individuals over the age of 35 or individuals with preexisting health problems. The pulse sensor is not a medical device. Various factors, including your movement, may affect the accuracy of heart rate readings. The sensor is intended only as an exercise aid in determining heart rate trends in general. The following guidelines will help you to plan your exercise program.
SUGGESTED STRETCHES The correct form for several basic stretches is shown at the right. Move slowly as you stretch—never bounce. 1. Toe Touch Stretch Stand with your knees bent slightly and slowly bend forward from your hips. Allow your back and shoulders to relax as you reach down toward your toes as far as possible. Hold for 15 counts, then relax. Repeat 3 times. Stretches: Hamstrings, back of knees and back. 1 2. Hamstring Stretch Sit with one leg extended.
PART LIST—Model No. DTL44941 Key No. Qty.
91 41 92 38 40 71 95 94 15 106 37 92 93 38 58 11 38 58 72 37 96 30 58 97 40 2 58 100 85 98 2 84 76 31 83 82 26 86 90 26 108 15 74 1 15 14 67 87 89 58 16 13 12 58 76 77 18 19 85 17 10 77 68 26 15 109 84 83 28 77 12 81 77 108 82 65 67 13 23 9* 3 26 22 61 26 8 21 24 60 7 5 14 4 103 80 58 62 25 26 35 59 6 63 22 27 33 78 79 39 20 105 57 77 52 53 45 61 65 63 13 2 102 57 69 29 34 58 62 26 39 54
HOW TO ORDER REPLACEMENT PARTS To order replacement parts, call our Customer Service Department toll-free at 1-800-999-3756, Monday through Friday, 6 a.m. until 6 p.m. Mountain Time (excluding holidays).