Model No. 831.291611 Serial No. USER'S MANUAL Serial Number Decal SEARS, ROEBUCK AND CO. HOFFMAN ESTATES, IL 60179 CAUTION Read all precautions and instructions in this manual before using this equipment. Save this manual for future reference. Visit our website at www.proform.
TABLE OF CONTENTS IMPORTANT PRECAUTIONS . . . . . . . . . . . . . . . . . . . . . . . . . . . . . . . . . . . . . . . . . . . . . . . . . . . . . . . . . . . . . . . . .2 BEFORE YOU BEGIN . . . . . . . . . . . . . . . . . . . . . . . . . . . . . . . . . . . . . . . . . . . . . . . . . . . . . . . . . . . . . . . . . . . . . . .4 ASSEMBLY . . . . . . . . . . . . . . . . . . . . . . . . . . . . . . . . . . . . . . . . . . . . . . . . . . . . . . . . . . . . . . . . . . . . . . . . . . . . . . .
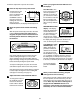
14. Never move the walking belt while the power is turned off. Do not operate the treadmill if the power cord or plug is damaged, or if the treadmill is not working properly. (See BEFORE YOU BEGIN on page 4 if the treadmill is not working properly.) 15. Never start the treadmill while you are standing on the walking belt. Always hold the handrails or upper body arms while using the treadmill. You must be able to safely lift 45 pounds (20 kg) to raise, lower, or move the treadmill. 19.
BEFORE YOU BEGIN Congratulations for selecting the new PROFORM® 490 LS CROSSWALK treadmill. The 490 LS CROSSWALK treadmill combines advanced technology with innovative design to help you get the most from your exercise in the convenience and privacy of your home. And when you’re not exercising, the unique 490 LS CROSSWALK can be folded up, requiring less than half the floor space of other treadmills. please call our toll-free HELPLINE at 1-800-736-6879, Monday through Saturday, 7 a.m. until 7 p.m.
ASSEMBLY Assembly requires two people. Set the treadmill in a cleared area and remove all packing materials. Do not dispose of the packing materials until assembly is completed. Assembly requires the included allen wrench and your own phillips screwdriver and wire cutters . Note: The underside of the treadmill walking belt is coated with high-performance lubricant. During shipping, a small amount of lubricant may be transferred to the top of the walking belt or the shipping carton.
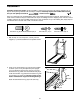
3. Remove the Handrail Screw (53) from one of the Handrails (1). Insert the Handrail into the tube at the top of the left Upright (11), and align the hole in the Handrail with the slotted hole in the Upright. Loosely thread the Handrail Screw into the Handrail, rotate the Handrail until the Screw is touching one end of the slotted hole, and then fully tighten the Screw. 3 53 53 Slotted Hole 1 1 Attach the other Handrail (1) to the right Upright (11) in the same way. 4.
OPERATION AND ADJUSTMENT THE PERFORMANT LUBETM WALKING BELT an equipment-grounding conductor and a grounding plug. Plug the power cord into a surge suppressor, and plug the surge suppressor into an appropriate outlet that is properly installed and grounded in accordance with all local codes and ordinances. Important: The treadmill is not compatible with GFCI-equipped outlets. Your treadmill features a walking belt coated with PERFORMANT LUBETM, a high-performance lubricant.
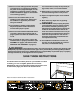
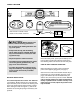
CONSOLE DIAGRAM Note: If there is a sheet of clear plastic on the console, remove it. Clip Key CAUTION: Before operating the console, read the following precautions. • Do not stand on the walking belt when turning on the power. • Always wear the clip (see the drawing above) while using the treadmill. When the key is removed from the console, the walking belt will stop. Batteries • Adjust the speed in small increments.
Follow the steps below to operate the console. 1 4 Insert the key fully into the power switch. The LED Track—The track in the center of the console represents a distance of 1/4 mile. As you exercise, the indicators around the track will light in sequence until you have completed 1/4 mile. A new lap will then begin. Inserting the key will not turn on the displays. The displays will turn on when the ON/RESET button is pressed or when the walking belt is started.
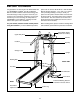
HOW TO USE THE UPPER BODY ARMS As you exercise on the treadmill, you can hold either the handrails or the upper body arms. The upper body arms are designed to exercise your arms, shoulders, and back for a total body workout. Hold one upper body arm with each hand, and move them forward and back as you walk on the treadmill. Upper Body Arms To vary the intensity of your upper body exercise, the resistance of the upper body arms can be adjusted.
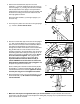
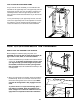
HOW TO MOVE THE TREADMILL Before moving the treadmill, convert the treadmill to the storage position as described on page 10. Make sure that the storage latch is closed fully over the catch. 1. Hold the upper ends of the handrails. Place one foot on the base as shown. 2. Tilt the treadmill back until it rolls freely on the front wheels. Carefully move the treadmill to the desired location. To reduce the risk of injury, use extreme caution while moving the treadmill.
TROUBLESHOOTING Most treadmill problems can be solved by following the simple steps below. Find the symptom that applies, and follow the steps listed. If further assistance is needed, call our toll-free HELPLINE at 1-800-736-6879, Monday through Saturday, 7 a.m. until 7 p.m. Central Time (excluding holidays). PROBLEM: The power does not turn on SOLUTION: a. Make sure that the power cord is plugged into a surge suppressor, and that the surge suppressor is plugged into a properly grounded outlet (see page 7).
PROBLEM: The walking belt slows when walked on SOLUTION: a. Use only a single-outlet surge suppressor that meets all of the specifications described on page 7. b. If the walking belt is overtightened, treadmill performance may decrease and the walking belt may become damaged. Remove the key and UNPLUG THE POWER CORD. Using the allen wrench, turn both rear roller adjustment bolts counterclockwise, 1/4 of a turn.
CONDITIONING GUIDELINES WARNING: Before beginning this or any exercise program, consult your physician. This is especially important for individuals over the age of 35 or individuals with pre-existing health problems. The following guidelines will help you to plan your exercise program. For more detailed exercise information, obtain a reputable book or consult your physician.
Training Zone Exercise—After warming up, increase the intensity of your exercise until your pulse is in your training zone for 20 to 60 minutes. (During the first few weeks of your exercise program, do not keep your pulse in your training zone for longer than 20 minutes.) Breathe regularly and deeply as you exercise—never hold your breath. EXERCISE FREQUENCY To maintain or improve your condition, complete three workouts each week, with at least one day of rest between workouts.
PART LIST—Model No. 831.291611 Key No. Qty.
83 39 84 31 90 41 88 86 83 17 32 6 91 92 89 1 39 74 17 93 5 75 4 13 77 7 62 97 57 95 52 3 42 25 57 96 13 46 79 49 79 98 61 13 73 80 73 13 101 48 79 79 82 59 71 66 62 9 47 73 35 52 3 8 15 38 77 87 48 5 48 76 10* 66 73 69 68 44 37 29 45 36 85* 16 67 50 2 38 49 43 63 22 61 73 40 25 33 34 39 48 78 14 73 47 33 64 38 29 40 25 39 33 65 76 39 51 35 27 13 60 38 15 29 33 37 53 70 28 12 31 30 53 78 1
The model number and serial number of your PROFORM® 490 LS CROSSWALK treadmill are listed on a decal attached to the frame. See the front cover of this manual to find the location of the decal. Model No. 831.291611 QUESTIONS? If you find that: • you need help assembling or operating the PROFORM 490 LS CROSSWALK treadmill • a part is missing • or you need to schedule repair service All replacement parts are available for immediate purchase or special order when you visit your nearest SEARS Service Center.