
User`s manual


10
12. Make sure that all parts are properly tightened before you use the treadmill. If there are sheets of clear
plastic on the treadmill decals, remove the plastic. To protect the floor or carpet, place a mat under the tread-
mill. Keep the included hex keys in a secure place; one of the hex keys is used to adjust the walking belt (see
pages 19 and 20).
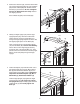
10. Press the Latch Insert (70) into the Left Upright
(73). It may be necessary to tap on the Latch
Insert with a rubber mallet.
L
ocate the Latch Pin Assembly (72). Remove
the knob from the pin. Make sure that the collar
and the spring are on the pin. Insert the pin into
the Latch Insert (70), and tighten the knob back
o
nto the pin.
Knob
70
10
73
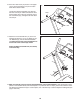
11. Attach the Left Crosswalk Arm (71) to the Left
Upright (73) with two 1/4" x 3 1/2" Bolts (4), two
1/4" Washers (9), and two M10 Star Washers
(8). Make sure that the Left Crosswalk Arm is
on the side of the Console (87) shown.
Attach the Right Crosswalk Arm (not shown)
in the same way.
4
9
11
73
71
8
Spring
Pin
Collar
87
72