¨ Model No. 831.299230 Serial No. The serial number is found in the location shown below. Write the serial number in the space above for future reference. Serial Number Decal USER'S MANUAL SEARS, ROEBUCK AND CO. HOFFMAN ESTATES, IL 60179 CAUTION Read all precautions and instructions in this manual before using this equipment. Save this manual for future reference. Visit our website at www.proform.
TABLE OF CONTENTS IMPORTANT PRECAUTIONS . . . . . . . . . . . . . . . . . . . . . . . . . . . . . . . . . . . . . . . . . . . . . . . . . . . . . . . . . . . . . . . . .2 BEFORE YOU BEGIN . . . . . . . . . . . . . . . . . . . . . . . . . . . . . . . . . . . . . . . . . . . . . . . . . . . . . . . . . . . . . . . . . . . . . . .4 ASSEMBLY . . . . . . . . . . . . . . . . . . . . . . . . . . . . . . . . . . . . . . . . . . . . . . . . . . . . . . . . . . . . . . . . . . . . . . . . . . . . . . .
13. Never move the walking belt while the power is turned off. Do not operate the treadmill if the power cord or plug is damaged, or if the treadmill is not working properly. (See BEFORE YOU BEGIN on page 4 if the treadmill is not working properly.) 14. Never start the treadmill while you are standing on the walking belt. Always hold the handrails or the upper body arms while using the treadmill. 15. The treadmill is capable of high speeds.
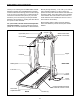
BEFORE YOU BEGIN Thank you for selecting the new PROFORM¨ CROSSWALK XT treadmill. The CROSSWALK XT treadmill combines advanced technology with innovative design to let you enjoy an excellent form of cardiovascular exercise in the convenience and privacy of your home. And when youÕre not exercising, the unique CROSSWALK XT can be folded up, requiring less than half the floor space of other treadmills. Monday through Saturday, 7 a.m. until 7 p.m. Central Time (excluding holidays).
ASSEMBLY Assembly requires two people. Set the treadmill in a cleared area and remove all packing materials. Do not dispose of the packing materials until assembly is completed. Assembly requires the included allen wrench and your own phillips screwdriver and two adjustable wrenches (not included). Note: The underside of the treadmill walking belt is coated with high-performance lubricant. During shipping, a small amount of lubricant may be transferred to the top of the walking belt or the shipping carton.
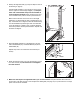
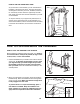
3. Identify the Right Handrail (7) (it may be helpful to look at the drawing on page 4). 3 11 Hold the Right Handrail (7) at an angle as shown and insert the upper end into the Right Upright (11). Keep the lower end of the Handrail away from the treadmill to avoid scratching the finish. Next, rotate the lower end of the Handrail to the position shown by the dotted line. 7 Make sure that the hole in the lower end of the Right Handrail (7) is aligned with the hole in the Extension Leg (34).
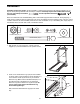
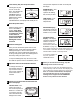
OPERATION AND ADJUSTMENT THE PERFORMANT LUBETM WALKING BELT This product is for use on a nominal 120-volt circuit, and has a grounding plug that looks like the plug illustrated in drawing 1 below. A temporary adapter that looks like the adapter illustrated in drawing 2 may be used to connect the surge suppressor to a 2-pole receptacle as shown in drawing 2 if a properly grounded outlet is not available. Your treadmill features a walking belt coated with PERFORMANT LUBETM, a high-performance lubricant.
CONSOLE DIAGRAM LED Track Note: If there is a thin sheet of clear plastic on the face of the console, remove it before operating the console. CAUTION: Before operating the console, read the following precautions. ¥ Do not stand on the walking belt when turning on the power. Battery Cover ¥ Always wear the clip (see the drawing at the lower right) while using the treadmill. When the key is removed from the console, the walking belt will stop. Batteries 1 ¥ Adjust the speed in small increments.
1 until you have completed 1/4 mile. A new lap will then begin. Insert the key fully into the power switch. Inserting the key will not turn on the displays. The displays will turn on when the ON/RESET button is pressed or when the walking belt is started. Note: If you just installed batteries, the displays will already be on. 2 SPEED displayÑThis display shows the speed of the walking belt, in miles per hour. TIME displayÑThis display shows the elapsed time. Reset the speed control.
HOW TO USE THE UPPER BODY ARMS As you exercise on the treadmill, you can hold either the handrails or the upper body arms. The upper body arms are designed to exercise your arms, shoulders, and back for a total body workout. Hold one upper body arm with each hand, and move them forward and back as you walk on the treadmill. To vary the intensity of your upper body exercise, the resistance of the upper body arms can be adjusted.
HOW TO MOVE THE TREADMILL Before moving the treadmill, convert the treadmill to the storage position as described above. Make sure that the storage latch is closed fully over the catch. 1. Hold the upper ends of the handrails. Place one foot on the base as shown. 2. Tilt the treadmill back until it rolls freely on the front wheels. Carefully move the treadmill to the desired location. Never move the treadmill without tipping it back.
TROUBLE-SHOOTING Most treadmill problems can be solved by following the simple steps below. Find the symptom that applies, and follow the steps listed. If further assistance is needed, call our toll-free HELPLINE at 1-800-736-6879, Monday through Saturday, 7 a.m. until 7 p.m. Central Time (excluding holidays). 1. SYMPTOM: THE POWER DOES NOT TURN ON a. Make sure that the power cord is plugged into a surge suppressor, and that the surge suppressor is plugged into a properly grounded outlet (see page 7).
4. SYMPTOM: THE WALKING BELT SLOWS WHEN WALKED ON a. Use only a UL-listed surge protector, rated at 15 amps, with a 14-gauge cord of five feet or less in length. b. If the walking belt is overtightened, treadmill performance may decrease and the walking belt may be permanently damaged. Remove the key and UNPLUG THE POWER CORD. Using the allen wrench, turn both rear roller adjustment bolts counterclockwise, 1/4 of a turn.
CONDITIONING GUIDELINES training zone. It may also be helpful to set the speed control on the console to FAT BURN to help you maintain the proper intensity level. (See page 9.) WARNING: Before beginning this or any exercise program, consult your physician. This is especially important for individuals over the age of 35 or individuals with pre-existing health problems. Aerobic Exercise If your goal is to strengthen your cardiovascular system, your exercise must be Òaerobic.
Training Zone Exercise to cool down. This will increase the flexibility of your muscles and will help to prevent post-exercise problems. After warming up, increase the intensity of your exercise until your pulse is in your training zone for 20 to 60 minutes. (During the first few weeks of your exercise program, do not keep your pulse in your training zone for longer than 20 minutes.) Breathe regularly and deeply as you exerciseÑnever hold your breath.
PART LISTÑModel No. 831.299230 Key No. Qty.
83 39 84 92 90 83 31 93 88 32 72 94 31 102 1 59 39 77 87 38 31 86 6 99 62 52 100 70 25 38 95 13 46 4 80 38 79 82 49 48 101 13 42 73 73 96 79 98 5 97 13 74 85 71 66 72 62 49 76 36 13 10* 77 70 48 5 66 81 3 73 68 37 48 47 38 45 44 69 75 52 73 13 8 9 2 67 50 38 63 49 73 65 43 41 89 39 89 73 38 49 47 53 31 89 60 29 27 73 30 11 40 37 38 25 64 35 39 78 51 13 39 48 61 73 39 40 91 25 73 34 14 EXPLOD
The model number and serial number of your PROFORM¨ CROSSWALK XT treadmill are listed on a decal attached to the frame. See the front cover of this manual to find the location of the decal. Model No. 831.299230 QUESTIONS? If you find that: ¥ you need help assembling or operating the PROFORM CROSSWALK XT treadmill ¥ a part is missing All replacement parts are available for immediate purchase or special order when you visit your nearest SEARS Service Center.