Model No. PFEX1495.0 Serial No. USER'S MANUAL Serial Number Decal QUESTIONS? As a manufacturer, we are committed to providing complete customer satisfaction. If you have questions, or if parts are damaged or missing, PLEASE CONTACT OUR CUSTOMER SERVICE DEPARTMENT DIRECTLY. CALL TOLL-FREE: 1-888-533-1333 Mon.–Fri., 6 a.m.–6 p.m. MST ON THE WEB: www.proformservice.com CAUTION Read all precautions and instructions in this manual before using this equipment. Keep this manual for future reference.
TABLE OF CONTENTS IMPORTANT PRECAUTIONS . . . . . . . . . . . . . . . . . . . . . . . . . . . . . . . . . . . . . . . . . . . . . . . . . . . . . . . . . . . . . . . .3 BEFORE YOU BEGIN . . . . . . . . . . . . . . . . . . . . . . . . . . . . . . . . . . . . . . . . . . . . . . . . . . . . . . . . . . . . . . . . . . . . . .4 ASSEMBLY . . . . . . . . . . . . . . . . . . . . . . . . . . . . . . . . . . . . . . . . . . . . . . . . . . . . . . . . . . . . . . . . . . . . . . . . . . . . . . .
IMPORTANT PRECAUTIONS WARNING: To reduce the risk of serious injury, read the following important precautions before using the exercise cycle. 1. Read all instructions in this manual and all warnings on the exercise cycle before using the exercise cycle. Use the exercise cycle only as described in this manual. 7. The exercise cycle should not be used by persons weighing more than 250 lbs. (115 kg). 8. Always keep your back straight while using the exercise cycle; do not arch your back. 2.
BEFORE YOU BEGIN Congratulations for selecting the new PROFORM® GR 75 exercise cycle. Cycling is one of the most effective exercises for increasing cardiovascular fitness, building endurance, and toning the body. The GR 75 exercise cycle offers a selection of features designed to let you enjoy this healthful exercise in the convenience and privacy of your home. model number and serial number before contacting us. The model number is PFEX1495.0.
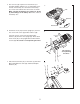
ASSEMBLY To hire an authorized service technician to assemble the exercise cycle, call toll-free 1-800-445-2480. Assembly requires two persons. Place all parts of the exercise cycle in a cleared area and remove the packing materials. Do not dispose of the packing materials until assembly is completed. Assembly requires the included tools and your own adjustable wrench and Phillips screwdriver . Use the drawings below to identify the small parts needed for assembly.
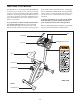
3. While another person holds the Upright (13) in the position shown, connect the Upper Wire Harness (36) to the Lower Wire Harness (55). 3 Carefully pull the excess Upper Wire Harness (36) out of the top of the Upright (13), and slide the Upright onto the Frame (1). Be careful to avoid pinching the Wire Harnesses. Next, attach the Upright with three M8 x 25mm Button Screws (45) and three M8 Split Washers (41). Be careful to avoid pinching the wire harnesses while attaching the upright.
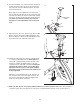
5. The Console (16) requires four “D” batteries (not included); alkaline batteries are recommended. Press the tab on the battery door and remove the battery door. Insert four batteries into the Console as shown. Make sure that the batteries are oriented as shown by the markings on the battery door. Then, reattach the battery door. 5 16 Batteries Batteries Door 6. Hold the Console (16) near the Upright (13). Connect the console wire to the Upper Wire Harness (36).
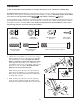
. Turn the Seat Knob (11) counterclockwise and remove it. Next, insert the Seat Post (5) into the Seat Frame (28). Press the Seat Post Endcap (54) into the lower end of the Seat Post. 8 5 Next, align one of the adjustment holes in the Seat Post (5) with the indicated hole in the Seat Frame (28). Insert the Seat Knob (11) into the Seat Frame and the Seat Post, and turn the Seat Knob clockwise until it is tight. Make sure that the Seat Knob is inserted through one of the adjustment holes in the Seat Post.
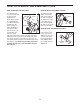
HOW TO OPERATE THE EXERCISE CYCLE HOW TO ADJUST THE SEAT POST HOW TO ADJUST THE PEDAL STRAPS For effective exercise, the seat should Seat be at the proper height. As you pedal, there should Hole be a slight bend in your knees when the pedals are in the Knob lowest position. To adjust the height of the seat, first turn the seat knob counterclockwise and remove it. Next, slide the seat post up or down, and align one of the adjustment holes in the seat post with the indicated hole in the seat frame.
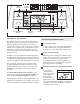
Fan Button Increase Button Program Profiles Program/Manual Button Program Indicator Display FEATURES OF THE CONSOLE Pace Guide Decrease Button HOW TO USE THE MANUAL MODE The advanced console offers a selection of features designed to make your workouts more enjoyable and effective. When the manual mode of the console is selected, the resistance of the pedals can be changed with the touch of a button. As you pedal, the console will provide continuous exercise feedback.
4 Next, hold the handgrip pulse sensor with your palms resting on the contacts. When your pulse is detected, the heart-shaped indicator in the lower half of the display will flash each time your heart beats, and your heart rate will be shown. Monitor your progress with the display. The upper half of the display will show the elapsed time, the distance you have pedaled, and the resistance level of the pedals. The display will change from one mode to the next every few seconds.
5 HOW TO USE A PULSE PROGRAM Pulse program 1 is 30 minutes long, and is divided into several time periods of different lengths. One target heart rate is programmed for each period. Pulse program 2 is sixty minutes long (you may choose to use only part of the program). The same target heart rate is programmed for the entire program. Pulse program 1 is designed to keep your heart rate within a set range during your workout.
7 Turn on the fan if desired. automatically change to the resistance level that is programmed for the next period. Note: If the resistance level is too high or too low, you can override it by pressing the Increase and Decrease buttons. However, when the current period ends, the resistance level will automatically change if a different resistance level is programmed for the next period. See step 6 on page 11. 8 When you are finished exercising, the console will automatically turn off.
MAINTENANCE AND TROUBLESHOOTING Inspect and tighten all parts of the exercise cycle regularly. Replace any worn parts immediately. Next, locate the Reed Switch (43). Turn the Crank (21) until the Magnet (38) is aligned with the Reed Switch. Loosen, but do not remove, the indicated M4 x 16mm Screw (49). Slide the Reed Switch slightly closer to or away from the Magnet, and then retighten the Screw. Turn the Crank for a moment. Repeat until the console displays correct feedback.
CONDITIONING GUIDELINES The following guidelines will help you to plan your exercise program. Remember that proper nutrition and adequate rest are essential for successful results. During the first few minutes of exercise, your body uses easily accessible carbohydrate calories for energy. Only after the first few minutes of exercise does your body begin to use stored fat calories for energy.
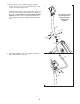
SUGGESTED STRETCHES The correct form for several basic stretches is shown at the right. Move slowly as you stretch—never bounce. 1 1. Toe Touch Stretch Stand with your knees bent slightly and slowly bend forward from your hips. Allow your back and shoulders to relax as you reach down toward your toes as far as possible. Hold for 15 counts, then relax. Repeat 3 times. Stretches: Hamstrings, back of knees and back. 2. Hamstring Stretch 2 Sit with one leg extended.
NOTES 17
PART LIST—Model No. PFEX1495.0 Key No. Qty. 1 2 3 4 5 6 7 8 9 10 11 12 13 14 15 16 17 18 19 20 21 22 23 24 25 26 27 28 29 1 1 1 2 1 1 2 2 2 7 1 1 1 2 1 1 1 1 1 1 1 1 2 1 1 1 4 1 1 Description Key No. Qty.
EXPLODED DRAWING—Model No. PFEX1495.
HOW TO ORDER REPLACEMENT PARTS To order replacement parts, see the front cover of this manual. To help us assist you, please be prepared to give the following information: • the MODEL NUMBER of the product (PFEX1495.0) • the NAME of the product (PROFORM GR 75 exercise cycle) • the SERIAL NUMBER of the product (see the front cover of this manual) • the KEY NUMBER and DESCRIPTION of the part(s) (see pages 18 to 19) LIMITED WARRANTY ICON Health & Fitness, Inc.