Model No. 831.21521.1 Serial No. RC E User's Manual Serial Number Decal • Assembly • Operation • Maintenance • Part List and Drawing CAUTION Read all precautions and instructions in this manual before using this equipment. Keep this manual for future reference. Sears, Roebuck and Co.
TABLE OF CONTENTS IMPORTANT PRECAUTIONS ................................................................ BEFORE YOU BEGIN ...................................................................... ASSEMBLY ............................................................................... HOW TO OPERATE THE EXERCISE CYCLE .................................................... MAINTENANCE AND TROUBLESHOOTING ................................................... CONDITIONING GUIDELINES ...................................
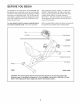
BEFORE YOU BEGIN Congratulations for selecting the new PROFORM _'_ GR 80 exercise cycle. Cycling is one of the most effective exercises for increasing cardiovascular fitness, building endurance, and toning the body. The GR 80 exercise cycle offers a selection of features designed to let you enjoy this healthful exercise in the convenience and privacy of your home. after reading this manual, please call 1-800-4-MYHOME" (1-800-469-4663).
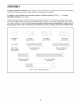
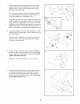
ASSEMBLY Assembly requires two persons, Place all parts of the exercise cycle in a cleared area and remove the packing materials. Do not dispose of the packing materials until assembly is completed. in addition to the included tools, assembly adjustable wrenches requires a Phillips screwdriver G_ ======_and two _, Use the drawings below to identify the small parts used for assembly. The number in parentheses below each drawing is the key number of the part, from the PART LIST on page 14.
Whileanotherpersonliftsthefrontofthe Frame(1) slightly,attachthe FrontStabilizer(3)tothe Frame withtwoMlOx 75mmCarriageBolts(51)andtwo MlONylonLocknuts(63). 51 3 Seetheinsetdrawing.LoosentheAdjustment Knob (17),slidethe RearFrame(2)outof theFrame(1), andthenretightentheAdjustment Knob. Note:Aftertheexercisecycleis assembled, adjustthe Seat(notshown)totheproperposition.Asyoupedal, thereshouldbea slightbendinyourkneeswhenthe pedalsareinthefarthestforwardposition.
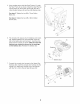
HaveanotherpersonholdtheSeatFrames(7)under the RearFrame(2)as shown.Attachthe SeatFrames andtheSeat(12)to theRearFramewithfourM6x 42mmButtonScrews(49)andfourM6Washers(55). Seestep 3.TightenthetwoM8x 70mmButton Bolts(54). Seestep 4,TightenthefourM6x 38mmButton Screws(48). 49 TheConsole(16)requiresfourD batteries(notincluded);alkalinebatteriesarerecommended. Pressthe tabonthe batterydoorandremoveit. InsertfourbatteriesintotheConsoleasshown.
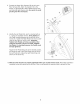
8. Connect the Upper Wire Harness (36) to the Lower Wire Harness (65). Attach the Upright (13) to the Frame (1) with three M8 x 25mm Button Screws (33) and three M8 Split Washers (59). Be careful to avoid pinching the Wire Harnesses. 8 13 36 65 . Identify the Left Pedal (24), which is marked with an "L." Using an adjustable wrench, firmly tighten the Left Pedal counterclockwise into the left arm of the Crank (31). Tighten the Right Pedal (not shown) clockwise into the right arm of the Crank.
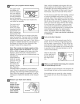
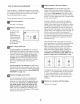
HOW TO OPERATE THE EXERCISE CYCLE Increase Button Fan Program Button Profiles ............ _ _- -L_ I t"l U MP. ILl, t / AWARNII_ Program/Manual Button @ 2 .PM / _. Toreduce riskof ser)ou4inju[y,readand understandthe user's m_nual, Pro( iram Indicator Display FEATURES OF THE CONSOLE Pace Guide Decrease Button HOW TO USE THE MANUAL MODE The advanced console offers a selection of features designed to make your workouts more enjoyable and effective.
Monitoryour progress with the display, Next, hold the handgrip pulse sensor with your palms resting on the contacts. When your pulse is detected, the heart-shaped indicator in the lower half of the display will flash each time your heart beats, and your heart rate will be shown. The upper half of the display will show the elapsed time, the distance you have pedaled, and the resistance For the most accurate heart rate reading, continue to hold the handgrip pulse sensor for about 30 seconds.
Begin pedaling to start the program, HOW TO USE A PULSE PROGRAM Pulse program 1 is 30 minutes long, and is divided into several time periods of different lengths. One target heart rate is programmed for each period. Pulse program 2 is sixty minutes long (you may choose to use only part of the program). The same target heart rate is programmed for the entire program. Pulse program 1 is designed to keep your heart rate within a set range during your workout.
Turn on the fan if desired. automatically change to the resistance level that is programmed for the next period. Note: If the resistance level is too high or too low, you can override it by pressing the Increase and Decrease buttons. However, when the current period ends, the resistance level will automatically change if a different resistance level is programmed for the next period. See step 6 on page 9. When you are finished exercising, the console will automatically turn off, See step 7 on page 9.
MAINTENANCE AND TROUBLESHOOTING With the left side shield removed, locate the Reed Switch (43). Turn the Crank (31) until the Magnet (38) is aligned with the Reed Switch. Next, loosen, but do not remove, the indicated M4 x 16mm Screw (57). Slide the Reed Switch slightly closer to or away from the Magnet, and then retighten the Screw. Turn the Crank for a moment. Repeat until the console displays correct feedback. When the Reed Switch is correctly adjusted, reattach the left side shield and the left pedal.
CONDiTiONiNG GUiDELiNES The following guidelines will help you to plan your exercise program. Remember that proper nutrition and adequate rest are essential for successful results. During the first few minutes of exercise, your body uses easily accessible carbohydrate calories for energy. Only after the first few minutes of exercise does your body begin to use stored fat calories for energy.
PART LIST--Model Key No. Qty. 1 2 3 4 5 6 7 8 9 10 11 12 13 14 15 16 17 18 19 20 21 22 23 24 25 26 27 28 29 30 31 32 33 34 1 1 1 1 1 1 2 1 1 1 2 1 1 1 1 1 1 2 2 1 1 1 1 1 1 1 1 1 1 1 1 1 3 1 No. 831.21521.1 Description Ro6osA Key No. Qty.
EXPLODED DRAWING--Model 8- No. 831.21521.
Your Home For repair - in your home - of all major brand appliances, or heating and cooling systems, no matter who made For the replacement parts, accessories, lawn and garden equipment, it, no matter who sold it! and user's manuals that you need to do=it-yourself. For Sears professional installation of home appliances and items like garage door openers and water heaters. 1=800=4=MY=HOME ® Anytime, day or night (U.S.A. and Canada) (1-800-469-4663) www.sears.com www.sears.