Model No. PFEVEX29832 Serial No. USER'S MANUAL Serial Number Decal QUESTIONS? As a manufacturer, we are committed to providing complete customer satisfaction. If you have questions, or if there are missing parts, please call: 08457 089 009 Or write: ICON Health & Fitness, Ltd. Customer Service Department Unit 4 Revie Road Industrial Estate Revie Road Beeston Leeds, LS118JG UK email: csuk@iconeurope.com CAUTION Read all precautions and instructions in this manual before using this equipment.
TABLE OF CONTENTS IMPORTANT PRECAUTIONS . . . . . . . . . . . . . . . . . . . . . . . . . . . . . . . . . . . . . . . . . . . . . . . . . . . . . . . . . . . . . . . .2 BEFORE YOU BEGIN . . . . . . . . . . . . . . . . . . . . . . . . . . . . . . . . . . . . . . . . . . . . . . . . . . . . . . . . . . . . . . . . . . . . . .3 ASSEMBLY . . . . . . . . . . . . . . . . . . . . . . . . . . . . . . . . . . . . . . . . . . . . . . . . . . . . . . . . . . . . . . . . . . . . . . . . . . . . . . .
BEFORE YOU BEGIN Congratulations for selecting the new PROFORM® 735 EKG exercise cycle. Cycling is one of the most effective exercises for increasing cardiovascular fitness, building endurance, and toning the entire body. The PROFORM® 735 EKG exercise cycle offers an impressive array of features to let you enjoy this healthful exercise in the convenience and privacy of your home. after reading this manual, please call our Customer Service Department toll-free at 08457 089 009.
ASSEMBLY Assembly requires two persons. Place all parts of the exercise cycle in a cleared area and remove the packing materials. Do not dispose of the packing materials until assembly is completed. Assembly requires the included tools and your own adjustable spanner screwdriver . and Phillips Use the part drawings below to identify the small parts used in assembly. The number in parenthesis below each drawing refers to the key number of the part, from the PART LIST on page 14.
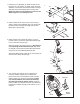
1. Identify the Front Stabiliser (2). Whilst another person lifts the front of the Frame (1) slightly, attach the Front Stabilizer to the Frame with two M10 x 65mm Carriage Bolts (65) and two M10 Black Nylon Locknuts (63). Make sure that the Front Stabiliser is turned so the Wheels (50) are not touching the floor. 1 50 65 50 2 2.
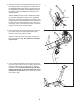
5. Slide the two slots in the Handlebar Clamp (49) onto the two indicated tabs on the Upright (13). Lift the bottom of the Handlebar Clamp away from the Upright, and insert the Handlebar (15) between the Handlebar Clamp and the Upright. Centre the Handlebar and rotate it to the desired position. 5 15 Slide an M8 Washer (67) onto the Adjustment Handle (9). Insert the Adjustment Handle into the Handlebar Clamp (49), and tighten the Adjustment Handle into the Upright (13).
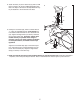
8. Attach the Seat (12) to the Seat Post (5) with four M8 Nylon Locknuts (10) and four M8 Split Washers (64). Note: The Nylon Locknuts and the Split Washers may be pre-attached to the underside of the Seat. 8 12 64 5 10 9. Identify the Left Pedal (24), which is marked with an “L.” Using an adjustable wrench, firmly tighten the Left Pedal counterclockwise into the Left Crank Arm (42). Tighten the Right Pedal (not shown) clockwise into the Right Crank Arm.
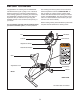
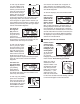
HOW TO OPERATE THE EXERCISE CYCLE HOW TO ADJUST THE SEAT POST HOW TO ADJUST THE HANDLEBAR For effective exercise, the seat Seat should be at the proper height. As Seat you pedal, there Post should be a slight Knob bend in your knees when the pedals are in the lowest position. To adjust the height of the seat, first turn the indicated knob counterclockwise two or three turns to loosen it (if the knob is not loosened enough, it may scratch the seat post).
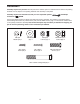
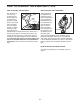
HOW TO OPERATE THE CONSOLE Fan Button Display Buttons On/Reset Button Resistance Buttons 3 The easy-to-use console offers a selection of features designed to help you get the most from your workouts. Follow the instructions below to operate the console. 1 2 Turn on the console. Note: The console requires four 1.5V “D” batteries. See assembly step 4 on page 5 for battery installation instructions.
To view only the distance Upper Button you have pedaled or the number of calories or fat calories you have burned, press the upper button on the left side of the large display until only the word DISTANCE, CALORIES, or FAT CALS appears in the upper section of the large display; make sure that the word SCAN does not appear. To again view the distance you have pedaled and the numbers of calories and fat calories you have burned, press the upper button until the word SCAN reappears.
5 Turn on the fan if desired. To turn on the fan at low speed, press the fan button. Thumb To turn on the Wheel fan at high Fan speed, press Button the fan button a second time. To turn off the fan, press the fan button a third time. Note: If the fan is turned on and the pedals are not moved for about half a minute, the fan will turn off to conserve the batteries. 6 Rotate the thumb wheel on the right side of the console to pivot the fan to the desired angle.
MAINTENANCE AND TROUBLESHOOTING Inspect and tighten all parts of the exercise cycle regularly. Replace any worn parts immediately. Using an adjustable wrench, turn the Left Pedal (24) clockwise and remove it. Next, remove the two Screws (66) from the Left Side Shield (17). Remove the Screw (59) from the left side of the Side Shield Cover (19) and lift it off. Gently remove the Left Side Shield. To clean the exercise cycle, use a damp cloth and a small amount of mild detergent.
CONDITIONING GUIDELINES The following guidelines will help you to plan your exercise program. Remember that proper nutrition and adequate rest are essential for successful results. WARNING: • Before beginning this or any exercise program, consult your physician. This is especially important for persons over the age of 35 or persons with pre-existing health problems. During the first few minutes of exercise, your body uses easily accessible carbohydrate calories for energy.
PART LIST—Model No. PFEVEX29832 Key No. Qty. Description Key No. Qty.
EXPLODED DRAWING—Model No.
ORDERING REPLACEMENT PARTS To order replacement parts, contact the ICON Health & Fitness, Ltd. office, or write: ICON Health & Fitness, Ltd.