
Installation Guide


21
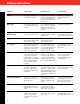
Conditions
Joint Problems
Tape Photographing
Starved Joint
High Joint
Beading/Ridging
Nail Problems
Nail Pops
Depressed Nails
Probable Cause
Slow drying of finishing coats. Too
much compound under tape. Joint
compound too thin.
Compound applied too thin in
viscosity and thickness. Too little
compound over joint. Excessive
sanding.
Excess joint compound under the
tape. Excess joint compound over
the tape and improper feathering.
Poor framing. Improper Gypsum
Board application. Improper
sanding. Use of compound too
heavy.
Lumber expansion and contraction.
Improper heating and ventilation.
Cold weather with high humidity.
Improper application of Gypsum
Board. Excess compound over
joints and needless wide joints.
Rough or poorly cut butt joint.
Framing out of alignment. Lumber
shrinkage. Improper Gypsum Board
application. Improper heating and
ventilation.
Framing out of alignment.
Lumber expansion due to moisture
absorption. Improper Gypsum
Board application. Too few nails,
improper furring, structural move-
ment. Nails dimpled too deeply.
Preventive Action
Correct drying conditions. Embed
tape properly. Use joint compound
thicker. Use ProForm
®
brand Joint
Tape.
Use finishing compound at heavier
viscosity and proper thickness of
coats. Do not over-sand.
Proper thickness of compounds
for taping and finishing. Feather
finishing coats wider than previous
coats. Correct poor framing and
improper wallboard application to
ensure proper alignment.
Sand properly.
Use Quick Set
®
System to minimize
beading or ridging. Alternatives
include: double-layer lamination
system.
Provide heat and ventilation to
dry framing lumber. Align framing
lumber. Nail center of wallboard first.
Hold gypsum board firm to nailing
member when nailing. Use proper
nails. Check all nails before nail
spotting. Systems recommended
to reduce or eliminate nail pops
include: double-layer lamination,
double nailing system, floating
angle system, adhesive nail-on
system and screw application.
Align framing lumber. Allow dry
lumber to become acclimated.
Correct gypsum board application
as described for nail pops. Use
proper nail spacing. When furring,
use no less than 2" x 2". Use
systems recommended to reduce
or eliminate nail pops. Avoid frac-
turing paper when driving nails.
Corrective Action
Sand down the tape outline and
seal. Refloat if necessary before
decoration. Prevent finish coat
moisture from re-wetting the tape
by applying a thinner coat for
fast drying.
Allow to thoroughly dry, then
apply an additional coat of topping
or joint compound.
Sand joint to near flush without
sanding into tape. Apply a wider
finishing coat properly feathered, if
necessary. Apply a second finishing
coat or skim coat.
Allow one full heating cycle --
six months to one year -- before
repairing, then sand ridge flush
and apply one or more finishing
coats of joint or topping com-
pound. Use critical lighting to
determine if bead is eliminated
prior to decoration.
When nail pops occur before
decoration, repair immediately. If
problem occurs after decoration,
repair after framing lumber is dry
(usually one heating cycle). To
repair, drive a GWB-54 nail 1-1/2”
from each side of popped nail
while holding Gypsum Board firm
to the nailing member. Countersink
popped nail, remove loose joint
compound, then apply finishing
coats of joint or topping compound.
Repair as described for nail pops,
unless most nails are depressed
and wallboard is loose (usually ceil-
ings). Re-nail entire surface using
proper spacing. Dimple depressed
nails and apply finishing coats of
joint or topping compound.
Problems And Solutions