¨ Model No. PFEL25070 Serial No. Serial Number Decal QUESTIONS? As a manufacturer, we are committed to providing complete customer satisfaction. If you have questions, or if there are missing or damaged parts, we will guarantee complete satisfaction through direct assistance from our factory. TO AVOID DELAYS, PLEASE CALL DIRECT TO OUR TOLLFREE CUSTOMER HOT LINE. The trained technicians on our customer hot line will provide immediate assistance, free of charge. CUSTOMER HOT LINE: 1-800-999-3756 Mon.ÐFri.
TABLE OF CONTENTS IMPORTANT PRECAUTIONS . . . . . . . . . . . . . . . . . . . . . . . . . . . . . . . . . . . . . . . . . . . . . . . . . . . . . . . . . . . . .3 BEFORE YOU BEGIN . . . . . . . . . . . . . . . . . . . . . . . . . . . . . . . . . . . . . . . . . . . . . . . . . . . . . . . . . . . . . . . . . . .4 PART IDENTIFICATION CHART . . . . . . . . . . . . . . . . . . . . . . . . . . . . . . . . . . . . . . . . . . . . . . . . . . . . . . . . . . .5 ASSEMBLY . . . . . . . . . . . . . . . . . . . . . .
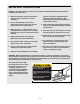
IMPORTANT PRECAUTIONS WARNING: To reduce the risk of serious injury, read the following important precautions before using the PROFORM¨ L.E.X.. position and hold the handlebars when mounting and dismounting the L.E.X.. Always step onto and off the pedal that is in the lowest position. 1. Read all instructions in this manual before using the L.E.X.. Use the L.E.X. only as described. 2. It is the responsibility of the owner to ensure that all users of the L.E.X. are adequately informed of all precautions.
BEFORE YOU BEGIN Congratulations for selecting the revolutionary PROFORM¨ L.E.X. low-impact elliptical crosstrainer. The L.E.X. is an incredibly smooth exerciser that moves your feet in a natural elliptical path, minimizing the impact to your knees and ankles. And the unique L.E.X. features adjustable resistance, dual-motion handlebars, and a multi-mode exercise monitor to help you get the most from your exercise. Welcome to a whole new world of natural, elliptical-motion exercise from PROFORM.
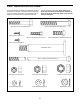
PART IDENTIFICATION CHART Use the chart below to identify the small parts used in assembly. The number in parenthesis below each part is the key number of the part, from the PART LIST on page 14. The number after the dash indicates the quantity needed for assembly. Note: Some small parts may have been pre-attached for shipping. If a part is not in the parts bag, check to see if it has been pre-attached.
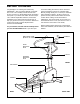
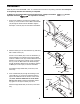
ASSEMBLY Place all parts of the PROFORM¨ L.E.X. in a cleared area and remove the packing materials. Do not dispose of the packing materials until assembly is completed. In addition to the included allen wrench and flat wrench, a phillips screwdriver adjustable wrenches are required for assembly. 1. Position the Stabilizer (4) against the saddle on the Frame (1). Insert two M10 x 75mm Button Head Bolts (45) through the Frame and the Stabilizer. Tighten M10 Nylon Locknuts (46) onto the Button Head Bolts.
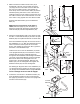
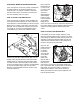
4. Make sure that the Cable Connector Nut (76) is threaded all of the way onto the Cable Connector (75). Align the slot in the Cable Connector Nut with the slot in the Cable Connector. See drawing 4a. Insert the tip of the Lower Tension Cable (74) into the indicated opening. Pull down on the Lower Tension Cable and insert it into the Cable Connector Nut. Turn the Cable Connector Nut counterclockwise one to two turns until it is snug against the Lower Tension Cable.
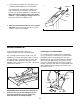
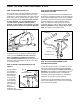
7. The Console (13) requires two ÒAAÓ batteries (not included). Alkaline batteries are recommended. 7 Batteries 14 To install batteries, first slide up the Battery Cover (14). Carefully remove the battery clip from the Console (13). Insert two batteries into the battery clip. Make sure that the negative ends of the batteries (marked ÒÐÓ) are touching the springs. Replace the battery clip and close the Battery Cover. Battery Clip 13 8. Make sure that all parts of the L.E.X. are properly tightened.
ELECTRONIC MONITOR TROUBLE-SHOOTING Next, locate the Reed Switch (3). Loosen, but do not remove, the M4 x 16mm 38 3 Screw (51). Slide the Reed 51 Switch slightly toward or away Magnet from the magnet on the pulley. Retighten the Screw. Turn the Crank (38) for a moment. Repeat until the console displays correct feedback. When the Reed Switch is correctly adjusted, reattach the left side shield. If the console does not function properly, the batteries should be replaced.
HOW TO USE THE PROFORM¨ L.E.X. HOW TO EXERCISE ON THE L.E.X. HOW TO USE THE HANDLEBARS IN THE STATIONARY POSITION To mount the L.E.X., pin the handlebars in the stationary position, hold the handlebars, and step onto the pedal that is in the lowest position. Next, step onto the other pedal. Push the pedals until they begin to move with a continuous motion.
DIAGRAM OF THE CONSOLE Note: If there is a thin sheet of clear plastic on the face of the console, remove it. DESCRIPTION OF THE CONSOLE The graphs on the left side of the console show how the target pace will change during the programs (see the drawing above). Each graph is divided into ten columns, with six bars in each column. The columns represent two-minute time periods, and the red bars show what the target pace will be. In the first column of the Fat Burn graph, for example, there is one red bar.
¥ DistanceÑThis mode shows the total number of repetitions (strides) you have completed, up to 999. The display will then reset to zero and continue counting. 3 If you selected the manual mode, go to step 4. If you selected one of the pacer programs, two columns of bars will appear in the Target Pace Actual Pace display. The left column will show one bar, showing that the target pace is 40 strides per minute. The right column will show your actual pace.
CONDITIONING GUIDELINES The following guidelines will help you to plan your exercise program. Remember that proper nutrition and adequate rest are essential for successful results. Burning Fat To burn fat effectively, you must exercise at the proper intensity level for a sustained period of time. During the first few minutes of exercise, your body uses easily accessible carbohydrate calories for energy. Only after the first few minutes does your body begin to use stored fat calories for energy.
A cardiovascular exercise period, including 20 to 30 minutes of exercise with your heart rate in your training zone. A cool-down, with 5 to 10 minutes of stretching. Thorough stretching helps to offset problems caused when you stop exercising suddenly. Stretching after exercise is also very effective for increasing flexibility. EXERCISE FREQUENCY To maintain or improve your condition, plan three workouts each week, with at least one day of rest between workouts.
EXPLODED DRAWINGÑModel No.
HOW TO ORDER REPLACEMENT PARTS To order replacement parts, simply call our Customer Service Department toll-free at 1-800-999-3756, Monday through Friday, 6 a.m. until 6 p.m. Mountain Time (excluding holidays). To help us assist you, please be prepared to give the following information when calling: ¥ The MODEL NUMBER of the product (PFEL25070). ¥ The NAME of the product (PROFORM¨ L.E.X. low-impact elliptical crosstrainer). ¥ The SERIAL NUMBER of the product (see the front cover of this manual).