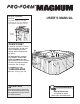
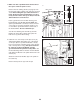
Model No. PFSB53950 Serial No. USER’S MANUAL The serial number is on a sign behind the access panel. Write the serial number in the space above. Access Panel QUESTIONS? If you have questions, or if there are missing parts, we will guarantee complete satisfaction through direct assistance from our factory. TO AVOID DELAYS, PLEASE CALL DIRECT TO OUR TOLLFREE CUSTOMER HOT LINE. The technicians on our customer hot line will provide immediate assistance, free of charge.
Table of Contents Posting the Warning Sign . . . . . . . . . . . . . . . . . . . . . . . . . . . . . . . . . . . . . . . . . . . . . . . . . . . . . . . . . . . . . . . . . . . 2 Important Safety Instructions . . . . . . . . . . . . . . . . . . . . . . . . . . . . . . . . . . . . . . . . . . . . . . . . . . . . . . . . . . . . . . . . . 3 Before You Begin . . . . . . . . . . . . . . . . . . . . . . . . . . . . . . . . . . . . . . . . . . . . . . . . . . . . . . . . . . . . . . . . . . . . . . . . . .
Important Safety Instructions WARNING: To reduce the risk of drowning, electric shock, or serious injury, read the following important precautions before using the hydrotherapy spa. READ AND FOLLOW ALL INSTRUCTIONS 1. It is the responsibility of the owner to ensure that all users of the hydrotherapy spa are adequately informed of all precautions. 10. Never insert any object into any opening. 11. Do not use breakable containers in or near the hydrotherapy spa. 2.
physician before using the hydrotherapy spa. Pregnant women should not use the spa if the water temperature is above 100°F; the unborn child could be seriously harmed. This is especially important during the first 90 days of the pregnancy. 20. DANGER—Risk of electric shock. Keep all electrical appliances such as radios, telephones, televisions, and lights at least five feet away from the water. 21. A wire connector is provided on the electronics pack of the hydrotherapy spa to connect a minimum No.
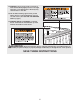
35. WARNING: The spa jets produce a stream of water with relatively high pressure. Prolonged exposure of a localized area of the body may cause bruises to the skin. 36. The included warning sign must be posted where all users of the hydrotherapy spa can see and read it. (See POSTING THE WARNING SIGN on page 2.) 37. WARNING DECAL PLACEMENT: Locate the decals shown below and familiarize yourself with the information on the decals. WARNING: Read all instructions before using the hydrotherapy spa.
Before You Begin For your benefit, read this manual carefully before using the hydrotherapy spa. If you have questions after reading the manual, please call our Customer Service Department toll-free at 1-888-884-6555, Monday through Friday, 8 a.m. until 5 p.m. Central Time (excluding holidays). To help us assist you, please mention the product model number and serial number when calling. The model number is PFSB53950.
Choosing a Location for the Hydrotherapy Spa There are many factors to consider when choosing a location to set up the hydrotherapy spa. These factors vary depending on whether you plan to use the spa inside or outside. We have listed several factors you may wish to consider as you decide where to set up the spa. If you set up the hydrotherapy spa inside: If you set up the hydrotherapy spa outside: 1. The spa will increase the level of humidity in your home.
Wiring the Hydrotherapy Spa This procedure must be performed by a qualified, licensed electrician in accrodance with the national electric code, and with all local, state, and federal electric code. Under no circumstances should the hydrotherapy spa be wired by someone other than a qualified electrician. Option 1 Main Panel GFCI Circuit Breaker Before you have the spa wired, make sure it is in the desired position, and that it can be easily serviced, if needed. The spa operates on a 240 volt power source.
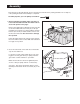
Assembly Place all parts of the hydrotherapy spa in a cleared area and remove the packing materials. Do not dispose of the packing materials until assembly is completed. Assembly requires your own phillips screwdriver . 1. Before beginning assembly, make sure that you have read and understand the information above and on the previous two pages. 1 38 Remove the eight #10 x 2” Machine Screws (37) that secure the indicated Access Panel (25) to the spa.
3. Make sure that a qualified electrician has wired the spa to a 240 volt power source. 3 3 Fill to here Remove the two warning decals (see page 5) from the spa shell. Using a damp cloth, wipe the spa shell clean. Before filling the spa, make sure that it is in the desired position and that there is room to easily service it. Once the spa is filled, it must be drained before it can be moved. 22 5 Insert a garden hose into the filter housing, and begin filling the spa. Do not use soft water.
Using the Hydrotherapy Spa Once the countdown has reached “000,” “Pr” will be displayed. “Pr” indicates that the controller is in the two-pump priming mode. This mode will last for four to five minutes. The hydrotherapy spa is designed to seat seven adults. The spa holds approximately 375 gallons of water and offers a heating system (80°F to 104°F), a filtration system, and adjustable hydrotherapy jets. Follow the guidelines below to use and maintain the spa for your long-term enjoyment. 5.
Once you have tested the GFCI, verify that water is flowing from the jets. Set the air controls to the lowest setting (see USING THE CONTROLS on page 14). Cover the hydrotherapy spa with the spa cover. The spa cover must be tight (see SECURING THE SPA COVER ON THE SPA on this page). The water will heat at about 6°F per hour with the cover on. If you are using the spa indoors, and the room temperature is maintained at 70°F, it will take approximately 6 to 8 hours for the water to reach the set temperature.
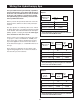
Jet Layout Diagram G J M H J H J I I N H H G I B J K B C F L H B A H E I B B I H D H I A. The underwater light can be used for night operation (see USING THE CONTROLS on page 14). G. The two neck jets can be adjusted to spray soothing water on your neck. B. The ten air injectors create air bubbles that enhance the hydrotherapy experience. H. The twenty-one rotary jets provide a spinning massage. C. The volcano jet provides a soothing foot massage. I.
Using the Controls Air Controls 1, 2, and 3 Blower Button Air Control 4 Mode Button Display Pump Button 1 Pump Button 2 Light Button Temperature Buttons standard mode is selected. • Economy Mode heats the spa to the set temperature only during the filter cycles. “Ecn” is always displayed when the actual temperature does not equal the set temperature. “Ecn” alternates with the actual temperature when the actual temperature is the set temperature.
The Temperature buttons control the temperature setting of the water. The temperature setting can be from 80°F to 104°F. The startup temperature is set at 100°F. The water heats at about 6°F per hour with the cover on. Use a medical or other accurate thermometer to check the temperature of the water. Your spa features an LED light with twelve different programmed lighting effects: 1. Lights cycle between Red, Green, and Blue 2. Dark Blue 3. Orange 4. Purple 5. Green 6. Red 7. Hot Pink 8. Cyan 9. White 10.
Maintenance MAINTAINING THE SPA COVER The hydrotherapy spa is designed to provide years of enjoyment. Please follow the guidelines below to properly maintain your spa. The spa cover should be cleaned monthly. To clean the spa cover, use water and a non-abrasive cleaner on the entire cover. Rinse the cover with a garden hose to remove any cleaner residue. Dry the cover entirely. Use a non-silicone-based vinyl conditioner on the cover after you clean it. This will help protect the cover from sun damage.
WATER CHEMISTRY To maintain the proper pH level, test the pH of the water regularly. To test the water, purchase a pH test kit at a pool and spa supply store. The pH reading should be between 7.2 and 7.8. If the level is too low, add a pH increaser (usually soda ash). If the level is too high, add a pH reducer (usually sodium bisulfate). Test the water again after five minutes. See the instructions with your pH test kit for additional information about testing and adjusting the pH.
and warping of the spa shell. Any damage caused by sun exposure is not covered under warranty. ATTACHING AND REMOVING THE ACCESS PANEL Turn off the spa power. Remove the eight #10 x 2” Machine Screws (37) that secure the indicated Access Panel (25) to the spa. Carefully remove the Access Panel until the CD wire harness (not shown) is visible and disconnect it. Set the Access Panel aside. Be careful not to damage the spa shell. To drain the hydrotherapy spa, follow the steps below: 1.
DRAINING THE PUMPS REPLACING THE LED LIGHT After the hydrotherapy spa is drained, the jet pumps should also be drained if the spa will be stored for more than thirty days or if it may be exposed to freezing temperatures. Remove the access panels (see ATTACHING AND REMOVING THE ACCESS PANELS on page 18). Make sure the spa power is turned off. Next, locate the light housing. Turn the light housing counterclockwise and remove it from the spa shell. Turn off the power to the spa.
Troubleshooting Most problems can be solved by following the simple steps below. Find the symptom that applies, and follow the steps listed. If further assistance is needed, call our Customer Service Department toll-free at 1-877-897-7493, Monday through Friday, 8 a.m. until 5 p.m. Central Time. 1. SYMPTOM: THE SPA WILL NOT OPERATE 6. SYMPTOM: THE WATER DOES NOT HEAT a. Check to see if the GFCI breaker is tripped or was not turned on. Reset the GFCI breaker. a.
9. SYMPTOM: THE WATER LEVEL DROPS 11. SYMPTOM: THE CONSOLE DISPLAYS “--,” “OHH,” “ICE,” “SnA,” “SnB,” “SnS,” “HFL,” “LF,” “dr,” “OHS,” or “drY” a. A clamp or seal inside the pump compartment may be loose. Check inside the pump compartment for excess water and watch the pump unit while it is operating to see if water drips from any of the plumbing. If you can identify the location of the leak inside of the spa jet unit, tighten the clamp or replace the damaged seal. a.
Part List—Model No. PFSB53950 Key No. Qty. 1 2 3 4 5 6 7 8 9 10 11 12 13 14 15 16 17 18 19 20 21 22 23 24 25 26 27 28 29 30 31 32 1 2 1 8 1 2 1 1 6 1 1 21 4 1 5 7 4 4 1 1 1 1 8 1 2 4 8 8 1 1 14 1 Description Key No. Qty.
Exploded Drawing—Model No.
Ordering Replacement Parts To order replacement parts, simply call our Customer Service Department toll-free at 1-888-884-6555, Monday through Friday, 8 a.m. until 5 p.m. Central Time (excluding holidays).