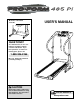
Model No. PCTL69030 Serial No. USER'S MANUAL Serial Number Decal QUESTIONS? As a manufacturer, we are committed to providing complete customer satisfaction. If you have questions, or if there are missing parts, please call: 1-888-936-4266 Mon.–Fri. 8h00 until 18h30 EST (excluding holidays). CAUTION Read all precautions and instructions in this manual before using this equipment. Save this manual for future reference. Visit our website at www.proform.
TABLE OF CONTENTS IMPORTANT PRECAUTIONS . . . . . . . . . . . . . . . . . . . . . . . . . . . . . . . . . . . . . . . . . . . . . . . . . . . . . . . . . . . . .2 BEFORE YOU BEGIN . . . . . . . . . . . . . . . . . . . . . . . . . . . . . . . . . . . . . . . . . . . . . . . . . . . . . . . . . . . . . . . . . . .4 ASSEMBLY . . . . . . . . . . . . . . . . . . . . . . . . . . . . . . . . . . . . . . . . . . . . . . . . . . . . . . . . . . . . . . . . . . . . . . . . . . .5 OPERATION AND ADJUSTMENT . . . . . .
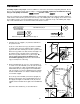
13. Keep the power cord and the surge suppressor away from heated surfaces. 14. Never move the walking belt while the power is turned off. Do not operate the treadmill if the power cord or plug is damaged, or if the treadmill is not working properly. (See BEFORE YOU BEGIN on page 4 if the treadmill is not working properly.) 15. Never start the treadmill while you are standing on the walking belt. Always hold the handrails while using the treadmill. AND MOVE THE TREADMILL on page 10.
BEFORE YOU BEGIN Congratulations for selecting the new PROFORM® 485 Pi treadmill. The 485 Pi treadmill combines advanced technology with innovative design to help you get the most from your exercise in the convenience and privacy of your home. And when you’re not exercising, the unique 485 Pi can be folded up, requiring less than half the floor space of other treadmills. 1-888-936-4266, Monday through Friday 8h00 until 18h30 eastern time (excluding holidays).
ASSEMBLY Assembly requires two people. Set the treadmill in a cleared area and remove all packing materials. Do not dispose of the packing materials until assembly is completed. Assembly requires the included allen wrench and your own phillips screwdriver and wire cutters . Note: The underside of the treadmill walking belt is coated with high-performance lubricant. During shipping, a small amount of lubricant may be transferred to the top of the walking belt or the shipping carton.
3. Place the Console Base (46) on the tubes on the Uprights (11). Pull out the two Wires (21) just enough to connect them to the two connectors in the Console Base. Make a loop with the indicated plastic tie and insert the end through the tie holder on the bottom of the Console Base. Plug the Wire that has a red connector into the corresponding connector in the Console Base. The connectors should fit together without being forced; if they do not, rotate the red connector on the Wire and try again.
OPERATION AND ADJUSTMENT THE PERFORMANT LUBETM WALKING BELT having an equipment-grounding conductor and a grounding plug. Plug the power cord into a surge suppressor, and plug the surge suppressor into an appropriate outlet that is properly installed and grounded in accordance with all local codes and ordinances. Important: The treadmill is not compatible with GFCI-equipped outlets. Your treadmill features a walking belt coated with PERFORMANT LUBETM, a high-performance lubricant.
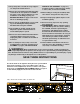
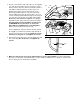
CONSOLE DIAGRAM Note: If there is a sheet of clear plastic on the face of the console, remove it. Clip CAUTION: Before operating the console, read the following precautions. • Do not stand on the walking belt when turning on the power. Battery Cover • Always wear the clip (see the drawing above) while using the treadmill. When the key is removed from the console, the walking belt will stop. Tab Batteries • Adjust the speed in small increments. are touching the springs in the battery compartment.
Follow the steps below to operate the console. 1 4 Insert the key fully into the power switch. The LED Track—The track in the center of the console represent a distance of 1/4 mile (400 m). As you exercise, the indicators around the track will light one at a time until you have completed 1/4 mile. A new lap will then begin. Inserting the key will not turn on the displays. The displays will turn on when the On/Reset button is pressed or when the walking belt is started.
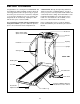
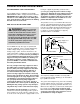
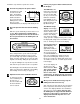
HOW TO FOLD AND MOVE THE TREADMILL HOW TO FOLD THE TREADMILL FOR STORAGE Before folding the treadmill, unplug the power cord. CAUTION: You must be able to safely lift 20 kg (45 lbs.) in order to raise, lower, or move the treadmill. 1. Hold the treadmill with your hands in the locations shown at the right. To decrease the possibility of injury, bend your legs and keep your back straight. As you raise the treadmill, make sure to lift with your legs rather than your back.
HOW TO LOWER THE TREADMILL FOR USE 1. Hold the upper end of the treadmill with your right hand as shown. Using your left thumb, press the storage latch and hold it. Pivot the treadmill until the frame and foot rail are past the storage latch. Unlatched Storage Latch 2. Hold the treadmill firmly with both hands, and lower the treadmill to the floor. Do not drop the treadmill frame to the floor. To decrease the possibility of injury, bend your legs and keep your back straight.
TROUBLESHOOTING Most treadmill problems can be solved by following the steps below. Find the symptom that applies, and follow the steps listed. If further assistance is needed, please call our Customer Service Department tollfree at 1-888-936-4266, Monday through Friday, 8h00 until 18h30 eastern time (excluding holidays). PROBLEM: The power does not turn on SOLUTION: a.
PROBLEM: The incline system does not function properly SOLUTION: a. Make sure that the two wires under the console are fully plugged in (refer to assembly step 4 on page 6). WARNING: Do not disconnect or connect the wires while the treadmill power cord is plugged in. PROBLEM: The walking belt slows when walked on SOLUTION: a. Use only a single-outlet surge suppressor that meets all of the specifications described on page 7. b.
CONDITIONING GUIDELINES WARNING: Before beginning this or any exercise program, consult your physician. This is especially important for individuals over the age of 35 or individuals with pre-existing health problems. is activity that requires large amounts of oxygen for prolonged periods of time. This increases the demand on the heart to pump blood to the muscles, and on the lungs to oxygenate the blood.
EXERCISE FREQUENCY between workouts. After a few months, you may complete up to five workouts each week if desired. The key to success is to make exercise a regular and enjoyable part of your everyday life. To maintain or improve your condition, complete three workouts each week, with at least one day of rest HOW TO ORDER REPLACEMENT PARTS To order replacement parts, call toll-free 1-888-936-4266, Monday through Friday 8h00 until 18h30 Eastern Time (excluding holidays).
LIMITED WARRANTY ICON OF CANADA, INC., (ICON), warrants this product to be free from defects in workmanship and material, under normal use and service conditions, for a period of one (1) year from the date of purchase. This warranty extends only to the original purchaser. ICON's obligation under this warranty is limited to replacing or repairing, at ICON's option, the product through one of its authorized service centers. All repairs for which warranty claims are made must be pre-authorized by ICON.
PART LIST—Model No. PCTL69030 Key No. Qty.
REMOVE THIS EXPLODED DRAWING AND PART LIST FROM THE MANUAL 34 Save this EXPLODED DRAWING and PART LIST for future reference. Note: Specifications are subject to change without notice. For information about ordering replacement parts, see page 15 of the User’s Manual.
83 39 84 31 86 83 17 32 1 6 39 74 17 75 5 41 4 13 77 7 62 61 52 3 42 25 13 46 79 49 61 79 80 73 73 13 13 90 48 79 79 82 59 71 66 62 9 47 73 35 52 3 8 15 38 77 87 48 5 48 76 10* 66 73 69 68 37 45 44 36 85* 16 67 50 2 38 49 43 63 22 61 73 40 25 33 34 39 48 14 33 64 38 78 40 25 39 39 33 65 47 73 76 91 51 35 27 88 60 39 38 15 29 33 39 37 53 70 28 12 31 30 53 36 39 17 19 81 18 20* 11 34 70 39