
User's Manual

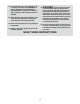
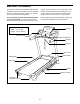
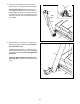
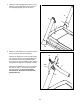
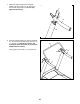
Table Of Contents

7
• Assembly requires two persons.
• Place all parts in a cleared area and remove the
packing materials. Do not dispose of the packing
materials until you nish all assembly steps.
• After shipping, there may be an oily substance
on the exterior of the treadmill. This is normal. If
there is an oily substance on the treadmill, wipe
it off with a soft cloth and a mild, non-abrasive
cleaner.
• Left parts are marked “L” or “Left” and right parts
are marked “R” or “Right.”
• To identify small parts, see page 6.
• Assembly requires the following tools:
the included hex keys
one adjustable wrench
one Phillips screwdriver
scissors
needlenose pliers
To avoid damaging parts, do not use power tools.
ASSEMBLY
2. Make sure that the power cord is unplugged.
Locate the Upright Wire (70) bundled around the
front of the Base (80). Cut the plastic tie securing
the Upright Wire. Then, route the Upright Wire
out of the indicated hole.
Press a Base Cap (77) into each side of the
Base (80).
See the inset drawing. Cut the plastic tie near
the Upright Wire (70). Be careful not to dam-
age the Upright Wire.
70
2
80
Hole
Cut
70
Tie
Cut
77
1. Go to www.iconsupport.eu on your computer
and register your product.
• activates your warranty
• saves you time if you ever need to contact
Customer Service
• allows us to notify you of upgrades and offers
Note: If you do not have Internet access, call
Customer Service (see the front cover of this
manual) and register your product.
1