Model No. PFCG2224.0 Serial No. Write the serial number in the space above for future reference. Serial Number Decal (Under Seat) QUESTIONS? As a manufacturer, we are committed to providing complete customer satisfaction. If you have questions, or if a part is damaged or missing, PLEASE CONTACT OUR CUSTOMER SERVICE DEPARTMENT DIRECTLY. CALL TOLL-FREE: 1-888-533-1333 Mon.–Fri., 6 a.m.–6 p.m. MST ON THE WEB: www.proformservice.
TABLE OF CONTENTS WARNING DECAL PLACEMENT . . . . . . . . . . . . . . . . . . . . . . . . . . . . . . . . . . . . . . . . . . . . . . . . . . . . . . . . . . . . . 2 IMPORTANT PRECAUTIONS . . . . . . . . . . . . . . . . . . . . . . . . . . . . . . . . . . . . . . . . . . . . . . . . . . . . . . . . . . . . . . . . 3 BEFORE YOU BEGIN . . . . . . . . . . . . . . . . . . . . . . . . . . . . . . . . . . . . . . . . . . . . . . . . . . . . . . . . . . . . . . . . . . . . . . 4 ASSEMBLY . . . . . . . . . . . . .
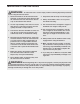
IMPORTANT PRECAUTIONS WARNING: To reduce the risk of serious injury, read the following important precautions before using the exercise bench. 1. Read all instructions in this manual and all warnings on the exercise bench before using the exercise bench. Use the exercise bench only as described in this manual. 7. Keep hands and feet away from moving parts. 2. It is the responsibility of the owner to ensure that all users of the exercise bench are adequately informed of all precautions. 9.
BEFORE YOU BEGIN Thank you for selecting the versatile PROFORM® CARDIO GLIDE PLUS exercise bench. The exercise bench is designed to develop every major muscle group of the body. Whether your goal is to tone your body, build dramatic muscle size and strength, or improve your cardiovascular system, the exercise bench will help you to achieve the specific results you want. model number is PFCG2224.0.
ASSEMBLY • As you assemble the weight bench, make sure all parts are oriented as shown in the drawings. Make Things Easier for Yourself Everything in this manual is designed to ensure that the weight bench can be assembled successfully by anyone. Most people find that by setting aside plenty of time, assembly will go smoothly. • For help identifying small parts, use the PART IDENTIFICATION CHART.
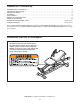
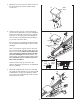
3. Orient the Seat (14) as shown. Attach the Seat to the Seat Carriage (13) with four M6 x 16mm Screws (55). 3 Wide End 14 13 55 55 4. Pull the Seat Pin (18) out of the Seat Carriage (13) and turn it 90 degrees (see inset drawing B). Set the Seat Carriage on the Rail (4) so that the Seat Pin is on the same side as the adjustment holes and the preassembled Small Seat Wheel (not shown) is under the Rail.
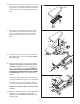
6. Orient the Backrest (12) so that the narrow end is over the top of the Backrest Frame (11). Attach the Backrest to the Backrest Frame with two M6 x 25mm Screws (77) and two M6 x 45mm Screws (78). 6 Narrow End 12 11 77 78 7. Slide the top of the Backrest Frame (11) under the Handlebar (10). Pivot the Backrest Frame down onto the Rail (4) so that the pin on the Backrest Frame is inserted into the hole in the Rail. 7 10 4 11 Hole 8.
ADJUSTMENTS This section explains how to adjust the exercise bench. See the EXERCISE GUIDELINES on page 13 for important information about how to get the most benefit from your exercise program. Refer to the accompanying exercise guide to see the correct form for each exercise. Make sure all parts are properly tightened each time the exercise bench is used. Replace any worn parts immediately. The exercise bench can be cleaned with a damp cloth and a mild, non-abrasive detergent. Do not use solvents.
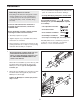
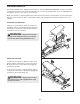
ATTACHING THE ACCESSORIES 68 A Handle (68) can be attached to the Rope (80) with a Clip (83). The other accessories can be attached to the Rope in the same manner. 83 80 ADJUSTING THE RESISTANCE SETTING To adjust the resistance setting, pull the Resistance Knob (27) and use the Knob (71) to slide the Resistance Leg Extension (7) into or out of the Resistance Leg (8). Engage the Resistance Knob into the Resistance Leg.
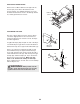
REPLACING THE BATTERIES Remove the four M4 x 16mm Screws (76) from the Console (84). Insert three “AA” batteries in the Console battery case. Alkaline batteries are recommended. Reattach the Console to the Rail (4) and the Foot Plate (9) with the four Screws. 76 84 Battery Case 76 9 4 76 TIGHTENING THE ROPE 15 The type of Rope (80) used on the exercise bench can stretch slightly when it is first used. If there is slack in the Rope before resistance is felt, the Rope should be tightened.
FEATURES OF THE CONSOLE 1. Turn on the power. The console features five modes that provide instant exercise feedback during your workouts. The modes are described below. To turn on the power, press the On/Reset button or begin exercising. The entire display will light for a moment; the console will then be ready for use. 2. Select the desired mode. Scan mode— Mode Indicators When the power is turned on, the Scan mode will be selected.
WEIGHT RESISTANCE CHART The exercise bench uses a percentage of the user’s weight as resistance for exercising. The charts below show the approximate resistance in pounds for six popular exercises. Note: The actual resistance for each exercise may vary due to differences in friction levels between the cables, pulleys, and other moving parts.
EXERCISE GUIDELINES THE FOUR BASIC TYPES OF WORKOUTS Muscle Building—To increase muscle size, use a high amount of resistance. Your muscles will adapt and grow as you progressively increase the intensity of your exercise by: • changing the level of resistance • changing the number of repetitions or sets performed. (A “repetition” is one complete cycle of an exercise, such as one sit-up. A “set” is a series of repetitions.) The proper amount of resistance for each exercise depends upon the individual.
EXERCISE MONDAY WEIGHT SETS REPS WEIGHT SETS REPS WEIGHT SETS REPS Date: / / AEROBIC EXERCISE TUESDAY Date: / / WEDNESDAY EXERCISE Date: / / THURSDAY AEROBIC EXERCISE Date: / / EXERCISE FRIDAY Date: / / Make photocopies of this page for scheduling and recording your workouts.
EXERCISE MONDAY WEIGHT SETS REPS WEIGHT SETS REPS WEIGHT SETS REPS Date: / / AEROBIC EXERCISE TUESDAY Date: / / WEDNESDAY EXERCISE Date: / / THURSDAY AEROBIC EXERCISE Date: / / EXERCISE FRIDAY Date: / / Make photocopies of this page for scheduling and recording your workouts.
PART IDENTIFICATION CHART Refer to the drawings below to identify small parts used in assembly. The number in parentheses by each drawing is the key number of the part, from the PART LIST in the center of this manual. Note: Some small parts may have been pre-attached. If a part is not in the parts bag, check to see if it has been pre-attached.
PART LIST—Model No. PFCG2224.0 Key No. Qty.
EXPLODED DRAWING—Model No. PFCG2224.
ORDERING REPLACEMENT PARTS To order replacement parts, see the front cover of this manual. To help us assist you, please be prepared to give the following information: 1. The MODEL NUMBER of the product (PFCG2224.0) 2. The NAME of the product (PROFORM CARDIO GLIDE PLUS exercise bench) 3. The SERIAL NUMBER of the product (see the front cover of this manual) 4.