
Instructions / Assembly


12
10
111
105
9
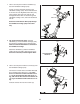
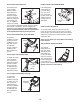
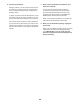
10. Tip: Avoid pinching the wires. Attach the
Console (9) to the Handlebar Carriage (105) with
four M4 x 12mm Screws (111); start all four
Screws, and then tighten them.
Avoid pinching
the wires
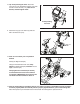
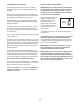
11. Attach the Tray (8) to the Frame (2) with two
M4 x 10mm Screws (116).
11
8
2
116
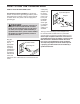
13. After the training bike is assembled, inspect it to make sure that it is assembled correctly and that it
functions properly. Make sure that all parts are properly tightened before you use the training bike.
Note: Extra parts may be included. Place a mat beneath the training bike to protect the floor.
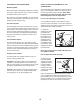
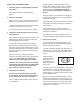
12. Note: You can attach your own pedals if
desired.
Identify the Right Pedal (62).
Using the included flat wrench tool, firmly
tighten the Right Pedal (62) clockwise into the
Right Crank Arm (64).
Firmly tighten the Left Pedal (not shown)
counterclockwise into the Left Crank Arm
(not shown). IMPORTANT: You must turn the
Left Pedal counterclockwise to attach it.
12
62
64