
Instructions / Assembly


14
FEATURES OF THE TRAINING BIKE
Measuring Watts
Each training bike is individually calibrated to measure
your power output and allow you to monitor your watts
and RPMs directly on the console.
By monitoring your watts and RPMs, you can see how
hard you are training and make sure that you are chal-
lenging yourself and improving.
The Incline System
The training bike can incline and decline up to 20 per-
cent to realistically simulate outdoor terrain. When you
create maps of your actual training routes on iFit.com
(see the console instructions beginning on page 16
for more information), the training bike will automati-
cally incline and decline to match the terrain of your
training routes.
The Handlebar Shifters
The training bike allows you to shift gears just like
you do on your road bike. The right and left handlebar
shifters simulate front and rear derailleurs that you can
configure to match the gearing setup of your road bike
(see the console instructions beginning on page 16
for more information).
Pedaling Form Features
The training bike has multiple features to help you
develop correct pedaling form:
Freewheel—The training bike has a freewheel that
simulates a road bike rather than a fixed-drive spin
bike. This discourages you from letting your feet coast
through the top and bottom of your pedal stroke.
Flywheel—The flywheel on the training bike has the
correct inertia to allow you to pedal smoothly while
encouraging you to use good pedaling form.
HOW TO ADJUST THE GEOMETRY OF THE
TRAINING BIKE
The training bike can be adjusted to match the geom-
etry of your road bike to promote correct form and to
ensure proper training of the muscles. Note: Make
adjustments in small increments, and then pedal
the training bike to test the adjustments.
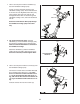
How to Adjust the Angle of the Saddle
You can adjust the angle of the saddle to the posi-
tion that is most comfortable. You can also adjust the
saddle forward or backward for increased comfort or to
adjust the distance to the handlebar.
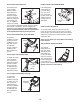
To adjust the
saddle, first loosen
the attachment
hardware beneath
the saddle a few
turns. Next, tilt the
saddle upward or
downward or slide
the saddle forward
or backward, Then,
retighten the attach-
ment hardware.
Note: You can remove the saddle and attach your
own saddle if desired.
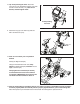
How to Adjust the Saddle Carriage
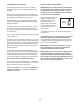
To adjust the posi-
tion of the saddle
carriage, loosen the
adjustment handle,
move the saddle
carriage forward or
backward, and then
retighten the adjust-
ment handle.
Note: The adjustment handle functions like a ratchet.
Turn the adjustment handle in the desired direction,
pull it outward, turn it in the opposite direction, push it
inward, and then turn it in the desired direction again.
Repeat this process as many times as necessary.
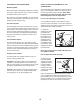
Hardware
Saddle
Carriage
Handle