Model No. PFEX17932 Serial No. USER'S MANUAL Serial Number Decal QUESTIONS? If you have questions, or if there are missing parts, we will guarantee complete satisfaction through direct assistance from our factory. TO AVOID DELAYS, PLEASE CALL DIRECT TO OUR TOLLFREE CUSTOMER HOT LINE. The trained technicians on our customer hot line will provide immediate assistance, free of charge to you. CUSTOMER HOT LINE: 1-888-533-1333 Mon.–Fri., 6 a.m.–6 p.m.
TABLE OF CONTENTS IMPORTANT PRECAUTIONS . . . . . . . . . . . . . . . . . . . . . . . . . . . . . . . . . . . . . . . . . . . . . . . . . . . . . . . . . . . . . . . .3 BEFORE YOU BEGIN . . . . . . . . . . . . . . . . . . . . . . . . . . . . . . . . . . . . . . . . . . . . . . . . . . . . . . . . . . . . . . . . . . . . . .4 ASSEMBLY . . . . . . . . . . . . . . . . . . . . . . . . . . . . . . . . . . . . . . . . . . . . . . . . . . . . . . . . . . . . . . . . . . . . . . . . . . . . . . .
IMPORTANT PRECAUTIONS WARNING: To reduce the risk of serious injury, read the following important precautions before using the exercise cycle. 1. Read all instructions in this manual before using the exercise cycle. readings. The pulse sensor is intended only as an exercise aid in determining heart rate trends in general. 2. Use the exercise cycle only as described in this manual. 11. Always keep your back straight when using the exercise cycle; do not arch your back. 3.
BEFORE YOU BEGIN Congratulations for selecting the new PROFORM® GL35 exercise cycle. Cycling is one of the most effective exercises for increasing cardiovascular fitness, building endurance, and toning the entire body. The PROFORM® GL35 exercise cycle offers an impressive array of features to let you enjoy this healthful exercise in the convenience and privacy of your home. Service Department toll-free at 1-888-533-1333, Monday through Friday, 6 a.m. until 6 p.m. Mountain Time (excluding holidays).
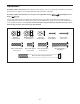
ASSEMBLY Assembly requires two persons. Place all parts of the exercise cycle in a cleared area and remove the packing materials. Do not dispose of the packing materials until assembly is completed. Assembly requires the included tools and your own adjustable wrench driver . and Phillips screw- Use the part drawings below to identify the small parts used in assembly. The number in parenthesis below each drawing refers to the key number of the part, from the PART LIST on page 22.
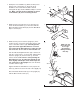
1. Identify the Front Stabilizer (2). While another person lifts the front of the Frame (1), attach the Front Stabilizer to the Frame with two M10 x 112mm Carriage Bolts (65) and two M10 Black Nylon Locknuts (63). Make sure that the Front Stabilizer is turned so the Wheels (30) are not touching the floor. 1 30 65 30 2 1 63 2. While another person lifts the rear of the Frame (1), attach the Rear Stabilizer (3) to the Frame with two M10 x 112mm Carriage Bolts (65) and two M10 Black Nylon Locknuts (63).
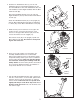
4. Slide the two Handlebar Collars (7) onto the Left Handlebar (50). Insert the Right Handlebar (51) into the Left Handlebar. Connect the Handlebar Collars, the Left Handlebar, and the Right Handlebar with two M4 x 16mm Screws (66). 4 7 51 66 Attach the Handlebar Bracket (15) to the Left and Right Handlebars (50, 51) with four M8 x 22mm Button Screws (74).
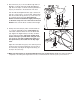
. Attach the Seat (12) to the Seat Bracket (6) with four M8 Nylon Locknuts (10) and four M8 Split Washers (70). Note: The Nylon Locknuts and the Split Washers may be pre-attached to the underside of the Seat. 8 12 Turn the indicated Adjustment Knob (28) counterclockwise two or three turns to loosen it. Next, pull the Knob, slide the Seat Bracket (6) into the top of the Seat Post (5), and then release the Knob.
HOW TO OPERATE THE EXERCISE CYCLE HOW TO ADJUST THE SEAT POST HOW TO ADJUST THE UPRIGHT For effective exercise, the seat should be at the Seat proper height. As you pedal, there should be a slight Knob Seat bend in your knees Post when the pedals are in the lowest position. To adjust the height of the seat, first turn the indicated knob counterclockwise two or three turns to loosen it (if the knob is not loosened enough, it may scratch the seat post).
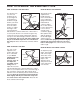
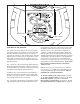
Fan Button Display Buttons On/Reset Button Resistance Buttons FEATURES OF THE CONSOLE The advanced console offers a selection of features designed to make your workouts more enjoyable and effective. When the manual mode of the console is selected, the resistance of the pedals can be changed with the touch of a button. As you pedal, the console will provide continuous exercise feedback. You can even measure your heart rate using the built-in handgrip pulse sensor.
seconds. If you use the handgrip pulse sensor, the display will also show your heart rate (see step 5 on page 12). HOW TO USE THE MANUAL MODE 1 Turn on the console. To view only the distance Upper Button you have pedaled or the number of calories or fat calories you have burned, press the upper button on the left side of the large display until only the word DISTANCE, CALORIES, or FAT CALORIES appears in the upper section of the large display. Make sure that the word SCAN does not appear.
For the most accurate heart rate reading, continue to hold the handgrips for about 30 seconds. Note: When you first hold the handgrips, the large display will show your heart rate continuously for 30 seconds. The display will then show your heart rate along with other feedback modes. To reset the displays, press the On/Reset button. Note: The console can show speed and distance in either miles or kilometers.
The target pace for the current Indicator period will be Bar shown by the arrows in the Arrows small display. To pedal at the target pace, simply increase or decrease your pace until there is one arrow pointing to each segment of the indicator bar (see the drawing above). At the end of each period, the number of arrows will change if a different target pace is programmed for the next period.
to operate properly. Each time you hold the handgrips, keep your hands on the metal contacts for at least 30 seconds. Note: When you are not holding the handgrips, the letters PLS will appear in the large display instead of your heart rate. HOW TO USE A HEART RATE PROGRAM Heart Rate program 1 is designed to keep your heart rate between 65% and 85% of your maximum heart rate during your workout. (Your maximum heart rate is estimated by subtracting your age from 220.
Note: If you stop pedaling for a few seconds, the program will end. To use the program again, reselect it and start it at the beginning. 6 Follow your progress with the large display. See step 4 on page 11. 7 Turn on the fan if desired. See step 6 on page 12. 8 When you are finished exercising, the console will automatically turn off. HOW TO CONNECT YOUR CD PLAYER, VCR, OR COMPUTER To use iFIT.
HOW TO CONNECT YOUR PORTABLE STEREO HOW TO CONNECT YOUR HOME STEREO Note: If your stereo has an RCA-type AUDIO OUT jack, see instruction A below. If your stereo has a 1/8” LINE OUT jack, see instruction B. If your stereo has only a PHONES jack, see instruction C. Note: If your stereo has an unused LINE OUT jack, see instruction A below. If the LINE OUT jack is being used, see instruction B. A.
HOW TO CONNECT YOUR COMPUTER HOW TO CONNECT YOUR VCR Note: If your computer has a 1/8” LINE OUT jack, see instruction A. If your computer has only a PHONES jack, see instruction B. Note: If your VCR has an unused AUDIO OUT jack, see instruction A below. If the AUDIO OUT jack is being used, see instruction B. If you have a TV with a built-in VCR, see instruction B. If your VCR is connected to your home stereo, see HOW TO CONNECT YOUR HOME STEREO on page 16. A.
The program will function in almost the same way as a Smart program (see step 3 on page 13). However, an electronic “chirping” sound will alert you when the resistance level and/or the target pace is about to change. HOW TO USE IFIT.COM CD AND VIDEO PROGRAMS To use iFIT.com CDs or videocassettes, the exercise cycle must be connected to your portable CD player, portable stereo, home stereo, computer with CD player, or VCR. See HOW TO CONNECT YOUR CD PLAYER, VCR, OR COMPUTER on page 15. To purchase iFIT.
HOW TO USE PROGRAMS DIRECTLY FROM OUR WEB SITE Our Web site at www.iFIT.com allows you to play iFIT.com programs directly from the internet. To use programs from our Web site, the exercise cycle must be connected to your computer. See HOW TO CONNECT YOUR COMPUTER on page 17. In addition, you must have an internet connection and an internet service provider. A list of specific system requirements will be found on our Web site. Start your Web browser, if necessary, and go to our Web site at www.iFIT.com.
MAINTENANCE AND TROUBLESHOOTING Inspect and tighten all parts of the exercise cycle regularly. Replace any worn parts immediately. • For the most accurate heart rate reading, hold the metal contacts for about 30 seconds. To clean the exercise cycle, use a damp cloth and a small amount of mild soap. Important: To avoid damage to the console, keep liquids away from the console and keep the console out of direct sunlight. • For optimal performance of the handgrip pulse sensor, keep the metal contacts clean.
CONDITIONING GUIDELINES The following guidelines will help you to plan your exercise program. Remember that proper nutrition and adequate rest are essential for successful results. During the first few minutes of exercise, your body uses easily accessible carbohydrate calories for energy. Only after the first few minutes of exercise does your body begin to use stored fat calories for energy.
EXPLODED DRAWING—Model No. PFEX17932 Key No. Qty. 1 2 3 4 5 6 7 8 9 10 11 12 13 14 15 16 17 18 19 20 21 22 23 24 25 26 27 28 29 30 31 32 33 34 35 36 37 38 1 1 1 2 1 1 2 2 1 8 1 1 1 1 1 1 1 1 1 1 2 1 2 1 1 1 1 3 2 2 1 1 1 1 1 1 1 1 Description Key No. Qty.
EXPLODED DRAWING—Model No.
HOW TO ORDER REPLACEMENT PARTS To order replacement parts, call our Customer Service Department toll-free at 1-888-533-1333, Monday through Friday, 6 a.m. until 6 p.m. Mountain Time (excluding holidays).