
Tempest User's Manual

9
1. Before beginning assembly, make sure that you
have read and understand the information in the
box above and on the previous two pages.
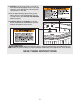
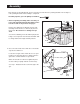
Remove the eight #10 x 2” Machine Screws (39).
Carefully remove the Access Panels (25) and set
them aside. Be careful not to damage the spa
shell.
See the inset drawing. Insert the Pillow (38) into the
lounge seat receptacle. Note: Rotate the Pillow 180º
to change between the high and low positions.
Assembly
25
25
39
39
1
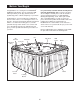
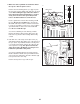
2. Close the valve knob on the drain hose. Thread the
cap onto the drain hose.
Locate the four gate valves inside the access open-
ing (there are two gate valves per pump). Turn the
gate valves counterclockwise to open them.
Make sure that the six collars are tightened (there
are two collars per pump and two on the heater).
See step 1. Reattach the Access Panels (25) to the
spa.
Collar
Cap
Valve
Knob
Drain
Hose
2
Gate Valve
Place all parts of the hydrotherapy spa in a cleared area and remove the packing materials. Do not dispose
of the packing materials until assembly is completed.
Assembly requires your own phillips screwdriver .
38