
Stepper Machine User Manual

16
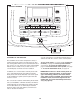
7. Select a display mode and monitor your
progress with the display.
T
he console offers several display modes. The dis-
play mode that you select will determine which
w
orkout information is shown. To select the de-
sired display mode, press the Disp. button repeat-
edly.
As you walk or run on the treadmill, the display can
show the following workout information:
• The elapsed time
• The distance that you have walked or run
• The number of vertical feet you have climbed
• The speed of the walking belt
• Your pace in minutes per mile
• The approximate number of calories burned per
hour
• The approximate number of calories you have
burned
Regardless of which display mode you select, the
speed setting will appear in the display for a few
seconds each time you change the setting.
Press the Cals. button at any time to view the ap-
proximate number of calories burned per hour and
the approximate number of calories you have
burned.
To adjust the volume level, press the Vol increase
and decrease buttons.
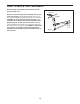
8. When you are finished exercising, remove the
key from the console.
Step onto the foot rails, press the Stop button, re-
move the key from the console, and put it in a se-
cure place.
When you are finished using the treadmill, switch
the reset/off circuit breaker to the off position and
unplug the power cord. IMPORTANT: If you do
not do this, the treadmillʼs electrical compo-
nents may wear prematurely.
HOW TO USE A PRESET WORKOUT
1. Insert the key into the console.
See HOW TO TURN ON THE POWER on page 15.
2. Select a preset workout.
If you have selected the manual mode, a workout,
or the iFit training mode, press the Menu button to
return to the main menu.
To select a preset workout, use the increase and
decrease buttons next to the Enter button and
highlight WORKOUTS. Press the Enter button.
Then, press the increase and decrease buttons to
highlight the desired workout category and press
the Enter button. You can also press the Walk but-
ton or the Run button on the console.
Use the increase and decrease buttons to select
the desired workout. When you select a workout,
the display will show the name, the duration, the
maximum speed setting, the suggested incline
level, and a profile of the speed settings of the
workout. Press the Enter button. Note: When a dis-
tance workout is selected, the duration of the work-
out will not appear in the display.
3. Adjust the incline level and shock cylinder
firmness.
Each workout is designed to operate at a specific
incline level and shock cylinder firmness. To adjust
the incline to the desired level, see page 18. To ad-
just the shock cylinders to the desired firmness,
see page 18.
4. Enter your weight.
See step 5 on page 15.
5. Start the workout.
Press the Start button to start the workout. A mo-
ment after you press the button, the treadmill will
automatically adjust to the first speed setting of the
workout. Hold the handrails and begin walking.
Each preset workout is divided into segments. One
speed setting is programmed for each segment.
Note: The same speed setting may be pro-
grammed for consecutive segments.