
Stepper Machine User Manual


8
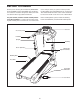
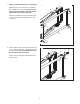
3. Identify the Right Upright Spacer (73), which is
marked with an "R." Orient the Right Upright
Spacer so that the "R" is in the position shown.
Insert the Upright Wire (91) through the Right
U
pright Spacer (73). Set the Right Upright
Spacer on the Base (62).
Identify the Right Upright (72) which is marked
with a “Right” sticker. Have a second person
hold the Right Upright near the Base (62), with
the bracket in the position shown. See the inset
drawing. Tie the wire tie in the Right Upright se-
curely around the end of the Upright Wire (91).
Then, pull the other end of the wire tie until the
Upright Wire is routed completely through the
Right Upright.
72
62
3
91
"R"
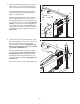
4. Hold a Bolt Spacer (71) inside the lower end of
the Right Upright (72). Insert a 3/8" x 4" Bolt (1)
with a 3/8" Star Washer (9) into the Right
Upright and the Bolt Spacer. Repeat this step
with a second Bolt Spacer (71), 3/8" x 4" Bolt
(1), and 3/8" Star Washer (9).
Hold the Right Upright (72) against the Right
Upright Spacer (73). Be careful not to pinch
the Upright Wire (91). Partially tighten a 3/8"
Jam Nut (8) with a 3/8" Star Washer (9) onto
each 3/8" x 4" Bolt (1); do not fully tighten the
Jam Nuts yet.
Remove the wire tie from the Upright Wire (91).
71
Wire Tie
91
72
73
9
9
1
4
Wire
Tie
Wire
Tie
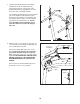
Hole
B
racket
72
91
73
91
8