® Model No. PFTL20462 Serial No. Serial Number Decal QUESTIONS? As a manufacturer, we are committed to providing complete customer satisfaction. If you have questions, or find that there are missing or damaged parts, we will guarantee you complete satisfaction through direct assistance from our factory. TO AVOID UNNECESSARY DELAYS, PLEASE CALL DIRECT TO OUR TOLL-FREE CUSTOMER HOT LINE. The trained technicians on our Customer Hot Line will provide immediate assistance, free of charge to you.
® TABLE OF CONTENTS IMPORTANT PRECAUTIONS . . . . . . . . . . . . . . . . . . . . . . . . . . . . . . . . . . . . . . . . . . . . . . . . . . . . . . . . . . . . . . . . .3 BEFORE YOU BEGIN . . . . . . . . . . . . . . . . . . . . . . . . . . . . . . . . . . . . . . . . . . . . . . . . . . . . . . . . . . . . . . . . . . . . . . .4 ASSEMBLY . . . . . . . . . . . . . . . . . . . . . . . . . . . . . . . . . . . . . . . . . . . . . . . . . . . . . . . . . . . . . . . . . . . . . . . . . . . . . . .
IMPORTANT PRECAUTIONS WARNING: ! To reduce the risk of burns, fire, electric shock or injury to persons, read the following important precautions and information before operating the treadmill. 1. It is the responsibility of the owner to ensure that all users of this treadmill are adequately informed of all warnings and precautions. 2. Use the treadmill only as described in this manual. 3. Place the treadmill on a level surface, with eight feet of clearance behind it.
BEFORE YOU BEGIN Thank you for selecting the PROFORM® CROSSWALK si treadmill. The CROSSWALK si treadmill combines advanced technology with innovative design to offer you an excellent form of cardiovascular exercise, in the convenience and privacy of your home. And when you’re not exercising, the unique CROSSWALK si can be folded up, requiring less than half the floor space of other treadmills. please call our Customer Service Department toll-free at 1-800-999-3756, Monday through Friday, 6 a.m. until 6 p.
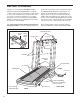
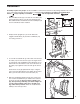
ASSEMBLY Assembly requires two people. Set the treadmill in a cleared area and remove all packing materials. Do not dispose of the packing materials until assembly is completed. Tools required for assembly: The included allen wrench and your phillips screwdriver and two adjustable wrenches . 1. Attach six Base Pads (73) to the bottom of the Base (75) in the indicated locations (see the inset drawing). Note: One additional Base Pad will be used in assembly step 6, and one extra Base Pad is included.
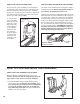
5. Move your right hand to the position shown at the right, and hold the treadmill firmly. Using your left hand, lift the storage latch. Raise the treadmill until the locking pin snaps into the storage latch. Make sure that the locking pin is inside the storage latch, and that the storage latch is fully closed. 6. See drawing 6B. Attach a Base Pad (73) to the bottom of the Stabilizer Plate (88) in the indicated location. 5 Storage Latch Locking Pin 6B 6A 88 4 See drawing 6A.
OPERATION AND ADJUSTMENT THE PERFORMANT LUBETM WALKING BELT Your treadmill features a walking belt coated with PERFORMANT LUBETM, a high-performance lubricant. IMPORTANT: Never apply silicone spray or other substances to the walking belt or the walking platform. They will deteriorate the walking belt and cause excessive wear. HOW TO PLUG IN THE POWER CORD ! DANGER: Improper connection of the equipment-grounding conductor can result in an increased risk of electric shock.
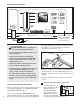
DIAGRAM OF THE CONSOLE TIME SPEED Maximum Performance FAST Minimum CALORIES Aerobic DISTANCE Fat Burn PULSE ON/CLEAR Warm-Up & Cool-Down ON OFF 1 INSERT KEY SLOW RESET THUMB PULSE 2 RESET / SET SPEED Key Pulse Sensor Speed Control Clip ! CAUTION: Before operating the console, read the following precautions. ET-385 Note: If there is a thin sheet of clear plastic on the face of the console, remove it.
CALORIES 2 Reset the speed control and start the walking belt. Slide the speed control down to the "RESET" position. Note: Each time the walking belt is stopped, the speed control must be moved to the “RESET” position before the walking belt can be restarted. Next, slide the control up until the walking belt begins to move at slow speed. Performance FAST Fat Burn Warm-Up & Cool-Down SLOW RESET RESET 2 RESET / SET SPEED Follow your progress with the monitor displays.
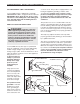
HOW TO USE THE UPPER BODY ARMS HOW TO CHANGE THE INCLINE OF THE TREADMILL As you exercise on the treadmill, you can hold either the handrails or the upper body arms. The upper body arms are designed to exercise your arms, shoulders, and back for a total body workout. Hold one upper body arm with each hand, and move the arms forward and back as you walk on the treadmill. The incline of the treadmill can be changed by raising or lowering the back end.
2. Move your right hand to the position shown at the right, and hold the treadmill firmly. Using your left hand, lift the storage latch. Raise the treadmill until the locking pin snaps into the storage latch. Make sure that the locking pin is inside the storage latch, and that the storage latch is fully closed. Storage Latch Locking Pin To protect the floor or carpet from damage, place a mat under the treadmill. Keep the treadmill out of direct sunlight.
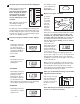
TROUBLE-SHOOTING Most treadmill problems can be solved by following the steps below. Find the symptom that applies, and follow the steps listed. If further assistance is needed, please call our Customer Service Department tollfree at 1-800-999-3756, Monday through Friday, 6 a.m. until 6 p.m. Mountain Time (excluding holidays). 1. SYMPTOM: THE POWER DOES NOT TURN ON a. Make sure that the power cord is plugged into a surge protector, and that the surge protector is plugged into a properly grounded outlet.
5. SYMPTOM: THE DISPLAYS OF THE CONSOLE DO NOT FUNCTION PROPERLY a. The console requires two "AA" batteries (not included); alkaline batteries are recommended. If the displays of the console do not function properly, the batteries should be replaced. Open the battery cover as shown at the right. Press two batteries into the battery compartment, with the negative (-) ends of the batteries touching the springs. Close the battery cover. Batteries Battery Cover 6.
CONDITIONING GUIDELINES Fat Burning ! WARNING: Before beginning this or any exercise program, consult your physician. This is especially important for individuals over the age of 35 or individuals with pre-existing health problems. The pulse sensor is not a medical device. Various factors, including your movement, may affect the accuracy of heart rate readings. The sensor is intended only as an exercise aid in determining heart rate trends in general.
A cardiovascular phase, including 20 to 30 minutes of exercising with your heart rate in your training zone. (See EXERCISE INTENSITY on page 14 to find your training zone.) A cool-down phase, consisting of 5 to 10 minutes of stretching. Thorough stretching offsets muscle contractions and other problems caused when you stop exercising suddenly. Stretching for increased flexibility is also most effective during this phase. This phase should leave you relaxed and comfortably tired.
PART LIST—Model No. PFTL20462 Key No. Qty.
69 27 77 98 118 45 31 116 81 33 1 2 67 3 37 58 111 29 11 1 4 119 61 9 6* 115 81 12 10 66 5 37 57 33 63 16 7 36 81 94 101 59 120 121 64 63 68 15 44 65 62 13 60 7 7 113 55 78 97 24 7 17 99 93 10 9 103 86 110 23 89 18 22 7 101 95 96 19* 21 55 104 89 7 25 26 14 74 100 40 112 114 29 93 28 55 102 20 26 27 78 108 1 27 109 92 43 35 34 41 91 42 26 30 81 EXPLODED DRAWING—Model No.
ORDERING REPLACEMENT PARTS To order replacement parts, call our Customer Service Department toll-free at 1-800-999-3756, Monday through Friday, 6 a.m. until 6 p.m. Mountain Time (excluding holidays). When ordering parts, please be prepared to give the following information: • The MODEL NUMBER OF THE PRODUCT (PFTL20462). • The NAME OF THE PRODUCT (PROFORM® CROSSWALK si treadmill). • The SERIAL NUMBER OF THE PRODUCT (see the front cover of this manual).