
Installation Guide


Condition
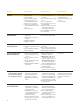
IN-PLACE CONDITIONS
Joint Cracking
Random Or Map Cracking
Mud Cracking
(Craze, Shrinkage, Alligator)
Dryout
Nail Pops
Probable Cause
1. Wrong type of reinforcing mesh
or tape was used.
2. No reinforcing mesh was used, or
improperly positioned over joint.
3. Joint not pretreated prior to
general plastering.
4. Rapid drying conditions.
5. Expansion/contraction.
6. Thermal shock.
7. Structural movement.
Concentrated stresses caused by
differential shrinkage or expansion
between plaster and substrate or
between individual plaster coats –
thermal shock.
Rapid drying or too thin plaster
application.
1. Rapid drying conditions.
2. Thin plaster application.
3. Excessive job addition or retarder.
1. Nail or screw heads
puncturing face paper.
2. Nails or screws not securely
driven, loose or improper type.
3. Framing members out of align-
ment or lumber shrinkage.
4. Plaster base not applied tight
against framing members.
Preventive Action
1–3. Use proper type of mesh and
recommended joint installation
procedures. – DO NOT USE SELF-
STICK (PRESSURE SENSITIVE) MESH.
4. Avoid hot, low humidity air,
high draft exposure.
5. Install control joints as required.
6. Avoid extreme and rapid tempera-
ture differentials (thermal shock).
7. Avoid jointing plaster base at
corners of openings, stagger joints
on opposite side of partition.
Maintain minimum 55°F (18°C)
conditions prior to, during and after
plastering.
Avoid rapid drying conditions, apply
plaster at recommended thickness.
1. Avoid rapid drying conditions.
2. Apply plaster at recommended
thickness.
3. Avoid job additions of retarder.
Follow recommended veneer plaster
base application procedures.
Corrective Action
Large Cracks: Scrape crack
and apply drywall tape and setting
type joint compound.
Small Cracks: Fill and feather
out area with ready mixed joint
compound.
Fill and feather area with ready
mixed joint compound.
Apply ready mixed joint
compound.
General or large area “dry-outs”
– remove plaster; vacuum or wipe
down surface, apply bonding agent
and replaster.
Small areas – spray surface with
water or alum solution to set plas-
ter. Repair area with ready mixed
joint compound for an acceptable
surface.
Remove plaster around fastener
and seat it properly and drive an
additional fastener about 1-1/2”
away from the popped fastener.
Patch with plaster or ready mixed
joint compound.
Conditions/Causes/
Prevention/Correction
Veneer plaster problems are gener-
ally related to job conditions or
abuses and marginal or improper
plastering techniques or practices
and infrequently to a product quality
deficiency.
The prime job conditions initiating
problems are:
m
Improper material storage and
handling.
m
Poor or improper plastering
practices and techniques.
m
Adverse or extreme environmental
conditions.
m
Improper or deficient substrate
for accepting plasters.
Some of the problems associated
with veneer plaster construction
have the same cause - prevention –
correction characteristics as drywall.
These main common conditions are:
m
Gypsum base application
deficiencies.
m
Structural and framing
irregularities and deficiencies.
m
Fastening deficiencies.
m
Structural movement.
Attention to good plastering
practices and procedures will
minimize or eliminate job site
problems and call-backs.
21
Veneer Plaster Problems and Solutions