
Installation Guide


25
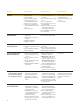
Condition
Peeling And Tearing Of Smooth
Finish During Application
DECORATING PROBLEMS
Paint Peeling/Blisters
Use only quality paints
specifically recommended by
the paint manufacturer for
application over lime
(alkaline) containing plasters
Joint Shadowing
Paint “Stringing” or “Roping”
During Roll Application
Probable Cause
1. “Double-back” coat of finish
troweled over “scratch” coat
which has stiffened excessively
or set.
2. Trowel pressure during “draw-
up” too strong for stiffness and
thickness of finish.
1. Plaster not completely dry.
2. Wrong type of paint used.
3. Plaster surface chalky.
4. Plaster surface contaminated,
grease, soot.
5. Plaster became wet after
decoration was completed.
Depression or ridge at the joint
line.
1. Wrong type of paint.
2. Solids content of paint too high.
3. Fast drying conditions.
4. Plaster surface dusty.
Preventive Action
1. “Scratch” and “double-back”
with finish from the same batch,
minimizing time between coats.
2. Use only light, even trowel
pressure when “drawing-up”.
1. Allow sufficient drying time
before painting; consideration
to environmental conditions is
imperative.
2. Use only paint specifically rec-
ommended by the paint manu-
facturer for use over new or
freshly plastered surfaces.
3. Finish plaster per recommended
practices, leave plaster surface
under trowel, do not brush finish.
4. Examine plaster surface for signs
of contamination prior to painting.
5. Make sure areas are weather tight
before plastering and printing.
See “Joint Shadowing Caused By
Depression Or Ridging.”
1. Use proper type of paint for
plaster surfaces.
2. Dilute paint per manufacturer’s
recommendations.
3. Reduce drying conditions.
4. Make sure plaster is dust free.
Corrective Action
See Prevention.
1/2. Remove all peeling/blistering
paint, allow sufficient drying
time. Prime and redecorate.
3. Remove all peeling paint,
and brush surface to remove
chalkiness. Apply primer recom-
mended by paint manufacturer
for chalky plaster surfaces.
See “Joint Shadowing Caused By
Depression Or Ridging.”
1. Stop painting.
2. Check preventative measures
and make necessary corrections.
3. Allow painted area to dry and
repair by either sanding the
affected area or skimming with
joint compound to a smooth
surface and repaint.
4. Brush the surface thoroughly
to remove dust (vacuuming is
recommended).
Painting Plaster
Various job conditions such as suction differences, wet or only partially
dry walls, and reactions between paint and lime may cause unsatisfactory
paint finishes particularly on new construction.
Alkali-resistant primers specifically formulated for use over new plaster
will permit decorating with oil or latex type paints. Quality paint products
should be used and manufacturers’ recommendations followed. Finished
plaster should be painted or covered to conceal possible discoloration.
The paint system should be suitable for use over plaster surfaces that
contain lime.
It is essential that plaster be sound and completely dry before painting.
Under good drying conditions, veneer plaster may be painted 48 hours
after application.
PLASTER APPLICATION CONDITIONS (cont.)