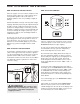
USER'S MANUAL Model No. PFST12020 Model Number Decal QUESTIONS? If you have questions, or if there are missing parts, we will guarantee complete satisfaction through direct assistance from our factory. TO AVOID DELAYS, PLEASE CALL DIRECT TO OUR TOLLFREE CUSTOMER HOT LINE. The trained technicians on our customer hot line will provide immediate assistance, free of charge to you. CUSTOMER HOT LINE: 1-800-999-3756 Mon.–Fri., 6 a.m.–6 p.m.
TABLE OF CONTENTS IMPORTANT PRECAUTIONS . . . . . . . . . . . . . . . . . . . . . . . . . . . . . . . . . . . . . . . . . . . . . . . . . . . . . . . . . . . . .2 BEFORE YOU BEGIN . . . . . . . . . . . . . . . . . . . . . . . . . . . . . . . . . . . . . . . . . . . . . . . . . . . . . . . . . . . . . . . . . . .3 ASSEMBLY . . . . . . . . . . . . . . . . . . . . . . . . . . . . . . . . . . . . . . . . . . . . . . . . . . . . . . . . . . . . . . . . . . . . . . . . . . .4 HOW TO OPERATE THE STEPPER . . . . .
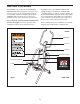
BEFORE YOU BEGIN Congratulations for selecting the new PROFORM® PROSTEP 220 stepper. Stepping is one of the most effective exercises for increasing cardiovascular fitness, building endurance, and toning the body. The PROSTEP 220 is designed to let you enjoy this healthful exercise in the convenience of your home. Department toll-free at 1-800-999-3756, Monday through Friday, 6 a.m. until 6 p.m. Mountain Time (excluding holidays).
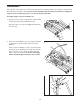
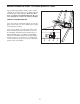
ASSEMBLY Place all parts of the stepper in a cleared area and remove the packing materials. Do not dispose of the packing materials until assembly is completed. Note: Some small parts may have been pre-attached for shipping. If a part is not in the parts bag, check to see if it has been pre-attached. Assembly requires only the included tools. 1. Attach a Foot (21) to the Left Pivot Arm (7) with an M5 x 25mm Screw (34) and an M5 Washer (39).
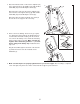
3. Attach the indicated end of a Resistance Cylinder (10) to the upper bracket on the Right Leg (5) with an M8 x 38mm Bolt (30) and an M8 Nylon Locknut (35). 3 30 Attach the lower end of the Resistance Cylinder (10) to the bracket on the right Pedal Leg (6) with an M8 x 38mm Bolt (30) and an M8 Nylon Locknut (35). 5 35 Attach the other Resistance Cylinder (not shown) to the left side of the stepper in the same way. 10 30 6 35 4. Refer to the inset drawing.
HOW TO OPERATE THE STEPPER HOW TO EXERCISE ON THE STEPPER HOW TO USE THE CONSOLE Place the stepper on a level surface and place a mat under the stepper. Note: The stepper features precision hydraulic cylinders. Due to the nature of hydraulic cylinders, there is a possibility of slight oil leakage. Hold the handlebars and step onto the pedals. Begin stepping, alternately depressing the right and left pedals with a smooth, continuous motion.
MAINTENANCE AND TROUBLESHOOTING Inspect and properly tighten all parts of the stepper regularly. To clean the stepper, use a damp cloth and a small amount of mild detergent. Never use abrasives or solvents. Keep liquid away from the console, and keep the console out of direct sunlight. 6 CONSOLE TROUBLESHOOTING 1 If the console does not function properly, or if the display becomes faint, refer to assembly step 4 on page 5 and replace the battery.
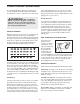
CONDITIONING GUIDELINES The following guidelines will help you to plan your exercise program. Remember that proper nutrition and adequate rest are essential for successful results. ber in your training zone as you exercise. For maximum fat burning, adjust the intensity of your exercise until your heart rate is near the middle number in your training zone as you exercise. Aerobic Exercise WARNING: Before beginning this or any exercise program, consult your physician.
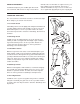
EXERCISE FREQUENCY workouts. After a few months of regular exercise, you may complete up to five workouts each week, if desired. Remember, the key to success is make exercise a regular and enjoyable part of your everyday life. To maintain or improve your condition, plan three workouts each week, with at least one day of rest between SUGGESTED STRETCHES 1 The correct form for several basic stretches is shown at the right. Move slowly as you stretch—never bounce. 1.
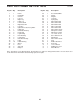
PART LIST—Model No. PFST12020 Key No. Qty. 1 2 3 4 5 6 7 8 9 10 11 12 13 14 15 16 17 18 19 20 21 22 23 1 1 1 1 1 2 1 1 1 2 1 2 2 4 2 2 4 2 10 2 2 2 2 Description R1202A Key No. Qty.
EXPLODED DRAWING—Model No.
HOW TO ORDER REPLACEMENT PARTS To order replacement parts, simply call our Customer Service Department toll-free at 1-800-999-3756, Monday through Friday, 6 a.m. until 6 p.m. Mountain Time (excluding holidays).