Model No. PFCCEX37082 Serial No. USER’S MANUAL Write the serial number in the space above for reference. Serial Number Decal If you require SERVICE for this product, please call SEARS: 1-800-4 MY HOME (469-4663) If you are MISSING PARTS or require INFORMATION on how to operate this product, call 1-888-936-ICON (4266) CAUTION Read all precautions and instructions in this manual before using this equipment. Save this manual for future reference. Notre site internet www.proform.
TABLE OF CONTENTS IMPORTANT PRECAUTIONS . . . . . . . . . . . . . . . . . . . . . . . . . . . . . . . . . . . . . . . . . . . . . . . . . . . . . . . . . . . . .2 BEFORE YOU BEGIN . . . . . . . . . . . . . . . . . . . . . . . . . . . . . . . . . . . . . . . . . . . . . . . . . . . . . . . . . . . . . . . . . . .3 PART IDENTIFICATION CHART . . . . . . . . . . . . . . . . . . . . . . . . . . . . . . . . . . . . . . . . . . . . . . . . . . . . . . . . . . .4 ASSEMBLY . . . . . . . . . . . . . . . . . . . . . .
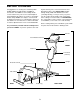
BEFORE YOU BEGIN Congratulations for selecting the revolutionary PROFORM® REBEL Recumbent Bike and Elliptical Crosstrainer. The REBEL is an incredibly smooth exerciser that moves your feet in a natural elliptical path, minimizing the impact on your knees and ankles. And the unique REBEL can easily be converted from an elliptical crosstrainer to a recumbent bike, giving you two machines in one. Welcome to a whole new world of natural, elliptical-motion exercise from PROFORM.
PART IDENTIFICATION CHART Use the chart below to identify the small parts used in assembly. The number in parenthesis below each part is the key number of the part, from the PART LIST on page 14. The number after the dash indicates the quantity needed for assembly. Note: Some small parts may have been pre-attached for shipping. If a part is not in the parts bag, check to see if it has been pre-attached.
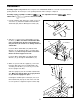
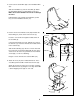
ASSEMBLY Assembly requires two persons. Place all parts of the PROFORM® REBEL in a cleared area and remove the packing materials. Do not dispose of the packing materials until assembly is completed. Assembly requires a phillips screwdriver , two adjustable wrenches rubber mallet (none of these is included). 1. Hold the Stabilizer (68) against the saddle on the rear of the Base (1). Attach the Stabilizer with two M10 x 75mm Bolts (66) and two M10 Nylon Locknuts (54). , and a 54 1 1 54 68 66 2.
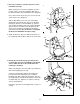
4. Connect the Seat Bar Wire (88) to the Handlebar Wire (87). 4 7 Slide the Handlebar (7) onto the Seat Bar (6). Attach the Handlebar with the four Handlebar Screws (51). Make sure that the Handlebar Screws do not damage the wires. Pull both Grips (72) towards the Handlebar (7) until they cover the Handlebar Screws (51). 72 51 87 88 6 51 72 5. Remove the Console Mount Screw (69) and slide the Detent Ring (73) off the shaft of the Console (5).
. Note: The assistance of another person is recommended for this step. 7 7 While another person holds the Handlebar (7) in the position shown, connect the Handlebar Wire (87) to the Extension Wire (49) extending from the Upright (2). Bracket 87 83 53 Next, slide a Plastic Sleeve (53) onto each of the indicated shafts on the Upright (2). 49 Slide an M10 Washer (71) onto each of the M10 x 25mm Button Head Bolts (85).
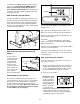
10.The Console (5) requires two “AA” batteries (not included). Alkaline batteries are recommended. 10 To install batteries, first slide up the battery cover and carefully remove the battery clip from the Console (5). Insert two batteries into the battery clip as shown. Make sure that the negative ends of the batteries (marked “–”) are touching the springs in the battery clip. Replace the battery clip and close the battery cover. Battery Cover Battery Clip 5 11.
To dismount the REBEL, allow the pedals to slowly come to a stop. Important: The REBEL does not have a free wheel; the pedals will continue to move until the flywheel stops. When the pedals are stationary, step off the highest pedal first. Then, step off the lowest pedal. Display HOW TO ADJUST THE TOE PEDALS To adjust the Right Toe Pedal (89), pull out the Lock Pin (90). Slide the Toe Pedal forward or backward to the desired position.
Speed, time, distance, fat calorie or calorie mode—To select one of these modes for continuous display, press the mode button repeatedly. The mode indicators will show which mode is selected. (Make sure that the scan mode is not selected.) 4. The console has an “auto-off” feature. If the pedals are not moved and the console buttons are not pressed for four minutes, the power will turn off automatically to conserve the batteries. 3. To reset the display, press the on/reset button.
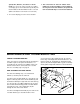
HOW TO ADJUST THE REED SWITCH HOW TO ADJUST THE DRIVE BELT If the console does not display correct feedback, the reed switch should be adjusted. To adjust the reed switch, the Left Side Shield (11, not shown) must first be removed as described on page 10. If the Drive Belt (32) slips as you exercise, it should be adjusted. To adjust the Drive Belt, both Side Shields (11 and 27, not shown) must first be removed as described on page 10. Next, locate the Reed Switch (48).
CONDITIONING GUIDELINES If your goal is to burn fat, adjust the intensity of your exercise until your heart rate is near the lowest number in your training zone as you exercise. For maximum fat burning, adjust the intensity of your exercise until your heart rate is near the middle number in your training zone as you exercise. WARNING Before beginning any exercise program, consult your physician.
EXERCISE FREQUENCY To maintain or improve your condition, plan three workouts each week, with at least one day of rest between workouts. After a few months of regular exercise, you may complete up to five workouts each week, if desired. Remember, the key to success is make exercise a regular and enjoyable part of your everyday life. SUGGESTED STRETCHES 1 The correct form for several basic stretches is shown at the right. Move slowly as you stretch—never bounce. 1.
PART LIST—MODEL No. PFCCEX37082 Key No. Qty. 1 2 3 4 5 6 7 8 9 10 11 12 13 14 15 16 17 18 19 20 21 22 23 24 25 26 27 28 29 30 31 32 33 34 35 36 37 38 39 40 41 42 43 44 45 46 47 1 1 1 12 1 1 1 2 2 2 1 2 2 1 1 1 2 2 1 1 1 3 2 2 2 2 1 8 2 9 1 1 1 1 1 1 1 2 4 1 1 2 1 2 1 1 4 Description Key No. Qty.
83 15 75 77 44 76 78 47 5 69 60 51 72 7 87 88 73 79 78 76 80 30 77 37 85 51 69 71 84 91 35 46 91 4 45 30 84 83 85 63 71 81 28 29 71 72 8 3 43 28 4 6 67 38 47 86 30 54 53 39 90 42 71 82 54 36 62 40 17 13 74 14 10 15 18 65 9 1 38 52 12 33 23 22 47 21 57 57 58 56 34 59 33 20 26 25 24 49 67 2 53 50 16 30 48 13 64 61 24 11 26 25 12 54 41 61 31 44 4 23 54 55 22 29 30 4 4 68 66 19 10 62 47 65 70 9 18 39 27
ORDERING REPLACEMENT PARTS To order replacement parts, simply call our Customer Service Department toll-free at 1-888-936-4266, Monday through Friday 8h00 until 18h30 Eastern Time (excluding holidays). To help us assist you, please be prepared to give the following information: 1. the MODEL NUMBER of the product (PFCCEX37082) 2. the NAME of the product (PROFORM® REBEL) 3. the SERIAL NUMBER of the product (see the front cover of this manual) 4.