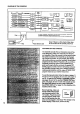
SEARS Model No. 831.297741 Serial No. The serial number can be found in the location shown below. Write the serial number in the space above. E_X EQ 11Oil z=" R u I C i F, _1 I S _" I,,.4 i=- I,,4T i Iol _ 11-I HELPLINE! 1-800-736-6879 USER'S MANUAL SEARS, ROEBUCK AND CO.
PRO;FORM TABLE OF CONTENTS • IMPORTANT PRECAUTIONS .................................... °.°o*°*,°°°°.°,.,..,,°°°o°.,3 •BEFORE YOU BEGIN .......................................... .°o°,°°_°°.°°°°.,*o°.o°..°°°.4 "ASSEMBLY .................................................. °°°°°,o°°*oo°.°.o°°.o°o°o°..5 HOW TO USE THE PULSE SENSOR .............................. °°°.o°,°.° OPERATION AND ADJUSTMENT °,°°°°°,°,°°°o°°..°°°°°°°,°°9 ................................ " HOW TO USE THE MANUAL MODE ...........
IMPORTANT PRECAUTIONS
BEFORE YOU BEGIN Thank you for selecting the PROFORM" 730si treadmill. The 730si treadmill blends advanced technology with innovative styling to provideyou with an excellent form of cardiovascular exercise in the convenience and privacy of your home. The 730si offers an impressive array of features designed to make your workouts more enjoyable and effective. And when you're not exercising, the unique 730sl can be folded up, requiring less than half the floor space of other treadmills.
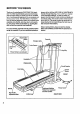
ASSEMBLY Assembly requires two people. Set the treadmill in a cleared area and remove all packing materials. Do not dispose of the packing materials until assembly is completed. Tools required for assembly: The included allen wrench _ andyour phillips screwdriver _ and two adjustable wrenches _ . 1. Attach six Base Pads (95) to the bottom of the Base (73) in the indicated locations (see the inset drawing).
5. Move your dght hand to the position shown at the right, and hold the treadmiti firmly. Using your left hand, rift the storage latch. Raise the treadmill until the lockingpin • snaps into the storage latch. Make sure that the locking pln Is Inslde the storage latch, and that the storage latch Is fully closed. . See the upper Inset drawing. Attach a Base Pad (95) to the bottomof the Stabilizer Plate (81) in the indicated location.
9. Attachthe Pulsesensor(105)toonectthe Headbands (106 or 107). Make sure that the sensor window is pressed through the indicated hole in the Headband. _" 9 " Sensor Window Clothes 105 Press open the clothes clip, and insed the pulse sensor wire into the clothes clip. Make sure that the pulse sensor wire Is resting agalnst the hinge of the clothes clip (see the Inset drawing), The use of the pulse sensor is explained on page 8.
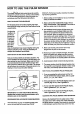
'HOLYTO' USE THE PULSE'SENSOR The unique headband-stTle pulse sensor Is specta ly designed for greater accuracy, comfod, and durability. To get the best performance from the pulse sensor, please read the f611owing Instructions. DISPLAY). For the best results, remember the following impodant guidelines: 1. Before putting on the headband, rub your forehead briefly to stimulate circulation.
•OPERATION THE PERFORMANT AND ADJUSTMENT LUBE TM WALKING BELT Your treadmill features a walking belt coated with PERFORMANT LUBE _', a high-performance lubricant. IMPORTANT: Never apply silicone spray or other substances to the walking belt or the walking platform. They will deteriorate the walking belt and cause excessive wear. electric shock. This product is equipped with a cord having an equipment-grounding conductor and a grounding plug.
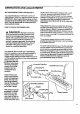
DIAGRAM OFTHECONSOLE c,:: ,_--' 57 "159 "(z_"*'___.h----', r _o,,,,., .- !'- owlU_m -. _-= _E/A_C_ff 3.5J _2481_=Niumn__ Tp ulse Sensor Jack Note: If there is a thin sheet of clear plaso tic on the face of the console, remove it. FEATURES OF THE CONSOLE The treadmill console offers an impressive array of feetures designed to make your workouts more effective and enjoyable. When the console is in the manual mode, the speed and incline of the treadmill can be changed with a touch of a button.
B buttons again to enter your age. Each time one of the buttons is pressed, the age setting will change by I year. If one of the buttons is held down, the age setting will change in increments of 5 years. After you have entered your age, your age will be shown in the PULSE display for three seconds. Insert the key fully Into the console. Stand on the foot rails and insert the key. Various displays and indicators will light.
B Change the incline of the treadmill, if desired. The incline of the treadmill is controlled with the decrease buttons. Each INCLINE increase and t_INCUNE_I time one of the buttons is pressed, the incline will change by 0.5%. The buttons can be held down to change the incline more quickly. The incline setting is shown in the DISTANCE/INCLINE display. The incline range Is 1.5% to 10%.
up period and encl with a cool-down period. (See WORKOUT GUIDEUNES on pages 22 and 23.) The WARM-UP & COOL-DOWN indicator will light when your workout intensity is Ideal for warming up or cooling down. • FAT BURN and MAXIMUM FAT BURN.--To bum fat effectively, you must exercise at a relatively low intensity level for a sustained period of time. (See BURNING FAT on page 22.) If you are exercising at the proper Intensity level for burning fat, the FAT BURN or MAXIMUM FAT BURN indicator will light.
Put on the pulse sensor, if desired. The indicators below the speed profiles will show the For the PULSE display to show your pulse, the pulse sensor must be worn. To put on the pulse sensor, see HOW TO USE THE PULSE SENSOR on page 8. Plug the pulse sensor wire fully into the jack on the front of the console. O Set e maximum speed for the program. After you have completed step 4,.a number will appear In the SPEED display and flash for seven seconds. display reaches zero.
.... sensor_see HOW TOJ-_r_t ,,_:_., USE THE PULSE I SENSOR on page 8. ,| Plug the pulse sensor_,_ _ U Make sure that the key Is fully Inserted Into the console. Stand on the foot rails and insert the key. Various displays and indicators will light. Find the clip attached to the key, and slide it onto the waistband of your clothing. Select the FAT BURN or AEROBIC program. Press the FAT BURN or AEROBIC button. An in- V "% dicator will light next to the button you press.
if you increase the speed, the inclinewill automatically decrease; if you decrease the speed, the incline will automatically increase. If you increase the incline, the speed will automatically decrease; if you decrease the incline, the speed will automatically increase. The console will always attempt to keep your pulse near a predetermined setting. When the incline reaches the highest setting, the speed cannot be decreased any further.
WhentheTIMEdisplayreaches4 m!nutes, the ... CALORIES display will show "L 2," indicafing th'at ..... the second 4-minute period has begun. The incline will increase to 4°/=, and the speed will increase to 2.5 mph. At the beginning of each 4-minute period, the speed and/or incline of the treadmill will automatically increase. The FITNESS TEST will continue in this manner until your pulse reaches 70% of your maximum heart rate, and the current 4-minute period is completed.
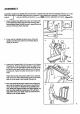
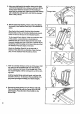
HOWTO'FOLD AND MOVE THE TREADMILL ................. • HOW TO FOLD THE TREADMILL FOR STORAGE Before folding the treadmill for storage, unplug the power cord. To prevent damage to tSe pulse sensor, be sure to unplug the pulse sensor from the console. Caution: You must be able to safely lift 45 pounds (20 kg) In order to raise, lower, or move the treadmill. 1. Hold the treadmill, with your hands in the locations shown at the dght.
•HOWTO LOWERTHETREADMILL FORUSE 1. Holdtheupperendofthetreadmillwithyourrighthand asshown..Using yourlefthand,liftthestoragelatch. PivotthetreadmillslightlyuntiltheI_kingplnis outOf thestoragelatch.Closethestoragelatch. Storage 2. Holdthetreadmillfirmly Lat_ with both hands, and lower the treadmill to the floor. To decrease the possibility of Injury, bend your legs and keep your back stralght.
TROUBI E:SHOOTING " "' Most treadmill problems r.an be solved by following the Simple Steps below. Rnd the sym'p|omthat ap-- .... plies, and follow the steps listed. If further assistance Is needed, call bur toll-free HELPLINE at 1-800-736-6879, Monday through Saturday, 7 a.m. until 7 p.m. Central Time (excluding holidays). 1. SYMPTOM: THE POWER DOES NOT TURN ON a. Make sure that the power cord is plugged into a surge protector, and that the surge protector is plugged into a propedy grounded outlet.
. c.-Errorcode-"E3" may appear in the SPEED display if the speed of the walking belt surges above the selected speed setting. Remove the key, wait for ten seconds, and then reinsert it. If the error code appears again, call our toll-free HELPLINE. Do not operate the treadmill untilthe problem is corrected. d. Error code "E4" may appear in the SPEED display if the walking boll is moving at a slow speed, and there is excessive stress on the motor. Remove the key, wait for ten seconds, and then reinsert it.
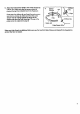
CONDiTIONINGGUiDELINES .... Training Zone (Beats/MIn.) The followingguidelines will help you to plan your exemise program. Remember--these are general guidelines. For more detailed information about exercise, obtain a reputable book or consult your physician. EXERCISE INTENSITY Whether you want to bum fat, strengthen your cardiovascular system, or increase your athletic performance, you can tailor your exercise to your specific goals.
Training Zone Exercise After warming up, increase the intensity of your exercise until your pulse is in your training zone for 20 to 60 minutes. (During the first few weeks of your exercise program, do not keep your pulse in your training zone for longer than 20 minutes.) Breathe regularly and deeply as you exercise---never hold your breath. to cool down. This will increase the flexibility of your muscles and will help to prevent post-exercise problems.
The model number and serial number of your PROFORM ®730si treadmill are listed on a decal attached to the frame. See the front cover of this manual to find the location of the decal. Model No. 831.297741 All replacement pads are available for immediate purchase or special order when you visit your nearest SEARS Service Center. To request service or to order pads by telephone, call the toll-free numbers listed at the left.