
User`s manual


6"
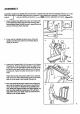
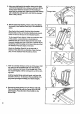
5. Move yourdght hand to the position shownat the right,
and hold the treadmiti firmly. Using your left hand, rift the
storage latch. Raise the treadmill untilthe lockingpin
• snaps into the storage latch. Make sure that the locking
pln Is Inslde the storage latch, and that the storage
latch Is fully closed.
.
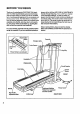
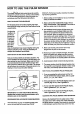
See the upper Inset drawing. Attach a Base Pad (95) to
the bottomof the Stabilizer Plate (81) in the indicated lo-
cation.
Stand behind the lreadmilL Hold the RightCrossbar
Bracket (36) and the Left Crossbar Bracket (not shown).
Place one foot on the base in the indicated location.
Tip the treadmill back slightly.While the treadmill is held
in this position,a second person should slide the
Stabilizer Plate (81) onto the base (see the lower inset
drawing). Keeping your foot on the base, carefully tip the
treadmillup until it is restingon the base. Make sure that
the Stabilizer Plate (81) stays on the base.
Attach the Stabilizer Plate (81) to the base with a
Stabilizer Plate Bolt (91), two Stabilizer Plate Washers
(94), and the Stabilizer Plate Nut (89) as shown.
7.
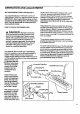
Refer to assembly drawing 5 at the top of this page. Hold
the upper end of the treadmill with your right hand as
shown. Using your left hand, liftthe storage latch. Pivot
the treadmill slightlyuntilthe locking pin isout of the stor-
age latch.
Hold the treadmill firmlywith both hands, and iower the
treadmill to the floor. To decrease the possibility of In-
Jury, bend your legs and keep your back stralght.
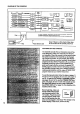
8. Remove the paper backing from the Wrench Clip (28).
Press the Wrench Clip ontothe Frame (49) in the indi-
cated location. Press the Allen Wrench (83) into the
Wrench Clip.
Storage Latc_
6
36
7
8
89 If
26_